31 August 2023

Altenew | September 2023 Release Blog Hop + Giveaway

Hello there, I am delighted to be joining Altenew today to celebrate the September 2023 release, which is out now! There are lots of stamps, dies, hot foil plates, embossing folders and stencils releasing and I have two cards to share with you today using a few of them. 

PLEASE NOTE: This post contains affiliate links. Please see below for my full disclosure.


I started off my first card by stamping the floral image from Altenew Bold Bouquet Stamp Set onto white cardstock using Altenew Obsidian Pigment Ink. I then placed the Altenew Bold Bouquet Stencils on top (one by one) and added ink blending to colour the image. I used Altenew Lapis Lazuli Crisp Dye Inks for the blue flowers and Altenew Rose Petal Crisp Dye Inks for the pink ones. 


For the leaves, I used Altenew Green Valley Crisp Dye Inks. The panel was then adhered flat to a US A2 sized white card base with Altenew Glue Tape. I stamped the sentiments from the set onto white cardstock with Altenew Obsidian Pigment Ink. I die cut the 'happy' using the Altenew Bold Bouquet Die Set and cut the 'birthday' into a strip. 


I die cut the die for the 'happy' word another two times and adhered them one on top of another to create dimension before adhering to the card with liquid glue. I then adhered the 'birthday' below using Altenew Instant Dimension Foam Tape. To finish off, I added a few Bubbles embellishments. 


For my next card, I started off by adding ink blending to a panel of white cardstock using Altenew Lapis Lazuli Crisp Dye Inks and an Altenew Large Ink Blending Tool. I then placed it inside the Altenew Bold Bouquet 3D Embossing Folder and ran it through my die cutting machine. 


Using a foam blending tool, I blended Altenew Cloud White Pigment Ink to the raised areas. I heat set the ink with a heat tool and then adhered the panel to a US A2 sized white card base with Altenew Instant Dimension Foam Tape


I took the Altenew Essential Sentiments Hot Foil Plate and foiled it onto black cardstock with Spellbinders White Foil. It was cut into a strip using the Altenew Essentials Sentiments Die Set and adhered to the card with more foam tape. To finish off, I added a few Bubbles embellishments. 

BLOG HOP:


This blog post is part of a fun, inspirational blog hop with prizes. Please click the links below for the other participants in the hop. 

You are invited to the Inlinkz link party!

Click here to enter

GIVEAWAY:

$300 in total prizes! To celebrate this release, Altenew is giving away a $100 gift certificate to 1 lucky winner and a $40 gift certificate to 5 winners! Please leave a comment on the Altenew Card Blog and/or each designer’s blog post on the blog hop list below by 6th September 2023 for a chance to win. Altenew will draw 6 random winners from the comments left on each stop of this blog hop and announce the winners on the Altenew Winners Page on 8th September 2023*The winners of the $100 gift certificate will be chosen from comments left on the Altenew blog. 


SUPPLIES:


Here are the links to what I have used on the projects. Affiliate links are used on some products. This means that if you make a purchase after clicking on my link, I receive a small commission with no extra cost to you. I truly appreciate your support when using these links. Please click on the logo below the product to shop at your favourite store. All products were personally purchased except those from Clearly Besotted, Hero Arts or those marked with an asterisk (*) which were kindly sent to me to use. You can read my full disclosure here.


Thank you so much for stopping by today, I really do appreciate it. I hope you have an excellent rest of the day! Take care! 

30 August 2023

Spellbinders | Gnome Drive Holiday

Hello there, today I have a fun card to share with you using the Spellbinders Gnome Drive Holiday set. The Gnome Drive release consists of adorable gnomes/gonks in their cars with various seasonal props. Today I am using the holiday/Christmas set. 

I especially love that the steering wheel of the car can be added to either side, so those of us in the UK (and a few other countries!) can change it up! 

PLEASE NOTE: This post contains affiliate links. Please see below for my full disclosure.


I started off by die cutting the elements from the Spellbinders Gnome Drive Holiday Etched Dies using Spellbinders Cardstock. I used Purple Mist, Lilac Blossom, Onyx, Snowdrift and Brushed Silver for the car. For the gnome I used Alabaster, Snowdrift, Waterfall and Teal Topaz. I cut the ball on the hat from Spellbinders White Glitter Pop Up Foam Sheets. The tree is cut from Rainforest and the gift from Royal Amethyst and Brushed Silver for the bow.  


The pieces were assembled and adhered using Bearly Art Glue. I stamped the sentiments from the Spellbinders Gnome Drive Sentiments Clear Stamp Set onto a panel of white cardstock using Versafine Clair Nocturne Ink. It was then die cut out using the Spellbinders Notched Corner Frames Etched Dies


I placed the car on first without adhering and used this as a placeholder/guide to adhere the tree first, using Bearly Art Glue. I then adhered the gift on top, followed by the gnome. The car was then adhered on top of them all. The panel was adhered to a US A2 sized white card base using thin foam tape. To finish off, I added a couple of white gel pen highlights to the gnome's hat. 

SUPPLIES:


Here are the links to what I have used on the project. Affiliate links are used on some products. This means that if you make a purchase after clicking on my link, I receive a small commission with no extra cost to you. I truly appreciate your support when using these links. Please click on the logo below the product to shop at your favourite store. All products were personally purchased except those from Clearly Besotted, Hero Arts or those marked with an asterisk (*) which were kindly sent to me to use. You can read my full disclosure here.


I like that the gnome also has legs, so that you can use him without the car too! Thank you so much for stopping by today, I really do appreciate it. I hope you have a wonderful day!

28 August 2023

Spellbinders | Mushroom Duo

Hello there, today I have a tag to share with you using the Spellbinders Mushroom Duo Press Plate that works with the Betterpress System. I'm sure you already know about the Betterpress System but if you do not, I made a video using it which you can see here

PLEASE NOTE: This post contains affiliate links. Please see below for my full disclosure.


I started off by pressing the Spellbinders Mushroom Duo Press Plate & Die Set plate onto Strathmore Toned Tan Mixed Media Paper using Spellbinders Betterpress Black Ink (the one that comes with the Spellbinders Betterpress System). The mixed media paper is pretty thick and the impression worked beautifully! 


I then die cut the panel using the Spellbinders Essential Arches Etched Dies. I also cut the same shape from white cardstock. I cut a little off the bottom of the image one and then coloured the mushrooms using Copic Markers and Polychromos pencils. This ink is not known to work with Copic Markers but I found that I did not get any bleeding on this paper using them. 


I lined the two arches together and punched a hole through the top using my Crop-A-Dile. I then threaded Spellbinders Journey Twine through and tied in a bow to create a tag. I hot foiled the 'hello' from the Spellbinders Hello, Friend Sentiments Glimmer Hot Foil Plate set onto white cardstock using Spellbinders Black Foil and the Spellbinders Glimmer Hot Foil System.


It was die cut out using the Spellbinders Wonderful Script Etched Dies set and I also cut another two of the die before adhering them behind the foiled one for added dimension. It was adhered to the tag with Bearly Art Glue. To finish off, I added white gel pen to the dots on the mushrooms and then a few dots around them. 

SUPPLIES:


Here are the links to what I have used on the project. Affiliate links are used on some products. This means that if you make a purchase after clicking on my link, I receive a small commission with no extra cost to you. I truly appreciate your support when using these links. Please click on the logo below the product to shop at your favourite store. All products were personally purchased except those from Clearly Besotted, Hero Arts or those marked with an asterisk (*) which were kindly sent to me to use. You can read my full disclosure here.


The Spellbinders Betterpress Autumn Collection which this plate is from is beautiful! There are a few leaf sets, as well as these mushrooms and they all have a beautiful autumn/fall vibe to them. Thank you so much for stopping by today. I really do appreciate you taking the time to do so. I wish you a wonderful week ahead! Take care!

25 August 2023

VIDEO | MFT You Bake the World a Better Place

Hello there, I was over on the My Favorite Things YouTube channel yesterday sharing a card using the new Chip, Chip, Hooray! set. This is such an adorable set, full of little kitties baking and eating cookies! 

PLEASE NOTE: This post contains affiliate links. Please see below for my full disclosure.


I started off my card by stamping one of the kitties, heart and chef hat from the MFT Chip, Chip, Hooray! Stamp Set onto white cardstock using MFT Extreme Black Ink. I coloured them with Copic Markers (the colours that I used are listed below the supplies area) and then die cut them out using the coordinating MFT Chip, Chip, Hooray! Die-namics


I die cut the MFT Tall Hello Die-namics from MFT Grapesicle Cardstock twice. I adhered the letters one on top of  another for added dimension. Whilst die cutting, I also cut the images again from white cardstock and adhered them to the back of the stamped ones for added stability. 


I adhered the letters to a 3 3/4" x 5" panel of white cardstock using liquid glue. The panel was then adhered to the card base with thin foam tape. To create the base, I added a sheet of paper from the new MFT Orange Sherbet 6 x 6 Paper Pad onto the front of a US A2 sized white card base with tape runner adhesive. 


I stamped a sentiment from the MFT Chip, Chip, Hooray! Stamp Set onto MFT Black Licorice Cardstock using Versamark Ink. I applied white embossing powder and heat set. It was cut into a strip and adhered to the card using thin foam tape. The kitty was adhered on top with thin foam tape, followed by the chef's hat. I adhered the heart using liquid glue. To finish, I added black glaze pen to the kitty's eyes and white gel pen highlights to the kitty's head and bowl. 

VIDEO:

Here is the video showing how I made the card:


If you are viewing this blog post via email subscription, you can watch the video HERE on YouTube. 

SUPPLIES:


Here are the links to what I have used on the project. Affiliate links are used on some products. This means that if you make a purchase after clicking on my link, I receive a small commission with no extra cost to you. I truly appreciate your support when using these links. Please click on the logo below the product to shop at your favourite store. All products were personally purchased except those from Clearly Besotted, Hero Arts or those marked with an asterisk (*) which were kindly sent to me to use. You can read my full disclosure here.


COPIC MARKERS: Kitty - C7, C5, C3, C1, RV52. Bowl - V15, V12, V01/E55, E53, E50/C0. Heart - V15, V12, V01. Hat - V15, V12, V01, V000, 0. 

This set is just cuteness overload! Thank you so much for stopping by today, I really do appreciate it. I hope you have a wonderful day! 

24 August 2023

Hero Arts | Holiday 2023 Release Blog Hop + Giveaway

Hello there and welcome to the Hero Arts Holiday 2023 Release Blog Hop! Hero Arts are releasing a plethora of new products today as part of the Oh Joy release, including new stamps, dies, foil plates, mediums and much more! 

PLEASE NOTE: This post contains affiliate links. Please see below for my full disclosure.


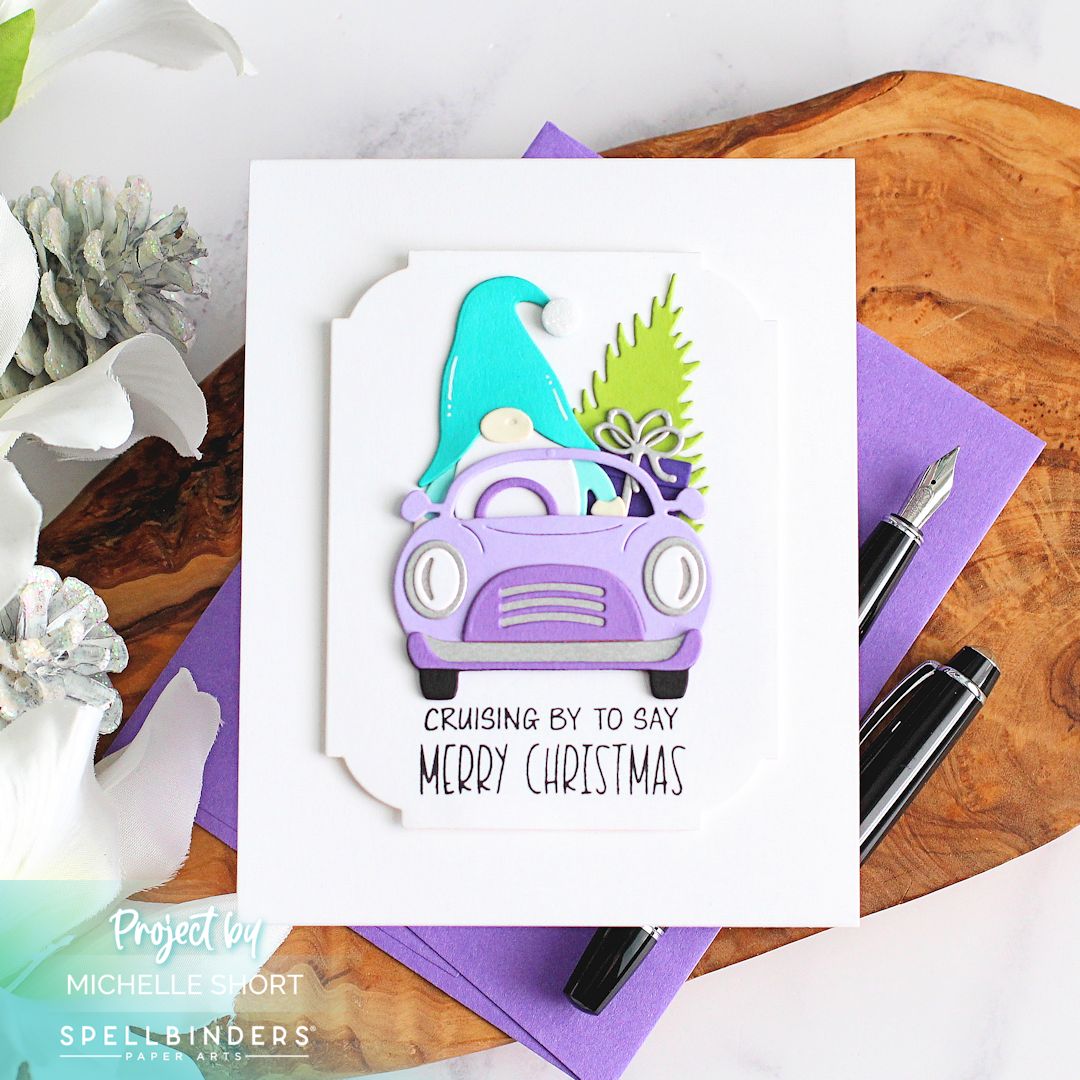
For my projects today, I was heavily inspired by Laura Bassen and her great skill with both colour and paper/cardstock strips. So I used them as a base for my other elements. 


For my first card, I started off by die cutting the Hero Arts Tree Pattern Cover Plate three times from Hero Arts Deluxe Smooth White Cardstock. I picked five trees and layered them up one on top of another to create dimension (so that the trees were three high). I then took the Hero Arts Sentiment Strips Fancy Die and cut it from Hero Arts Peony, Cherry, Cranberry, Paradise and Bermuda Cardstock. 


The strips were adhered to a 3.5" x 4.75" panel of white cardstock and the excess cut off the sides. The trees were then adhered on top using Hero Arts Precision Glue. The panel was then in turn adhered to a US A2 sized white card base with thin foam tape. 


I stamped the sentiment from the Hero Arts Christmas Sentiment Strips Set (this is one whole stamp with multiple sentiments, so that you can stamp and die cut all at once) and stamped it onto Hero Arts Pitch Black Cardstock using Hero Arts Clear Embossing & Watermark Ink. I applied Hero Arts White Detail Embossing Powder and heat set. It was then cut into a strip using the Hero Arts Sentiment Strips Fancy Die before adhering to the card with more thin foam tape. 


My next card uses the same base but with the Hero Arts Winter Foliage Stamp & Cut XL Set. I die cut the foliage from Hero Arts Kiwi, Paradise and Bermuda Cardstock. I cut the pine cones from Hero Arts Sand Cardstock. I added ink blending to them using Hero Arts Core Inks. I used Kiwi, Fresh Lawn and Pine for the green foliage and Bermuda and Nautical for the teal foliage. 


I blended Sand, Cup O' Joe and Espresso Core Inks onto the pine cones. I added the same cardstock strips to a 3.5" x 4.75" panel of white cardstock and then adhered the foliage on top using Hero Arts Precision Glue. The panel was adhered to a US A2 sized white card base with thin foam tape. 


I adhered the pine cones on top using a combination of thin foam tape (at the tips) and Precision Glue (at the bottoms). The sentiment from the Hero Arts Christmas Sentiment Strips set that I stamped for the first card was adhered on top with more thin foam tape. To finish off, I added a few white gel pen dots. 

BLOG HOP:


As mentioned, this post is part of a fun, inspirational blog hop (with prizes!). For the hop, you should have arrived here from Lydia. Next on the hop is Mindy. If you get lost along the way, please head over to the Hero Arts Blog

GIVEAWAY:

Hero Arts are giving away two $50 gift cards, drawn from the comments left along the hop. Comment on all the blogs for more chances to win! You have until Thursday 31st August 2023 at 11.59pm ET to enter. The winners will be announced on the Hero Arts blog. 
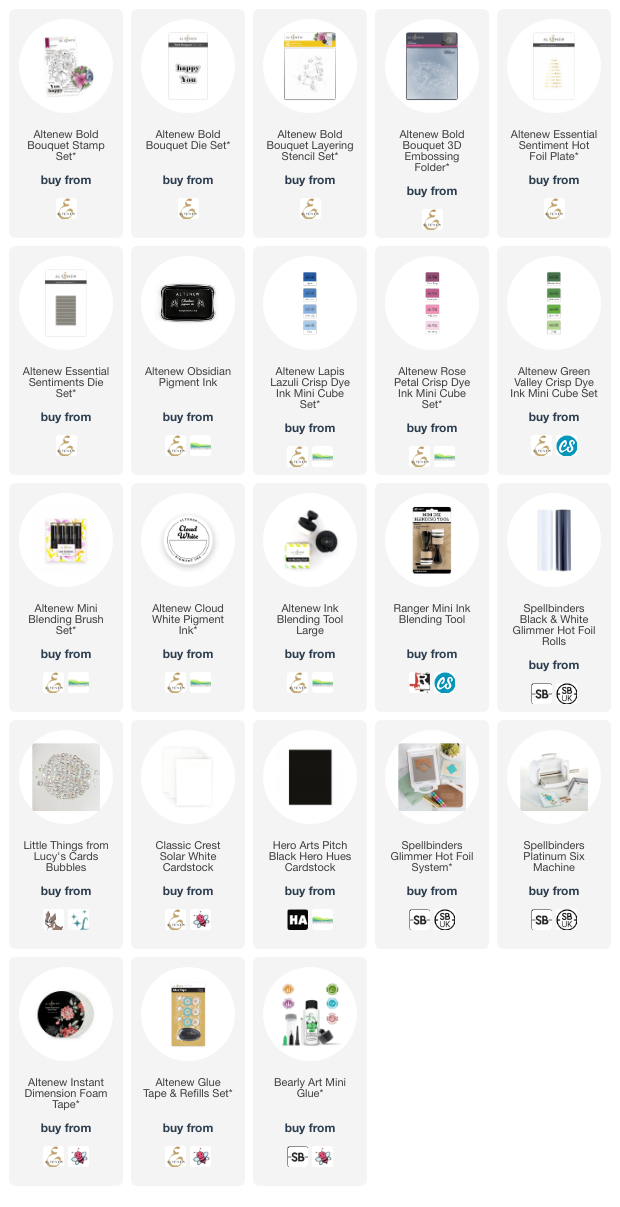
SUPPLIES:


Here are the links to what I have used on the projects. Affiliate links are used on some products. This means that if you make a purchase after clicking on my link, I receive a small commission with no extra cost to you. I truly appreciate your support when using these links. Please click on the logo below the product to shop at your favourite store. All products were personally purchased except those from Clearly Besotted, Hero Arts or those marked with an asterisk (*) which were kindly sent to me to use. You can read my full disclosure here.


Before I go, I wanted to let you know that there will be a new Holiday Stamp-Along happening in November. This is a virtual class with some of your favourite cardmakers!


You can find more information about the class here. Thank you so much for stopping by today, I really do appreciate it. I hope you have a wonderful rest of the day! 

23 August 2023

Altenew | Modern Monsteras

Hello there, today I have a card to share using the Altenew Modern Monsteras Layering Stencil set. The set is one stencil with two monsteras - one layer for the base of the leaf and one for the detail in two sizes. This is great because you can create your own patterns, or just use the leaves on their own. 

PLEASE NOTE: This post contains affiliate links. Please see below for my full disclosure.


I started off by die cutting a panel of white cardstock using the Altenew Ornate Nesting Die Set. I added ink blending around the outside using Altenew Sea Shore Crisp Dye Inks. I then placed the Altenew Modern Monsteras Stencil on top. I actually found it easier to cut the stencil up to have the leaves separate. For the first layer of the leaves I used the Altenew Sea Shore Crisp Dye Inks (3 darkest) as well as Sunray from the Altenew Golden Sunset Crisp Dye Inks set. 


For the second layer, I used Emerald from the Sea Shore set. I then took Jet Black from Altenew Green Fields Crisp Dye Inks set and added this around the edges of the shape. I adhered the shape onto a US A2 sized black card base with Altenew Instant Dimension Foam Tape. I die cut the 'hello' from Altenew Versatile Greetings Die Set from white cardstock for the base/shadow and black cardstock for the word itself. 


I cut that three times and layered them one on top of another for added dimension before adhering to the card. The sentiment from Altenew Soft Blossoms Stamp Set was stamped onto black cardstock using Altenew Embossing Ink. I applied Altenew Pure White Crisp Embossing Powder and heat set. It was cut into a strip and adhered to the card with more Altenew Instant Dimension Foam Tape

SUPPLIES:


Here are the links to what I have used on the project. Affiliate links are used on some products. This means that if you make a purchase after clicking on my link, I receive a small commission with no extra cost to you. I truly appreciate your support when using these links. Please click on the logo below the product to shop at your favourite store. All products were personally purchased except those from Clearly Besotted, Hero Arts or those marked with an asterisk (*) which were kindly sent to me to use. You can read my full disclosure here.


The Modern Monsteras Layering Stencil can be purchased separately or you can get it FREE on orders over $49 until 26th August 2023 11.59pm EDT. The set will be automatically added to eligible orders while supplies last. 


Thank you so much for stopping by today, I really do appreciate it. I hope you have a wonderful day! 

22 August 2023

Spellbinders | Santa Hugs

Hello there, today I have a card to share using the Santa Hugs set from Spellbinders and Stampendous. I love that Santa looks like he is hugging the reindeer! 

PLEASE NOTE: This post contains affiliate links. Please see below for my full disclosure.


I started off by die cutting the elements from the Spellbinders Santa Hugs Etched Dies Set. I added ink blending to the layers using Altenew Inks and Spellbinders Blending Brushes. I did cut a few of the layers twice to adhere them together to create dimension. 


I cut the trim on Santa's hat and sleeves from white glitter paper. I ran a panel of white cardstock through my Platinum Six inside the Spellbinders Flurry of Snowflakes 3D Embossing Folder. I made sure to hang the bottom of the panel outside of the folder so that that part had no embossing on. This helped to ground Santa and the reindeer which I adhered on top using Bearly Art Glue. 


I stamped the sentiment from the Spellbinders Gnome Drive Sentiments Clear Stamp Set onto black cardstock using Spellbinders Clear Embossing & Watermark Ink. I applied white embossing powder and heat set. It was cut into a strip and adhered to the card using thin foam tape. To finish off, I added Christmas Red Stickles to the reindeer's nose. 

SUPPLIES:


Here are the links to what I have used on the project. Affiliate links are used on some products. This means that if you make a purchase after clicking on my link, I receive a small commission with no extra cost to you. I truly appreciate your support when using these links. Please click on the logo below the product to shop at your favourite store. All products were personally purchased except those from Clearly Besotted, Hero Arts or those marked with an asterisk (*) which were kindly sent to me to use. You can read my full disclosure here.


I think both the Santa and reindeer are so cute! These dies are very easy to layer up too. Thank you so much for stopping by today, I hope you have a wonderful day! 

21 August 2023

VIDEO | Hero Arts Fun & Cute Halloween Tag

Hello there, I am over on the Hero Arts blog today sharing a tag using the Cactus Fancy Dies set. This set can be used as intended, but why not dress up the cactus for Halloween! (Could also be Christmas or any occasion really!) 

PLEASE NOTE: This post contains affiliate links. Please see below for my full disclosure.


I started off by die cutting the Hero Arts Cactus Fancy Dies from Hero Arts Kiwi Cardstock and added ink blending on top with Hero Arts Fresh Lawn and Pine Core Inks. The witch hat is from the Hero Lifestyle Trick or Treat set which I paper pieced using Hero Arts black glitter cardstock and Papaya Cardstock. The sizing worked perfectly! 


For the tag itself, I used the Hero Arts Tag Infinity Dies cut from Hero Arts Passion Flower Cardstock and added ink blending on top using Hero Arts Orchid, Amethyst, Grape Juice and Pitch Black Core Inks. It was splattered with Hero Arts Pitch Black Core Inker and Hero Arts Royal Purple + Gold Two-Tone Metallic Spray


The sentiment from the Hero Arts Prayers Stamp & Cut set is heat embossed on black cardstock and popped on the tag using foam tape, as is the cactus and hat. I also added a bat from Hero Arts Halloween Icons Dies for some added spookyness! To finish off, I added googly eyes to the cactus to bring in the cute factor! 

VIDEO:

Here is the video showing how I made the tag:


If you are viewing this blog post via email subscription, you can watch the video HERE on YouTube. 

SUPPLIES:


Here are the links to what I have used on the project. Affiliate links are used on some products. This means that if you make a purchase after clicking on my link, I receive a small commission with no extra cost to you. I truly appreciate your support when using these links. Please click on the logo below the product to shop at your favourite store. All products were personally purchased except those from Clearly Besotted, Hero Arts or those marked with an asterisk (*) which were kindly sent to me to use. You can read my full disclosure here.


Whilst I don't usually gravitate towards making Halloween projects, they are fun to make! I thought this tag would work well on a little treat bag or box. For more details on how I made the tag, please head over to the Hero Arts Blog. Thank you so much for stopping by today, I really do appreciate it. I hope you have a wonderful day! 

20 August 2023

Spellbinders | De-light-ful Christmas

Hello there, I am over on the Spellbinders Blog today, sharing three cards using the Glimmer Holly Background and Layered Glimmer Holly Background from the De-light-ful Christmas Collection by Yana Smakula. I made three cards - one using just the glimmer plate, one using just the stencil and one using both together. 

PLEASE NOTE: This post contains affiliate links. Please see below for my full disclosure.


Card 1 (left) uses both the Glimmer Holly Background Hot Foil Plate and Layered Glimmer Holly Background Stencil set. I hot foiled the plate onto white cardstock using Champagne Foil. I then placed the stencils on top and added ink blending for all the layers using Altenew Crisp Dye Inks. The sentiment from A Merry Little Christmas Sentiments Glimmer Hot Foil Plate & Die Set was foiled with Champagne Foil and popped on top. 

Card 2 (top right) uses the Glimmer Holly Background Hot Foil Plate foiled onto Waterfall Cardstock using White Foil. I coloured a few of the leaves with Copic Markers for some added interest. I created a shaped card using the Essential Arches Etched Dies. I added a poinsettia and holly on top, followed by the sentiment foiled in Black Foil

Card 3 (bottom right) uses the Layered Glimmer Holly Background Stencil. I added ink blending through the stencil using the same inks as the first card. It was simply adhered to an A2 white card base with a Teal Topaz Cardstock mat. The sentiment was foiled using Black Foil and then I finished off with a few Pink Color Essentials Gems

SUPPLIES:


Here are the links to what I have used on the projects. Affiliate links are used on some products. This means that if you make a purchase after clicking on my link, I receive a small commission with no extra cost to you. I truly appreciate your support when using these links. Please click on the logo below the product to shop at your favourite store. All products were personally purchased except those from Clearly Besotted, Hero Arts or those marked with an asterisk (*) which were kindly sent to me to use. You can read my full disclosure here.


For the full step-by-step photos and instructions on how I made these cards, please head over to the Spellbinders blog. Thank you so much for stopping by today, I truly appreciate it. I hope you have a wonderful rest of the weekend! Take care! 

19 August 2023

Spellbinders | Bibi's Snowflakes

Hello there, I was over on the Spellbinders Blog yesterday, sharing three projects using Bibi's Snowflakes Collection by Bibi Cameron. As the name suggests, the collection is full of pretty snowflakes!

PLEASE NOTE: This post contains affiliate links. Please see below for my full disclosure.


Card 1 (top) uses the Snowflake Card Creator Etched Dies to create a 6" snowflake shaped card. The top layer is cut from White Glitter Pop-Up Foam Sheet. The foliage and flower from the set were die cut out and popped on top. The sentiment is from the Snowflake Wishes Clear Stamp & Die Set

Card 2 (left) uses the Delicate Snowflakes Etched Dies. I cut the base from white cardstock, the flowers from purple cardstock and the leaves from green cardstock. They were layered up and a sentiment stamped and heat embossed from the Snowflake Wishes Clear Stamp & Die Set.

Card 3 (bottom right) uses the Glimmering Snowflakes Hot Foil Plate & Die Set foiled onto a tag using Opal Foil. This is a subtle look but you can see it a little better in the photos over on the Spellbinders blog! I added a Christmas Bird and more foliage behind. The sentiment is from Glimmering Snowflakes set foiled in Silver Foil on black cardstock. 

SUPPLIES:


Here are the links to what I have used on the projects. Affiliate links are used on some products. This means that if you make a purchase after clicking on my link, I receive a small commission with no extra cost to you. I truly appreciate your support when using these links. Please click on the logo below the product to shop at your favourite store. All products were personally purchased except those from Clearly Besotted, Hero Arts or those marked with an asterisk (*) which were kindly sent to me to use. You can read my full disclosure here.


For more details on how I made the cards, please head over to the Spellbinders Blog. Thank you so much for stopping by today, I really do appreciate it! Wishing you a wonderful Saturday! 

18 August 2023

Altenew | August 2023 Marvelous Monthly Series Release Blog Hop + Giveaway

Hello there, I am delighted to be joining Altenew today for the August 2023 Marvelous Monthly Series Blog Hop. Yesterday saw the release of the Marvelous Monthly Series sets and today I am using the Craft-A-Flower: Bellflower Layering Die Set. It is such a pretty set! You can purchase it as part of the Craft-A-Flower Monthly Subscription or separately. 

PLEASE NOTE: This post contains affiliate links. Please see below for my full disclosure.


I started off by die cutting the Altenew Craft-A-Flower: Bellflower Layering Die Set from white cardstock. I added ink blending to the flower petals using Altenew Enchanted Garden Crisp Dye Inks and an Altenew Small Ink Blending Tool. I then added ink blending to the stamens using Altenew Golden Sunset Fresh Dye Inks and the leaves use Altenew Green Valley Crisp Dye Inks.  


The flowers were assembled and adhered as per the guide on the back of the packaging. I ran a panel of white cardstock through my die cutting machine inside the Altenew Deck Planks 3D Embossing Folder. It was then adhered to a US A2 sized white card base using Altenew Instant Dimension Foam Tape. I added the leaves next, with liquid glue, followed by the flowers with more foam tape. 


I die cut the 'hello' from Altenew Versatile Greetings Die Set three times from white cardstock, adhered them one on top of another before adhering onto the card. To finish off, I embellished with a few Bubbles. 

BLOG HOP:


As mentioned, this blog post is part of a fun, inspirational blog hop. Please click the links below for the other participants in the hop. 

You are invited to the Inlinkz link party!

Click here to enter

GIVEAWAY:

$300 in total prizes! To celebrate this release, Altenew is giving away a $100 gift certificate to 1 lucky winner and a $40 gift certificate to 5 winners! Please leave a comment on the Altenew Card Blog and/or each designer’s blog post on the blog hop list below by 24th August 2023 for a chance to win. Altenew will draw 6 random winners from the comments left on each stop of this blog hop and announce the winners on the Altenew Winners Page on 26th August 2023*The winner of the $100 gift certificate will be chosen from comments left on the Altenew blog. 


SUPPLIES:


Here are the links to what I have used on the project. Affiliate links are used on some products. This means that if you make a purchase after clicking on my link, I receive a small commission with no extra cost to you. I truly appreciate your support when using these links. Please click on the logo below the product to shop at your favourite store. All products were personally purchased except those from Clearly Besotted, Hero Arts or those marked with an asterisk (*) which were kindly sent to me to use. You can read my full disclosure here.


Isn't that flower pretty? Thank you so much for stopping by today. I really do appreciate it. I hope you have a wonderful rest of the day! 
End of code