30 November 2016

VIDEO | Watercoluring with Ink Pads

Hello there, this month I have the absolute pleasure of being Altenew's Video Guest Designer. I shared my project last week over on their You Tube Channel and Blog and today I thought I would share it here too.
 
 
For my card I wanted to watercolour using Altenew's ink pads. They work really well for water colouring as they are dye based. They are also great as they have colours that coordinate really well, for example, they have light colours, mid-tones and dark colours. I used the Shades of Purple and Green Fields collections on my card today.
 

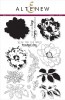
I started off by stamping the image on to some watercolour paper using black Archival ink. I masked off the flower before stamping the leaves. I also stamped the sentiment to the bottom left hand side. The image was coloured using the ink pads. I used lavender Fields, Deep Iris and Midnight Violet for the flower itself. I then used Frayed Leaf and Forest Glades for the leaves. I kept the colouring light and more of a wash type look which I think goes well with the style of the stamps.
 
 
Once the panel was dry, I added it to an A2 Fog card base with foam sheet. To finish if off, I added a few Pretty Pink Posh Sparkling clear sequins. A really simple card but I like the softness to it.
 
VIDEO:
 
Here is the video showing how I made it:


SUPPLIES:
Here are the links to what I have used on the card. Please click on the picture or wording to be taken to where I purchased it. Affiliate links are used on some products. This means that if you make a purchase after clicking on my link, I receive a small commission with no extra cost to you. I truly appreciate your support when using these links.


For more inspiration, do head over to the Altenew Blog, the Design Team are amazing! Thank you so much for visiting me today. I really do appreciate it. I hope you have a great day!

28 November 2016

Winter Wishes

Hello there, today I have a card to share using Flora from Purple Onion Designs. Doesn't she look so happy on top of that tree stump? She looks like she is dancing to me! :)
 

I started off with a piece of white cardstock. I stamped Flora on to it, as well as the sentiment, using Memento Tuxedo Black ink. The image was coloured with Copic Markers. I usually add blue as the background for these type of images but for this one, I thought I would add a little purple and pink in to it and I really like how it turned out. I also added some dots with a Colourless Blender for some added texture.
 
 
The image panel was simply added to an A2 purple card base with foam sheet. I love the simplicity of the card, along with the soft colours.
 

SUPPLIES:

Here are the links to what I have used on the card. Please click on the picture or wording to be taken to where I purchased it. Affiliate links are used on some products. This means that if you make a purchase after clicking on my link, I receive a small commission with no extra cost to you. I truly appreciate your support when using these links.


COPIC MARKERS: Owl - W8, W6, W4, W2, W1, W00, YR31, YR24. Scarf - BG49, BG13, BG11. Tree Stump - E59, E57, E55. Background - BV00, BV000, RV00, B000, B0000, 0.
 
I thought this would make a nice card to send to a friend during the winter season. I also have great news to share ...


Purple Onion Designs have their winter sale starting today. All stamps are 25% off until the 7th December so if you have been holding off purchasing, now is the time to do it! Thank you so much for visiting me today. I hope you have a great day and a wonderful week!  

26 November 2016

Bah Hum-Pug!

Hello there, due to popular demand Clearly Besotted have released their Bah Hum-Pug stamp set. Such a cute set with lots of pugs in their different poses and outfits. Since Clearly Besotted are on a break at the moment, the set is currently exclusive to Simon Says Stamp.
 
 
I started off my tag by cutting three layers of tags using the MFT Tag Builder 6 Blueprints dies. I took the solid piece and stamped the pug wearing the Christmas pudding on to it using black ink. I then coloured the image using coloured pencils. I added a little sparkle to the holly and berry with Copic Spica pens and added white gel pen to his eyes. I added the top outside layer of the tag to this piece with foam tape to give a little dimension.
 
 
The sentiment, from the same stamp set, was stamped on to another tag and this was adhered to the front pieces. I used another tag piece instead of just the back of the tag so that you could still see the stitching detail. To finish off, I simple added Doodlebug Twine to the top.
 
SUPPLIES:
Here are the links to what I have used on the tag. Please click on the picture or wording to be taken to where I purchased it. Affiliate links are used on some products. This means that if you make a purchase after clicking on my link, I receive a small commission with no extra cost to you. I truly appreciate your support when using these links.

POLYCHROMOS PENCILS: Pug - 270, 271, 272, 274, 275. Pudding - 180, 283, Derwent Coloursoft C150, 103, Holly - 112, 225. Ground - 235, 199. Shadow - Prismacolor White.
 
Isn't the expression on his face so funny? You can tell he is not amused at being dressed up like a Christmas pudding! Thanks so much for visiting me today. I hope you have a great weekend!

24 November 2016

Happy 40th Birthday

Hello there, today I have a card to share that I made for a friend to celebrate her 40th Birthday. I had originally planned on making a card with a big 40 on it but I decided to go for the more subtle version and add the 40 on the sentiment.

 
I started off by stamping the Lucky Tulip stamp by The Ton on to a piece of white cardstock. It was stamped using MFT Grout Gray ink, which is a great ink for the no-line colouring look. I then coloured the image using Polychromos pencils. The panel was adhered to a black A2 card base with foam sheet.
 
 
I typed the sentiment out on my computer and printed it on to cardstock. This was then cut out and added to the card with foam tape. To finish off, I added a few PPP Sparkling Clear sequins.
 

SUPPLIES:

Here are the links to what I have used on the card. Please click on the picture or wording to be taken to where I purchased it. Affiliate links are used on some products. This means that if you make a purchase after clicking on my link, I receive a small commission with no extra cost to you. I truly appreciate your support when using these links.


POLYCHROMOS - Flower Head: Light Flesh 132, Medium Flesh 131, Rose Carmine 124, Dark Red 225. Leaves: Earth Green Yellowish 168, Juniper Green 165, Pine Green 267.

A very simple card as you can see, but it did take me a while to colour that flower! I hope my friend likes it. Thank you so much for visiting me today. I hope you are having a great week.

23 November 2016

Watercolouring with Ink Pads

Hello there, today I am delighted to be joining Altenew as their November Video Guest Designer. I am using the stunning Beautiful Day stamp set along with their ink pads. Did you know that you can watercolour with their inks pads? I love that you can get them in cube sets with various shades in each. This not only makes them perfect for stamp layering, but also great for water colouring.
 
 
Please head over to the Altenew Blog to see the full card, as well as the video showing how I made it. Links to the supplies used are below. Thank you so much for visiting me today. I hope you have a great day!

21 November 2016

Hope

Hello there, today I have a card to share using another of the new images from Purple Onion Designs' Snow Day release. This time I am using Hope, isn't she so cute whizzing along on her sled?
 
 
I started off by stamping Hope on to a piece of white cardstock using Memento Tuxedo Black ink. I then took a panel of white cardstock and cut a circle in the middle using the largest of the SSS Stitched Circle dies. This was placed on to a white 4.5"x4.5" white card base. I drew a line inside the circle and then masked off the sides of the card base. The Snow Day Hill was then stamped on to the card base with the same black ink.
 
 
Hope and the background were coloured using Copic Markers, adding dots of the glitter on the scarf with Copics Spica pens. Hope was then fussy cut out leaving a small white border. The front panel was adhered to the card base with foam tape and then hope was added with foam tape also. I stamped the Merry Christmas sentiment on to some more white cardstock and cut out. This was added to the card with more foam tape. To finish, I added a little clear Wink of Stella to the trees.
 
SUPPLIES:
Here are the links to what I have used on the card. Please click on the picture or wording to be taken to where I purchased it. Affiliate links are used on some products. This means that if you make a purchase after clicking on my link, I receive a small commission with no extra cost to you. I truly appreciate your support when using these links.
COPIC MARKERS: Bunny - W6, W4, W2, W1, W0, W00, R00. Scarf - BG49, BG13, BG11, Spica 08 Turquoise, 17 Mint. Sled - E49, E47, E44, E43, E42. Sky - B66, B63, B60. Cloud - B41, C1. Snow - B000, B0000, BG000, C00, 0.
 
How are you doing with your Christmas cards? I still have tons to make but I am happy to be adding a few more to my box! Thank you so much for visiting me today. I hope you have a great week.
End of code