27 June 2023

Hello There Bear

Hello there, today I have a card to share with you using the MFT Pop-Up Pals Die-namics and Stamp Set. As the name suggests, these characters (there are four you can make - a bunny, bear, raccoon and cat. Although you can mix and match to create your own too!) are made to be pop-ups on cards, but for my card today, I am using the bear just as is. 

PLEASE NOTE: This post contains affiliate links. Please see below for my full disclosure.


I started off by die cutting the head, body, arms and ears from the MFT Pop-Up Pals Die-namics set from Kraft cardstock. I then cut the snout from Alabaster cardstock and the cheek blush and inside ears from Peony cardstock. I added ink blending to the brown areas using Tim Holtz Vintage Photo Distress Ink and then Tim Holtz Picked Raspberry Distress Ink for the inside of the ears. 


I stamped the face from the coordinating stamp set (the dies and stamp come as a set) using Versafine Clair Nocturne Ink and then added the stripes to his body using Tim Holtz Vintage Photo Distress Ink. I die cut extra layers of the pieces and then adhered them one on top of another for added stability and dimension. The pieces were then adhered together using liquid glue.


I created a circle shaped card base using the MFT A2 Stitched Circle STAX Die-namics set and added ink blending to one side using Tim Holtz Picked Raspberry Distress Ink. I created a frame for the front of the card by die cutting two of the MFT A2 Stitched Circle STAX Die-namics together. It was adhered to the card using foam tape. 


The bear was then adhered using foam tape also. I stamped a sentiment from the MFT Itty Bitty Basics Stamp Set on to black cardstock using Versamark Ink. I applied white embossing powder and heat set. It was cut into a strip using the MFT Itty Bitty Strips Die-namics. I adhered it to the card with more foam tape. To finish off, I added Crystal Glaze to the bear's nose and then added a few Bubbles embellishments around the sentiment. 

SUPPLIES:


Here are the links to what I have used on the project. Affiliate links are used on some products. This means that if you make a purchase after clicking on my link, I receive a small commission with no extra cost to you. I truly appreciate your support when using these links. Please click on the logo below the product to shop at your favourite store. All products were personally purchased except those from Clearly Besotted, Hero Arts or those marked with an asterisk (*) which were kindly sent to me to use. You can read my full disclosure here.


These characters are just so cute! You can see why they would work great as a pop-up but I think they look good without moving too! Thanks so much for stopping by to see me today, I really do appreciate it. I hope you have a great day! 

22 June 2023

Simon Says Stamp | It's Okay

Hello there, today I have a card to share using the new Here for You stamp set from Simon Says Stamp's Out of This World release, which is out now. The set is filled with lots of lovely encouraging sentiments and I have used one on my card today. 

PLEASE NOTE: This post contains affiliate links. Please see below for my full disclosure.


I started off by stamping the sentiment from the Simon Says Stamp Here for You Stamp Set on to white cardstock using Versafine Onyx Black Ink. I cut it out using a Simon Says Stamp Nested Round Hearts Die and then set it aside. 


Using the heart die as a guide, I stamped two flowers from the Simon Says Stamp Even More Spring Flowers Stamp Set on to a panel of white cardstock using Memento Tuxedo Black Ink. I coloured them using Copic Markers (the colours that I used are listed below the supplies area for reference) and then adhered the panel to a US A2 sized white card base using tape runner adhesive. 


The sentiment heart was adhered on top using foam tape. To finish off, I added a few Spellbinders Silver Mix Color Essentials Gems

SUPPLIES:


Here are the links to what I have used on the project. Affiliate links are used on some products. This means that if you make a purchase after clicking on my link, I receive a small commission with no extra cost to you. I truly appreciate your support when using these links. Please click on the logo below the product to shop at your favourite store. All products were personally purchased except those from Clearly Besotted, Hero Arts or those marked with an asterisk (*) which were kindly sent to me to use. You can read my full disclosure here.


COPIC MARKERS: Flowers - V09, V17, V15, V12, V01, V00/Y17, Y13. Leaves - G29, YG17, YG23, YG01. 

I think this sentiment is one that we could all remember. It is okay to not be okay sometimes. Thank you so much for stopping by today, I very much appreciate it. I hope you have a wonderful day! 

20 June 2023

VIDEO | MFT Oceans of Fun

Hello there, I am delighted to be over on the MFT YouTube Channel today sharing another underwater scene, this time using the Oceans of Fun and Under the Sea sets. The Oceans of Fun set contains lots of sea creatures but I fell in love with the narwhal, so used him on my card today. 

PLEASE NOTE: This post contains affiliate links. Please see below for my full disclosure.


I started off by stamping the narwhal, fish and starfish from the MFT Oceans of Fun Stamp Set on to white cardstock using MFT Extreme Black Ink. I coloured them using Copic Markers (the colours that I used are listed below the supplies area) and then die cut them out using the coordinating MFT Oceans of Fun Die-namics


I added ink blending on to a 3 3/4" x 5" panel of white cardstock using Tim Holtz Prize Ribbon and Mermaid Lagoon Distress Ink. I placed the MFT Sunny Rays Stencil on top and added Hero Arts Unicorn White Pigment Ink through it to add light rays through the water. 


I then die cut elements from the MFT Under the Sea Die-namics set. I die cut the cave/arch piece from white cardstock twice and added ink blending on top using the same inks as the background. They were stacked up and adhered to the panel using MFT On-Point Precision Glue. I then splattered water on to the panel using a paintbrush to add some interest. 


I die cut the coral, seaweed and seabed pieces from the same set using various colours of cardstock and added ink blending to them. The panel was adhered to a US A2 sized white card base using thin foam tape. The seabed was adhered using thin foam tape and the coral and seaweed adhered with liquid glue. The starfish and narwhal were adhered using thin foam tape and the fish with liquid glue. 


The sentiment from the MFT Oceans of Fun Stamp Set was stamped on to MFT Black Licorice Cardstock using Versamark Ink. I applied white embossing powder and heat set. It was cut into a strip and adhered to the card using thin foam tape. To finish off, I added white gel pen dots. 

VIDEO:

Here is the video showing how I made the card:


If you are viewing this blog post via email subscription, you can watch the video HERE on YouTube. 

SUPPLIES:


Here are the links to what I have used on the project. Affiliate links are used on some products. This means that if you make a purchase after clicking on my link, I receive a small commission with no extra cost to you. I truly appreciate your support when using these links. Please click on the logo below the product to shop at your favourite store. All products were personally purchased except those from Clearly Besotted, Hero Arts or those marked with an asterisk (*) which were kindly sent to me to use. You can read my full disclosure here.


COPIC MARKERS: Starfish - YR27, YR24, Y17, Y08, Y13. Fish - V17, V15, V12. Narwhal - BG49, BG15, BG13, BG11, BG10/RV55, RV52. 

I kept my scene pretty simple today but there are lots of sea creatures in the set, so you could really go all out and create a full underwater scene! Thank you so much for stopping by today, as always, I really do appreciate it. I hope you have a wonderful day! 

19 June 2023

Spellbinders | Carissa Wiley It's My Party Collection

Hello there, I am delighted to be guest designing over on the Spellbinders Blog today, sharing three projects using the new It's My party Collection by Carissa Wiley. This is such a fun collection filled with lots of balloons for lots of different occasions. You can even use the balloon shapes as non-balloons too, as the balloon strings are separate. 

PLEASE NOTE: This post contains affiliate links. Please see below for my full disclosure.


Project 1 (left) uses the Balloon Bouquet Glimmer Hot Foil Plate and Die Set which was foiled on to white cardstock using Champagne Foil. I added ink blending using Wilted Violet Distress Oxide Ink and the Balloon Bouquet Designs Stencil. The sentiment is from It's My Party Glimmer Sentiments Hot Foil Plate & Die Set and I embellished with white flowers and gold glitter leaves

Project 2 (top right) uses the Party Balloon Garland Clear Stamp Set which was stamped and heat embossed in white on to white cardstock. I added colour to the balloons with ink blending and the Balloon Garland & Sentiments Stencil. The sentiment is from the It's My Party Glimmer Sentiments Hot Foil Plate & Die Set and Birthday Unboxing Glimmer Hot Foil Plate & Die Set

Project 3 (bottom right) uses the Giant Party Balloon Glimmer Hot Foil Plate & Die Set which was foiled on to white cardstock using Silver Foil. The pieces were die cut out and made into a shaker using Teal Opalescent Color Essentials Sequins for the shaker bits and Acetate Sheets for the windows. 

SUPPLIES:


Here are the links to what I have used on the projects. Affiliate links are used on some products. This means that if you make a purchase after clicking on my link, I receive a small commission with no extra cost to you. I truly appreciate your support when using these links. Please click on the logo below the product to shop at your favourite store. All products were personally purchased except those from Clearly Besotted, Hero Arts or those marked with an asterisk (*) which were kindly sent to me to use. You can read my full disclosure here.


For more details on how I made the projects as well as photos, please head over to the Spellbinders Blog. Thank you so much for stopping by today, I hope you have a great week ahead! 

18 June 2023

Altenew | June 2023 Marvelous Monthly Series Blog Hop + Giveaway

Hello there, I am delighted to be joining Altenew today to celebrate the release of the June 2023 Marvelous Monthly Series. There are lots of new sets releasing today including: Craft-A-Flower, Mini Delight, Dynamic Duo and Build-A-Garden, plus lots more!

PLEASE NOTE: This post contains affiliate links. Please see below for my full disclosure.


Today, I am using the new Craft-A-Flower: Saffron Layering Die Set. Although I use saffron a lot in cooking, I have to be honest, I never knew what a saffron flower looked like. I have crocus in the garden, but I had never seen saffron crocus until I saw this set! Aren't they beautiful! 


I started off by die cutting the set from white cardstock. I then added ink blending using Altenew Small Ink Blending Tools and Altenew Crisp Dye Inks. I used Shades of Purple (all four) for the flower petals, Golden Sunset (Snapdragon and Marigold) for the flower centres and Golden Sunset (Marigold) and Red Cosmos (Ruby Red) for the saffron itself. 


For the leaves, I used Green Valley (all four shades). The flowers were assembled and adhered using liquid glue. I took a panel of white cardstock and adhered the leaves on first, followed by the flowers using Altenew Instant Dimension Foam Tape. The panel was then adhered to a US A2 sized white card base with more foam tape. 


I stamped the sentiment from the Altenew Soft Blossoms Stamp Set on to black cardstock using Altenew Embossing Ink. I applied Altenew Pure White Crisp Embossing Powder and heat set. It was cut into a strip and adhered to the card with foam tape. 

SUPPLIES:


Here are the links to what I have used on the project. Affiliate links are used on some products. This means that if you make a purchase after clicking on my link, I receive a small commission with no extra cost to you. I truly appreciate your support when using these links. Please click on the logo below the product to shop at your favourite store. All products were personally purchased except those from Clearly Besotted, Hero Arts or those marked with an asterisk (*) which were kindly sent to me to use. You can read my full disclosure here.


BLOG HOP:


This post is part of  a fun, inspirational blog hop with prizes. Please click the links below for the other participants in the hop. 

You are invited to the Inlinkz link party!

Click here to enter

GIVEAWAY:

$300 in total prizes! To celebrate this release, Altenew is giving away a $100 gift certificate to 1 lucky winner and a $40 gift certificate to 5 winners! Please leave a comment on the Altenew Card Blog and/or each designer’s blog post on the blog hop list below by 21st June 2023 for a chance to win. Altenew will draw 6 random winners from the comments left on each stop of this blog hop and announce the winners on the Altenew Winners Page on 23rd June 2023.*The winner of the $100 gift certificate will be chosen from comments left on the Altenew blog. 


Thank you so much for stopping by today, I really appreciate it. I hope you have a wonderful day and a great rest of the weekend too! 

17 June 2023

Happy Father's Day

Hello there, today I have a card to share with you that I made for my dad for Father's Day tomorrow. I usually make a card with some sort of punny phrase/joke on, but for this year, I went very simple and have used the fabulous Foxtrot Alphabet Die Set from Alex Syberia Designs. I love the quirky feel to this alphabet! 

PLEASE NOTE: This post contains affiliate links. Please see below for my full disclosure.

I started off by die cutting the Alex Syberia Designs Foxtrot Alphabet Die Set from Concord & 9th Cardstock - Buttercup, Sunflower, Aqua Sky, Oceanside, Peacock and Blueberry. I cut each letter three times and adhered them one on top of another using Bearly Art Glue. There isn't punctuation in the set, so I used an 'A' and just cut it into an apostrophe shape. 

I took a panel of white cardstock and ran it through my die cutting machine with the Alex Syberia Designs Tiny Dots Hot Foil Plate to deboss it into the cardstock. The panel was adhered to a US A2 sized white card base with tape runner adhesive. 

To adhere the letters (somewhat!) straight, I first aligned them on a sticky mat (I use a light grip one designed for use with the Cricut Joy) and then picked them up using Press'n Seal. I added Bearly Art Glue on to the back of the letters and then adhered them to the front of the card before removing the Press'n Seal. 

SUPPLIES:


Here are the links to what I have used on the project. Affiliate links are used on some products. This means that if you make a purchase after clicking on my link, I receive a small commission with no extra cost to you. I truly appreciate your support when using these links. Please click on the logo below the product to shop at your favourite store. All products were personally purchased except those from Clearly Besotted, Hero Arts or those marked with an asterisk (*) which were kindly sent to me to use. You can read my full disclosure here.


Although very simple, I really like the graphic feel to this card. I think it would also work well for other occasions. That's the great thing with alphabet dies, you can create your own words/sentiments! Thank you so much for stopping by today, I really do appreciate it. I hope you have a wonderful day! 

14 June 2023

VIDEO | MFT Pearl of a Friend

Hello there, I am delighted to be over on the MFT YouTube Channel today sharing an underwater scene card using the June 2023 release, which was out yesterday. 

PLEASE NOTE: This post contains affiliate links. Please see below for my full disclosure.


I started off the card by stamping the mermaid, octopus and seaweed from the MFT Mermaid for Each Other Stamp Set on to white cardstock using MFT Extreme Black Ink. I coloured them using Copic Markers (the colours that I used are listed below the supplies area for reference) and then die cut them out using the MFT Mermaid for Each Other Die-namics


I took a piece of paper from the MFT Sand, Surf & Sky Paper Pad and die cut it using one of the MFT Stitched Hexagon STAX Die-namics. I blended Tim Holtz Peacock Feathers Distress Ink around the outside edges to add a little depth to it. The seaweed was adhered to the bottom of the panel and excess cut off with scissors. 


The panel was adhered on to another die cut hexagon cut from white cardstock before adhering to a US A2 sized acetate card base. I die cut another three hexagons to add to the middle and back of the card to hide the adhesive. The mermaid and octopus were adhered on top using thin foam tape. 


The sentiment from the MFT Mermaid for Each Other Stamp Set was stamped on to MFT Black Licorice Cardstock using Versamark Ink. I applied white embossing powder and heat set. It was cut into a strip and adhered to the card with more thin foam tape. To finish off, I added a few Iridescent Bubbles

VIDEO:

Here is the video showing how I made the card:


If you are viewing this blog post via email subscription, you can watch the video HERE on YouTube. 

SUPPLIES:


Here are the links to what I have used on the project. Affiliate links are used on some products. This means that if you make a purchase after clicking on my link, I receive a small commission with no extra cost to you. I truly appreciate your support when using these links. Please click on the logo below the product to shop at your favourite store. All products were personally purchased except those from Clearly Besotted, Hero Arts or those marked with an asterisk (*) which were kindly sent to me to use. You can read my full disclosure here.


COPIC MARKERS: Mermaid skin - E13, E11, E51, E50, R20. Hair - E57, E55, E53, E51, E50. Tail - BG49, BG15, BG13, BG11, BG10. Seaweed - G29, YG17, YG23, YG01. Heart, starfish & octopus - V17, V15, V12, V01, V000.

I don't make acetate cards very often (although did make one recently!) but I always think they work well for underwater scenes in particular. Thank you so much for stopping by today, I really appreciate it. I hope you have a wonderful day! 

10 June 2023

Spellbinders | Glimmer Bouquet

Hello there, I hope you are well! Today I have a card to share with you using the new Glimmer Bouquet Hot Foil Plate from the Spellbinders Sealed for Summer Collection which is out today. What a pretty floral! 

PLEASE NOTE: This post contains affiliate links. Please see below for my full disclosure.


I started off my card by foiling the Spellbinders Glimmer Bouquet Hot Foil Plate & Die Set on to Simon Says Stamp 120lb White Cardstock using Spellbinders Silver Foil and the Spellbinders Glimmer Hot Foil System. I then coloured the image using Copic Markers (the colours that I used are listed below the supplies area for reference). 


The floral bouquet was die cut using the coordinating die and I also cut another from plain white cardstock so that I could adhere it to the back for dimension. I foiled the sentiment from Spellbinders Yana's Sentiments Glimmer Hot Foil Plate & Die Set again with silver foil. It was die cut out and again, I added another die cut behind for added dimension. 


I added a panel of Spellbinders Purple Mist Cardstock to a US A2 sized white card base using tape runner adhesive. I then die cut two Spellbinders Essential Diamonds Etched Dies from white cardstock, adhered them one on top of another and then on to the card, using Bearly Art Glue. The bouquet and sentiment were adhered on top. To finish off, I added a few Spellbinders Silver Mix Color Essentials Gems

SUPPLIES:


Here are the links to what I have used on the project. Affiliate links are used on some products. This means that if you make a purchase after clicking on my link, I receive a small commission with no extra cost to you. I truly appreciate your support when using these links. Please click on the logo below the product to shop at your favourite store. All products were personally purchased except those from Clearly Besotted, Hero Arts or those marked with an asterisk (*) which were kindly sent to me to use. You can read my full disclosure here.


COPIC MARKERS: Purple Flowers - V09, V17, V15, V12/YR27, YR24, Y17, Y15. Pink flowers - RV99, RV66, RV55, RV52. Leaves - G29, YG17, YG23, YG01/G28, G24, G43. 

This is such a pretty collection! I will have another card using it later in the month but for now, thank you for visiting my little blog today. I really do appreciate it! I hope you have a wonderful day and a great weekend! 

8 June 2023

Alex Syberia Designs | June 2023 Release Blog Hop + Giveaway

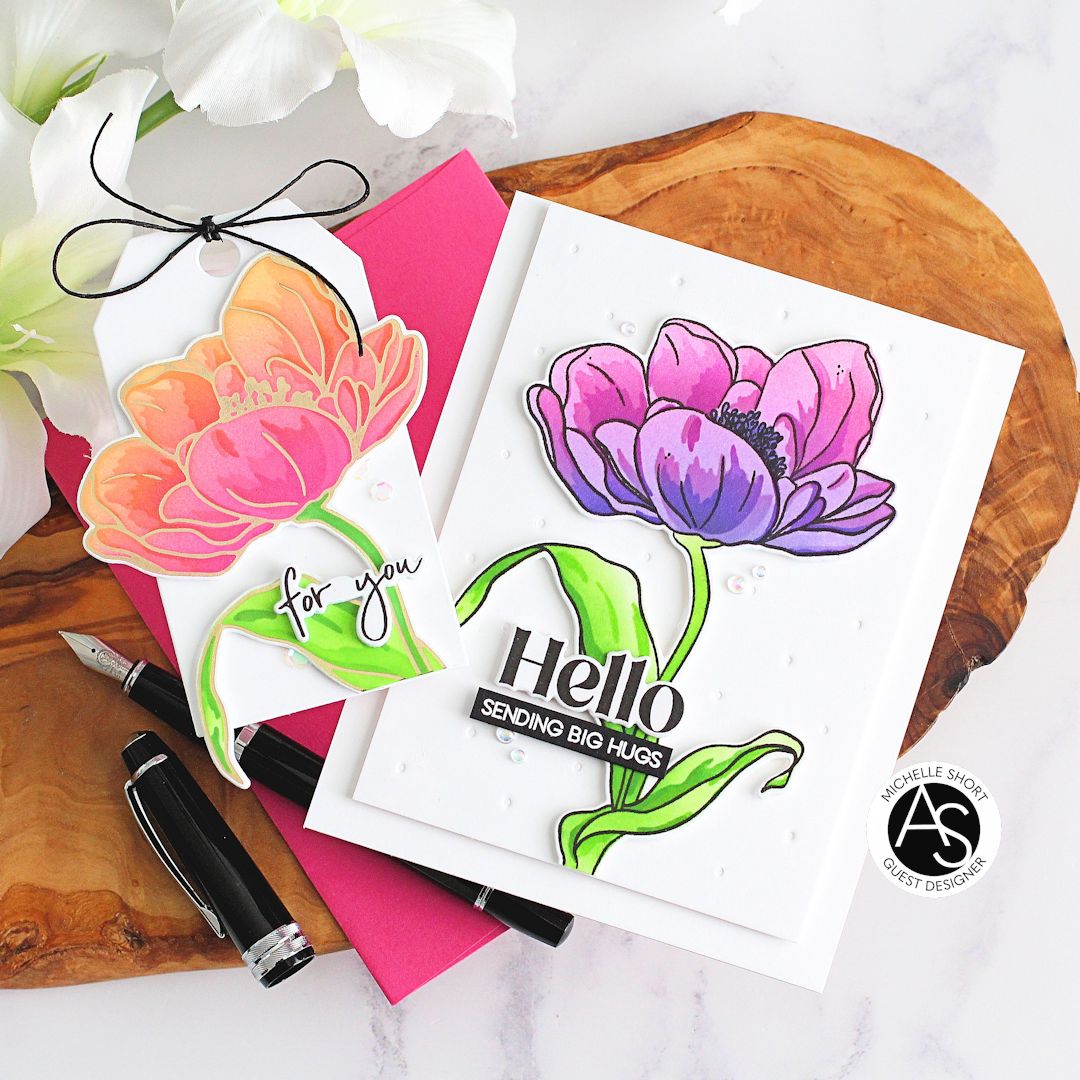
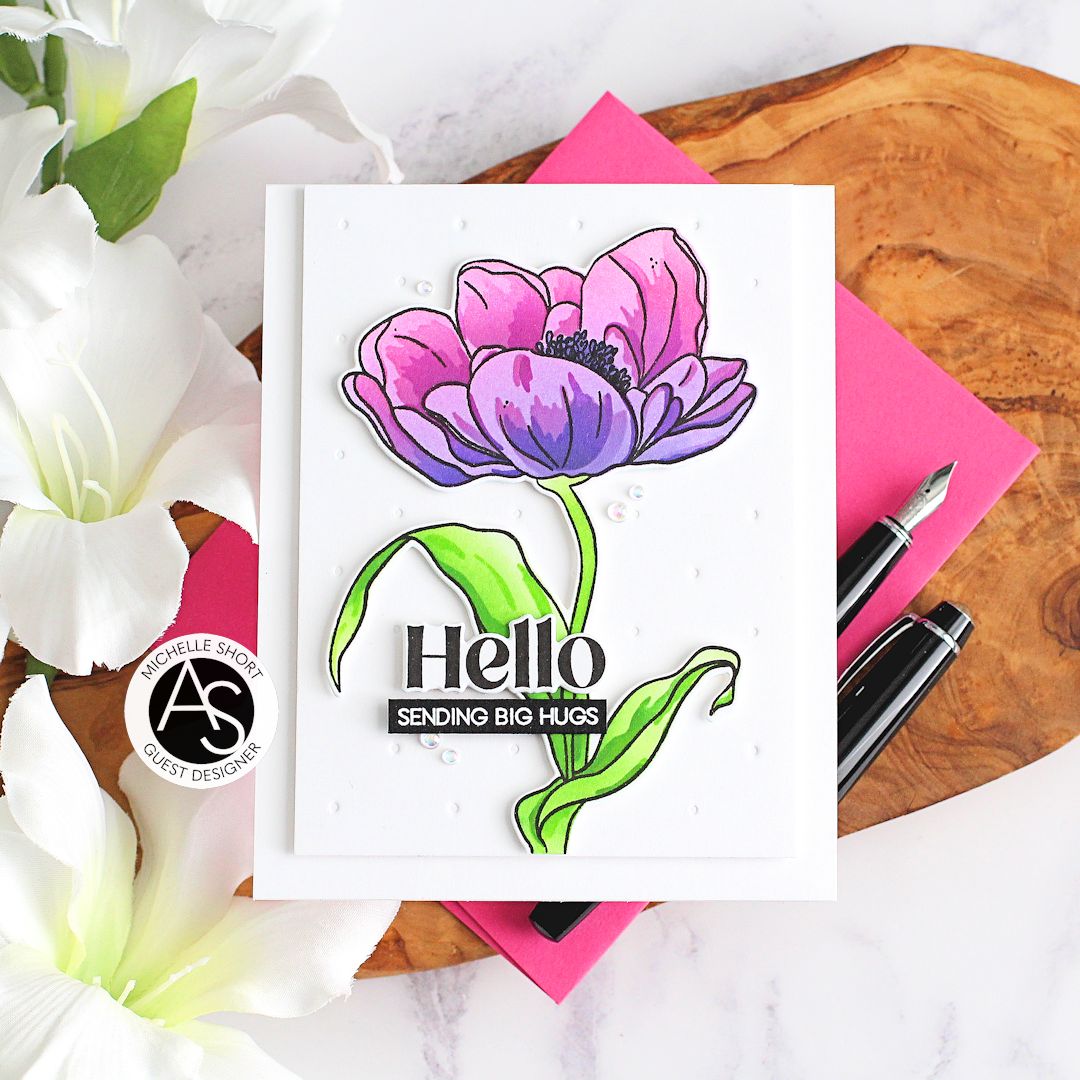
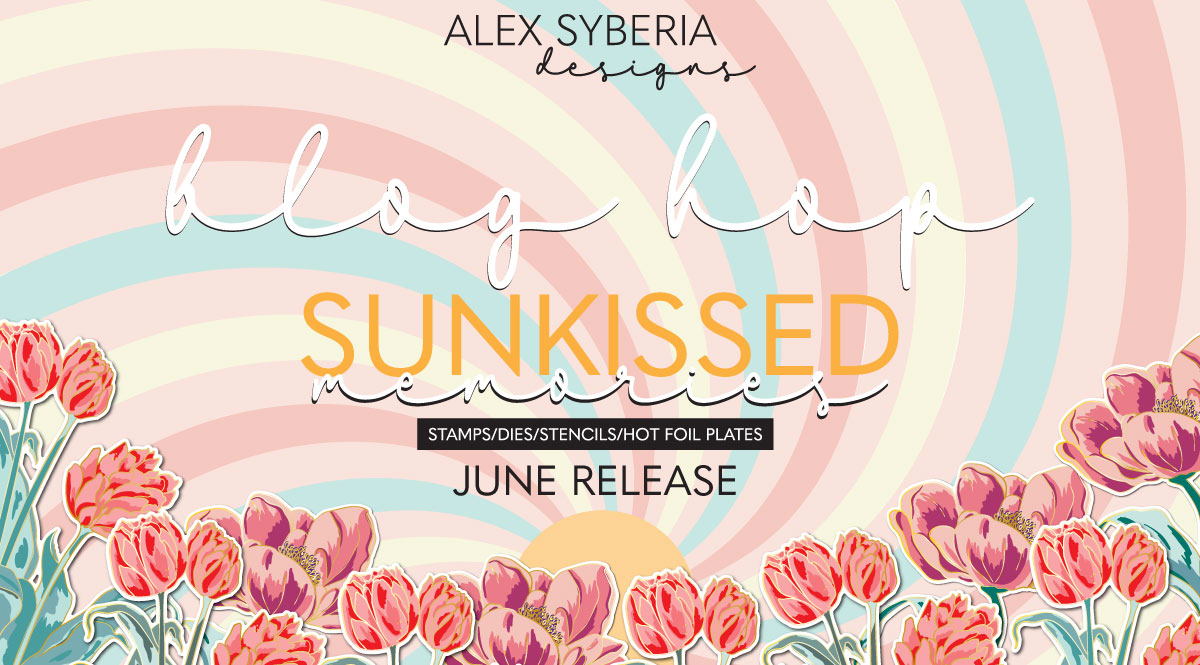
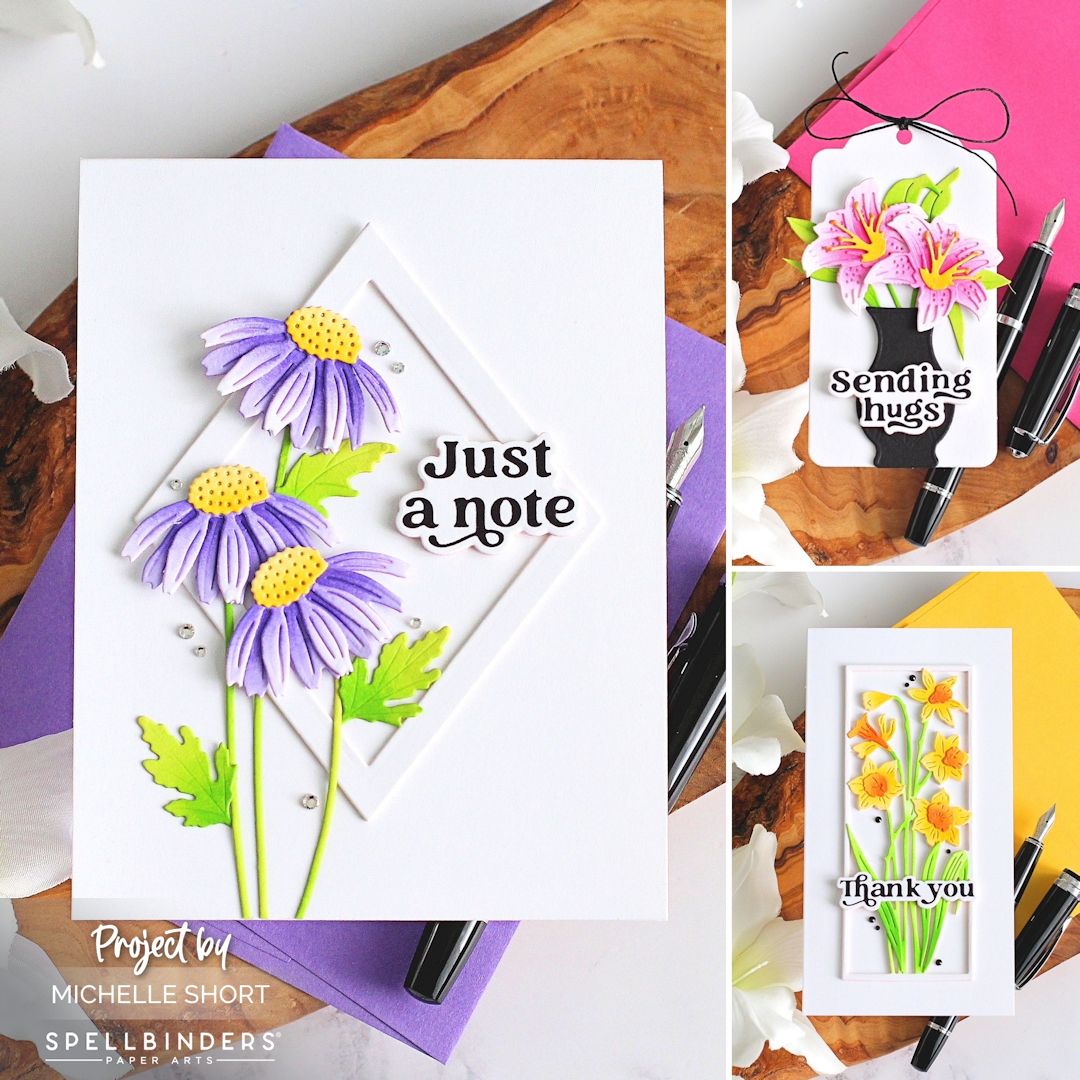
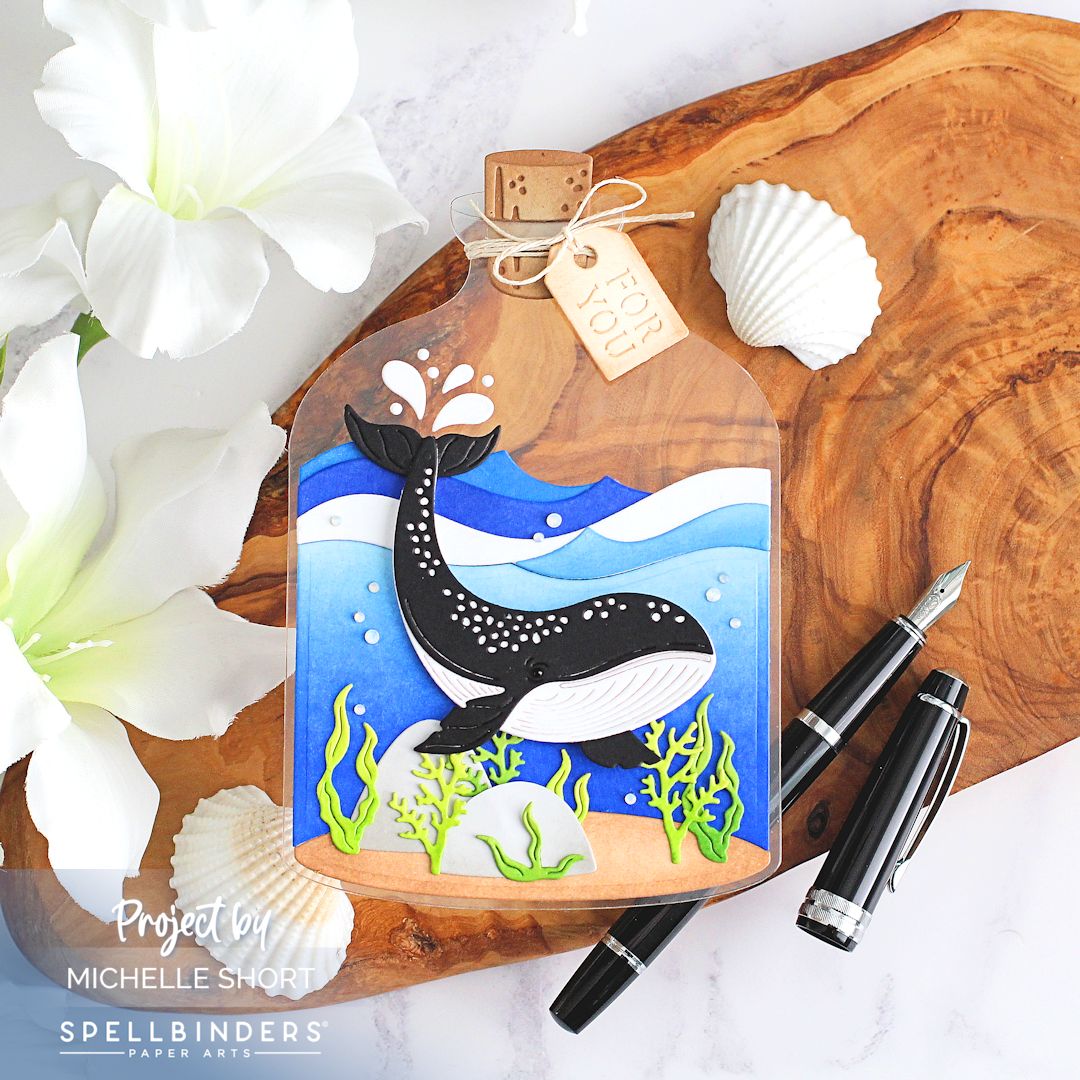
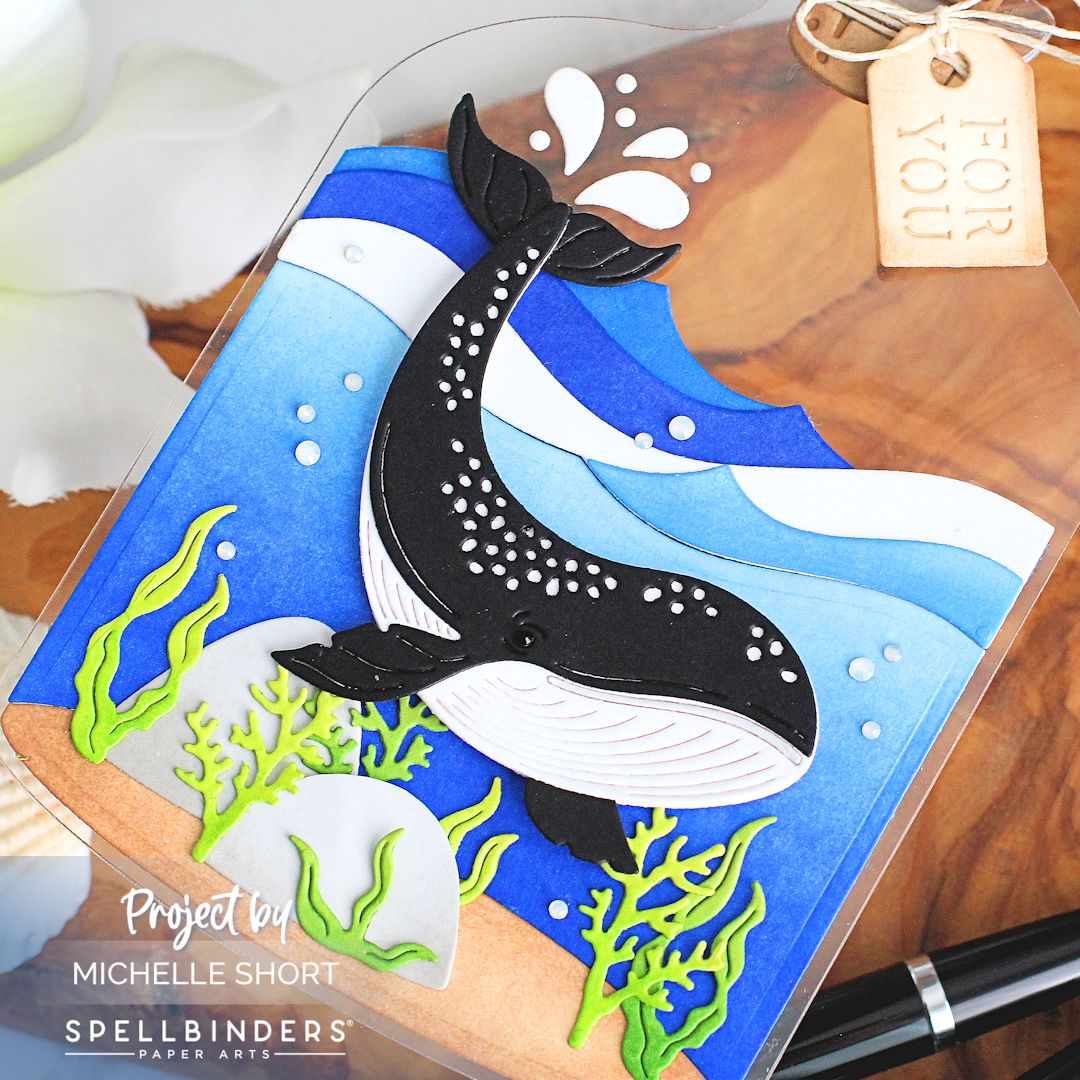
Hello there, I am delighted to be joining Alex Syberia Designs today for a fun blog hop to celebrate the release of their new Sunkissed Memories collection. There are lots of stamps, dies, foil plates and stencils in this release and I am using a few on my projects today. 

PLEASE NOTE: This post contains affiliate links. Please see below for my full disclosure.


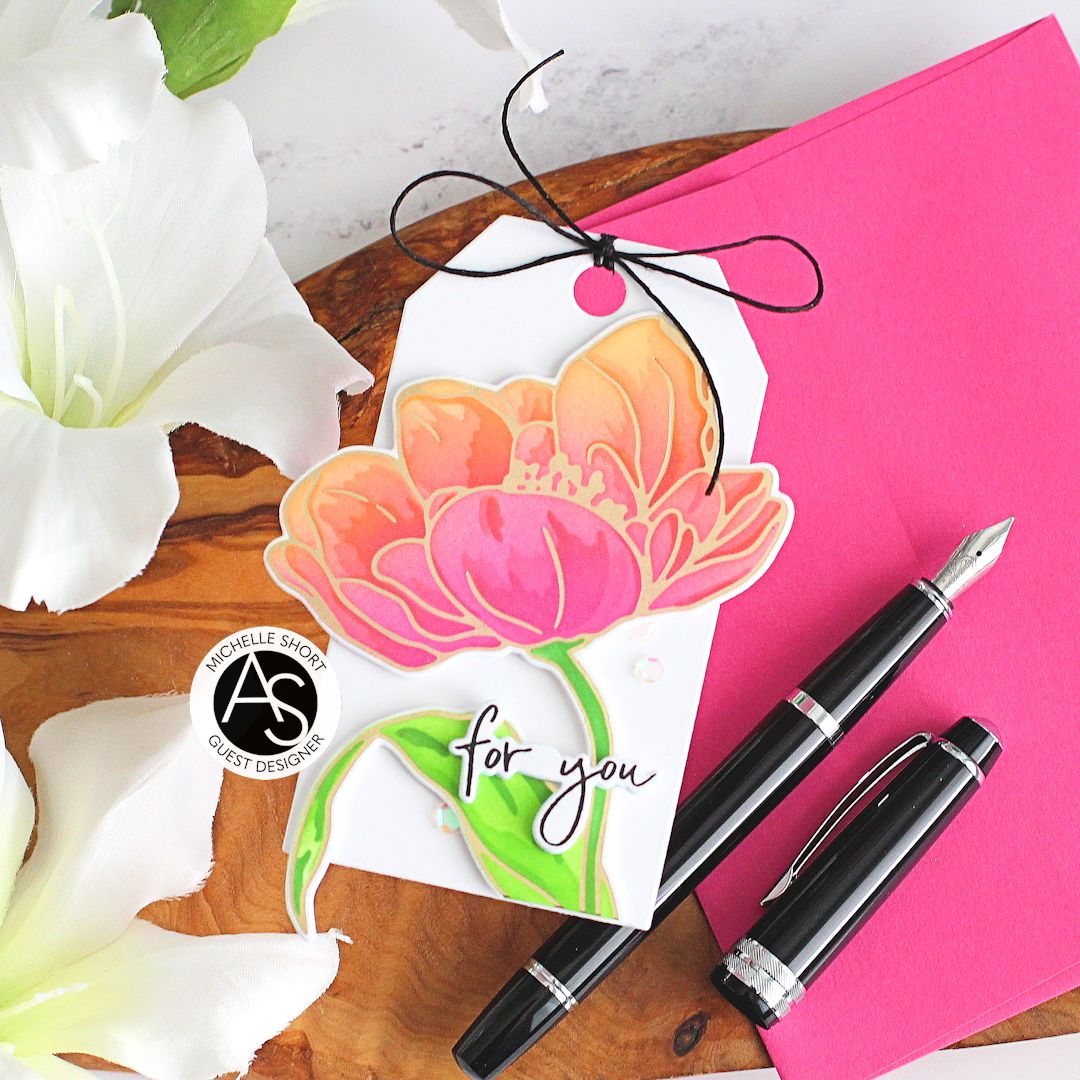
I am focussing on the the new Tulips Treasure set today. This set comes as a stamp set, die set, coordinating stencils and foil plate set. So you can mix and match with what suits you best. I am using all four between my two projects today. 


I started off my card by stamping the large tulip image from the Alex Syberia Designs Tulips Treasure Stamp Set on to white cardstock using Altenew Obsidian Pigment Ink. I then took the Alex Syberia Designs Tulip Treasure Stencil Set and one by one placed the stencils on to the image to add ink blending to colour it in. I used Altenew Green Valley Crisp Dye Inks for the leaves and stem and Altenew Cherry Blossom and Enchanted Evening Crisp Dye Inks for the petals.


It was die cut out using the Alex Syberia Designs Tulips Treasure Die Set and set aside. I took a panel of white cardstock and ran it through my die cutting machine with the new Alex Syberia Designs Tiny Dots Hot Foil Plate to dry emboss/deboss it. The panel was adhered to a US A2 sized white card base using thin foam tape. The flower was then adhered on top. 


I stamped the sentiment from the Alex Syberia Designs For Her Sentiments Set on to white cardstock using Altenew Obsidian Pigment Ink and die cut it out with the coordinating dies. The accompanying sentiment from Alex Syberia Designs Expressing Gratitude Stamp Set was stamped on to black cardstock using Versamark Ink. I applied white embossing powder and heat set. It was cut into a strip and adhered to the card. To finish off, I added a few Iridescent Bubbles


For the tag, I foiled the Alex Syberia Designs Tulips Treasure Hot Foil Plate on to white cardstock with Spellbinders Champagne Foil using the Spellbinders Glimmer Hot Foil System. I coloured the image using ink blending and the Alex Syberia Designs Tulip Treasure Stencil Set like the card, but this time used Altenew Cherry Blossom and Golden Sunset Crisp Dye Inks for the petals. 


I die cut a tag from the Alex Syberia Designs Signature Tags Die Set using white cardstock and then adhered the flower on top with thin foam tape. I stamped a sentiment from the Alex Syberia Designs Tulips Treasure Stamp Set on to white cardstock using Altenew Obsidian Pigment Ink and die cut it out with the coordinating dies. 


I stacked it up three die cuts high and adhered it to the tag with Bearly Art Glue. To finish off, I added twine through the top of the tag and tied in bow and to embellish, added a few Iridescent Sequins (sorry these are now discontinued sadly). 
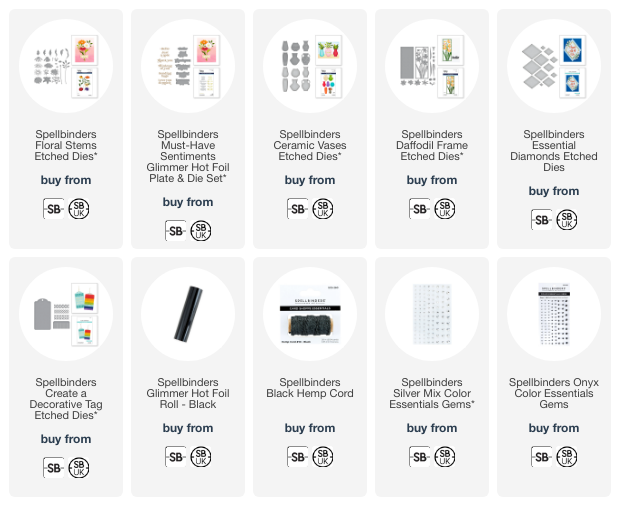
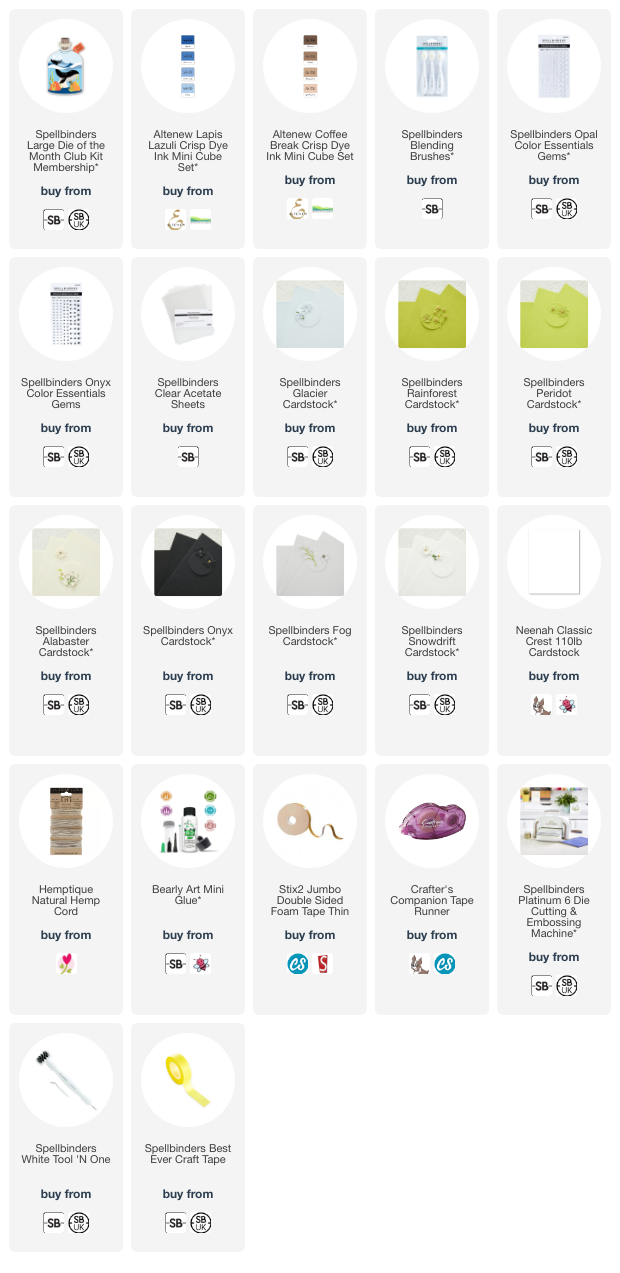
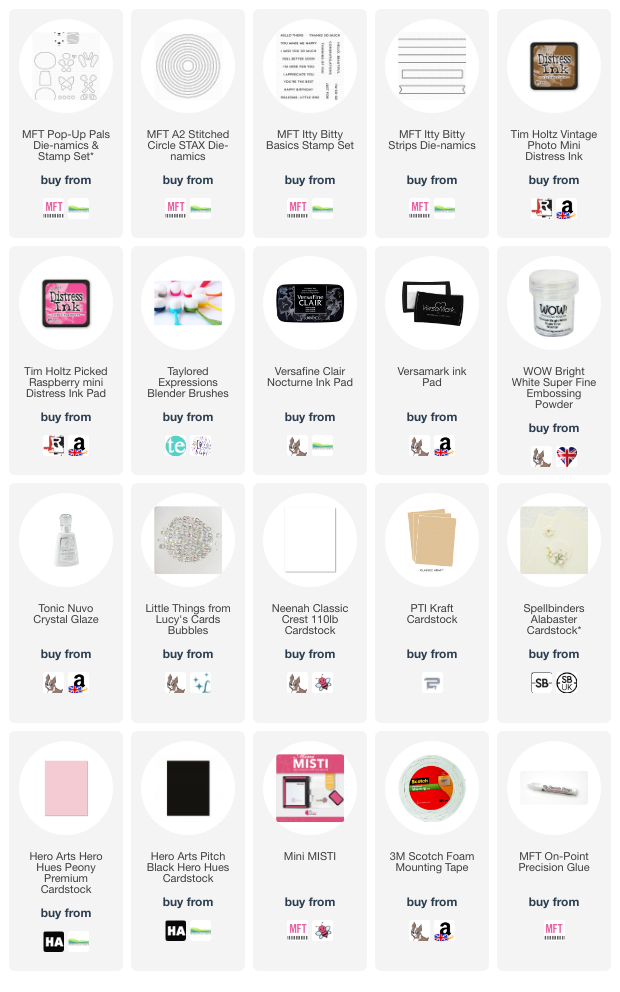
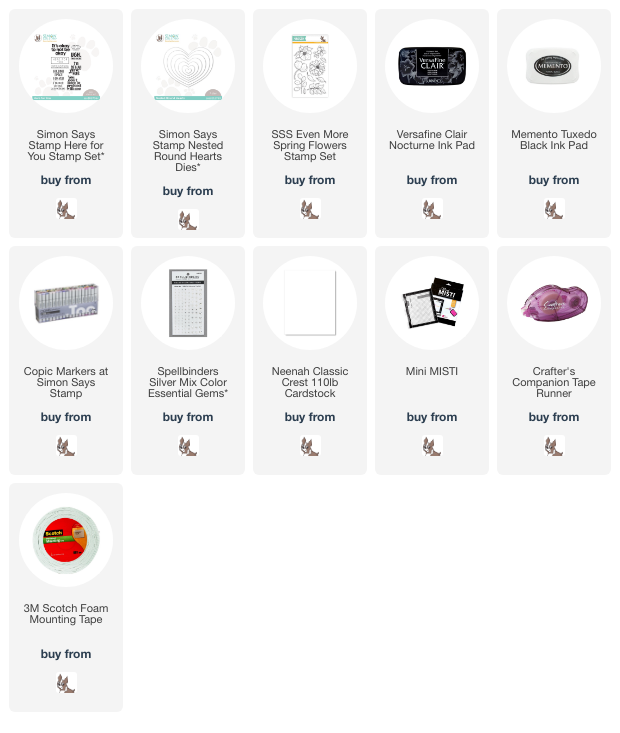
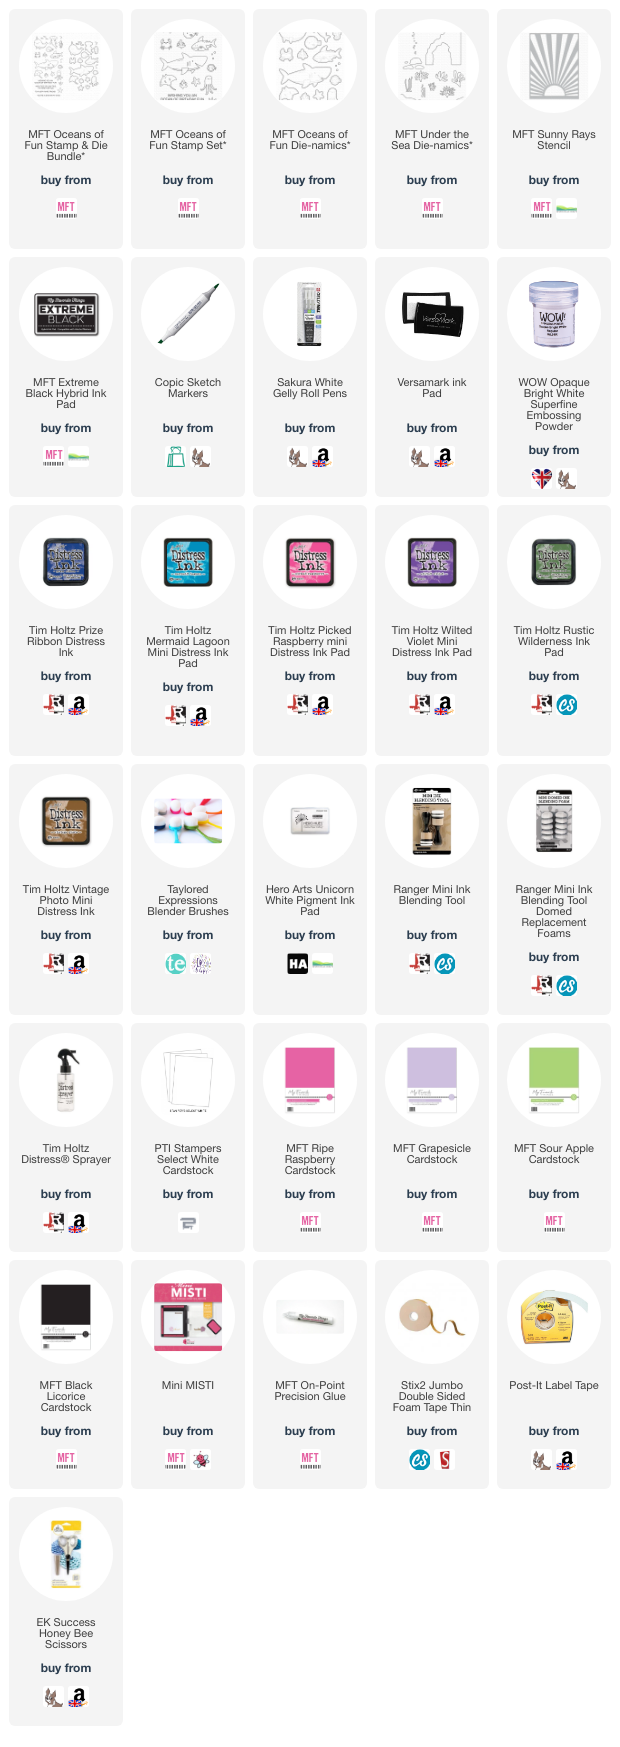
SUPPLIES:


Here are the links to what I have used on the projects. Affiliate links are used on some products. This means that if you make a purchase after clicking on my link, I receive a small commission with no extra cost to you. I truly appreciate your support when using these links. Please click on the logo below the product to shop at your favourite store. All products were personally purchased except those from Clearly Besotted, Hero Arts or those marked with an asterisk (*) which were kindly sent to me to use. You can read my full disclosure here.


BLOG HOP:


As mentioned, this post is part of  a fun, inspirational blog hop. For the hop, you should have arrived here from the fabulous Lien Leysen. Next on the hop is the wonderful Mindy Eggen. If you get lost along the way, please head over to Alex Syberia Designs for the full list of participants. 

GIVEAWAY:

Alex Syberia Designs is giving away two £15 gift cards to the ASD store and one full release bundle, valued at £400 ($495) in total. 

Alex Syberia Designs will pick the three winners from the comments left on each designer’s blog post in this hop before midnight BST on 18th June 2023. The winners will be announced on the ASD Release Blog Hop post on 19th June 2023.

I hope you will check out the release. It is  a really pretty one! I will have another project to share using the new release on Saturday over on Instagram. Thank you so much for stopping by today, I really do appreciate it. I hope you have a wonderful day! 

7 June 2023

Spellbinders | Photosynthesis Collection

Hello there, I hope you are well. I am over on the Spellbinders blog today sharing three projects using the Photosynthesis Collection from Simon Hurley. This is a fantastic collection full of dies and foil plates. I absolutely love the Must-Have Sentiments in particular!

PLEASE NOTE: This post contains affiliate links. Please see below for my full disclosure.


Project 1 (left) uses the Floral Stems Etched Dies which were die cut and then ink blended for some added dimension and interest. I die cut a frame using Essential Diamonds and then placed the cone flowers, stems and leaves on top. The Must-Have Sentiments set was foiled with Black Foil and die cut out. 

Project 2 (top right) uses the same supplies but this time, I cut the lilies from the Floral Stems set (there are lots of different flowers in it). I also popped them inside a Ceramic Vases die cut before adhering to the tag. The sentiment is from the same Must-Have Sentiments set. This set foils and die cuts all the sentiments at once, which is really handy! 

Project 3 (bottom right) uses the Daffodil Frame Etched Dies. This is such a pretty layering die set. Perfect for mini slimline cards (like I made) or A2 cards. I again popped another sentiment on top from the Must-Have Sentiments set and finished with Onyx Gems

SUPPLIES:


Here are the links to what I have used on the projects. Affiliate links are used on some products. This means that if you make a purchase after clicking on my link, I receive a small commission with no extra cost to you. I truly appreciate your support when using these links. Please click on the logo below the product to shop at your favourite store. All products were personally purchased except those from Clearly Besotted, Hero Arts or those marked with an asterisk (*) which were kindly sent to me to use. You can read my full disclosure here.


For more detailed instructions and photos of the projects, please head over to the Spellbinders Blog. Thank you so much for your visit today, it is very much appreciated. Have a wonderful day! 

6 June 2023

Spellbinders | Whale in a Bottle

Hello there, today I have a card to share with you using the Spellbinders June 2023 Large Die of the Month Club Kit. This month is a fun one - Whale in a Bottle! You can add the bottle to a card or make the bottle into a card itself, or of course, you don't even have to use the bottle at all and use the elements separately. So many possibilities! 

PLEASE NOTE: This post contains affiliate links. Please see below for my full disclosure.


I started off by die cutting the bottle piece itself from the Spellbinders June 2023 Large Die of the Month Club Kit from Spellbinders Acetate Sheet. I then cut the wave pieces from white and Spellbinders Glacier Cardstock. On the Glacier pieces, I added ink blending using Altenew Lapis Lazuli Crisp Dye Inks. I also die cut the sand/bottom piece from Spellbinders Alabaster Cardstock and added ink blending to it using Altenew Coffee Break Crisp Dye Inks


The pieces were adhered to the bottle using tape runner adhesive. I also die cut the pieces again from white cardstock and adhered them to the back of the bottle to hide the adhesive. I die cut the stones from Spellbinders Fog Cardstock and the seaweed from Spellbinders Rainforest and Peridot Cardstock. They were adhered flat to the card using Bearly Art Glue. 


I die cut the whale from Spellbinders Onyx and Snowdrift Cardstock. I cut the mouth piece from Fog. The pieces were assembled and adhered to the card using thin foam tape. I die cut the splash pieces from white cardstock and adhered them to the card with more Bearly Art Glue. I die cut the cork from Spellbinders Alabaster Cardstock and added ink blending using Altenew Coffee Break Crisp Dye Inks. It was assembled and adhered to the bottle using tape runner adhesive. 


I did add an extra piece between the cork pieces since my card is clear, you would be able to see that in real-life. Again I added extra to the back to hide the adhesive. The sentiment tag was die cut from Spellbinders Alabaster Cardstock, I added a little ink blending to it and then tied it to the bottle using twine. To finish off, I added Spellbinders Opal Color Essentials Gems to the water and a Spellbinders Onyx Color Essentials Gem to the the eye of the whale.

SUPPLIES:


Here are the links to what I have used on the project. Affiliate links are used on some products. This means that if you make a purchase after clicking on my link, I receive a small commission with no extra cost to you. I truly appreciate your support when using these links. Please click on the logo below the product to shop at your favourite store. All products were personally purchased except those from Clearly Besotted, Hero Arts or those marked with an asterisk (*) which were kindly sent to me to use. You can read my full disclosure here.


Whilst this isn't a card that actually opens, the back is clean, so that I could write a message on it. I thought it would it would be fun to make the bottle clear (with the acetate) but it would have been easier to just use cardstock! 

SPELLBINDERS CLUB KITS

I hope that you will check out the Spellbinders Club Kits. It is a wonderful monthly subscription where you receive the kit each month. Designers like myself share inspiration using the kit at the beginning of the month to show you lots of different ways that you can use it. 

There are also lots of other club kits too, like the Small Die of the Month, Clear Stamp & Die of the Month, Embossing Folder of the Month (plus lots more!), so there is something for everyone! If you do subscribe, you will get other benefits from Spellbinders too. Please see here for more information. You can also buy older kits here too. 

To buy the kit - if you are a current subscriber to the Large Die of the Month Club Kit (or any kit), you do not need to do anything. You will be charged as normal on the 5th of the month and your kit will be shipped to you. If you are a new subscriber, you can purchase the kit from the 6th - 27th of June 2023. Members can cancel their membership at any time.

Thank you so much for stopping by today, I really do appreciate it. I hope you have a great day! 

End of code