
Hello there, I hope you are well. Today I have a card to share using the Spellbinders October 2023 Large Die of the Month Club Kit. This month is called "Christmas Boutique" and It is one that you can use in a few different ways - make the boutique into a house, add it to a card or make the the boutique the card itself (like I have done today).
PLEASE
NOTE: This post contains affiliate links. Please see below for my full
disclosure.
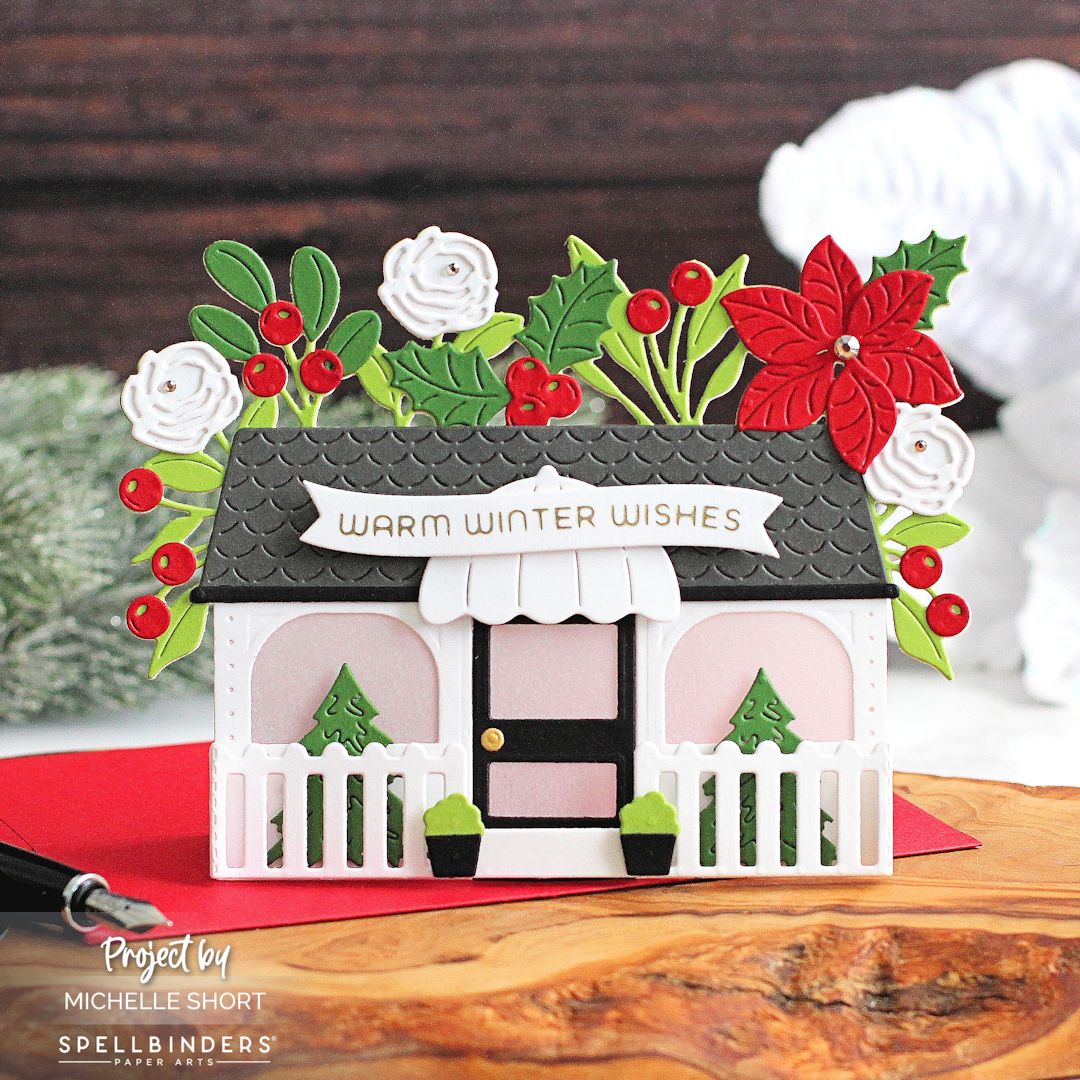
I started off my card by die cutting the base layer die from the Spellbinders October 2023 Large Die of the Month Club Kit three times - twice from white cardstock and once from Spellbinders Rainforest Cardstock. I then cut the door and windows from one of the white layers so that I could add vellum to the back for the glass part. I cut the top part off of the Rainforest background layer (across so that it is hidden behind the roof) and adhered it on top.

I cut the roof from Spellbinders Graphite Cardstock and the trim piece from Spellbinders Onyx Cardstock. I cut the door from Onyx too. They were adhered to the boutique with Bearly Art Glue. The awning piece was cut from white cardstock and adhered on top with thin foam tape. The leaves were cut from Spellbinders Fern Cardstock and the berries and poinsettia from Spellbinders Pomegranate Cardstock. The flowers were cut from white cardstock and the pieces adhered on top of the base layer using Bearly Art Glue.

I die cut the trees from Spellbinders Fern Cardstock and adhered them to the front of the boutique using more thin foam tape. The fence was then die cut from white and adhered by folding behind the front layer of the card (so that it is popped out from the front for a 3D look). I die cut the flower pots from Spellbinders Onyx Cardstock and what should be the centre of the poinsettia from Spellbinders Rainforest Cardstock. I used them to make little topiary to add to the front of the boutique.

The door handle, cut from Spellbinders Brushed Gold Cardstock, was adhered to the door. I then took a sentiment from the Spellbinders Comfort & Joy Glimmer Hot Foil Plate & Die Set that I had previously foiled using Spellbinders Champagne Foil and die cut out. It was adhered to the roof using thin foam tape. To finish off, I added a few Spellbinders Gold Mix Color Essentials Gems.
The second base layer that I cut from white cardstock was scored (to create a hinge) and adhered to the back of the front panel. This created the card base. I did also add a layer to the back of the front panel to hide the vellum panel.
SPELLBINDERS CLUB KITS
I hope that you will check out the Spellbinders Club Kits. It is a wonderful monthly subscription where you receive the kit each month. Designers like myself share inspiration using the kit at the beginning of the month to show you lots of different ways that you can use it.
There are also lots of other club kits too, like the Small Die of the Month, Clear Stamp & Die of the Month, Embossing Folder of the Month (plus lots more!), so there is something for everyone! If you do subscribe, you will get other benefits from Spellbinders too. Please see here for more information. You can also buy older kits here too.
To buy the kit - if you are a current subscriber to the Large Die of the Month Club Kit (or any kit), you do not need to do anything. You will be charged as normal on the 5th of the month and your kit will be shipped to you. If you are a new subscriber, you can purchase the kit from the 6th - 27th of October 2023. Members can cancel their membership at any time.
SUPPLIES:
Here are the links to what I have used on the project. Affiliate links are used on some products. This means that if you make a purchase after clicking on my link, I receive a small commission with no extra cost to you. I truly appreciate your support when using these links. Please click on the logo below the product to shop at your favourite store. All products were personally purchased except those from Clearly Besotted, Hero Arts or those marked with an asterisk (*) which were kindly sent to me to use. You can read my full disclosure here.

This was so much fun to put together! There are so many different colour combinations that can be used and you can use some elements and not others, there is even ornaments in the set if you want to decorate the trees! Thank you so much for stopping by today, I really do appreciate it. Wishing you a wonderful week ahead!
My goodness this must have taken ages to make! But so worth the effort, it's absolutely gorgeous with so many beautiful details in it. What a fun design with the flowers peeking up from behind the roof!
ReplyDeleteamazing work
ReplyDelete