15 April 2022

Spellbinders | Decorate a Tag

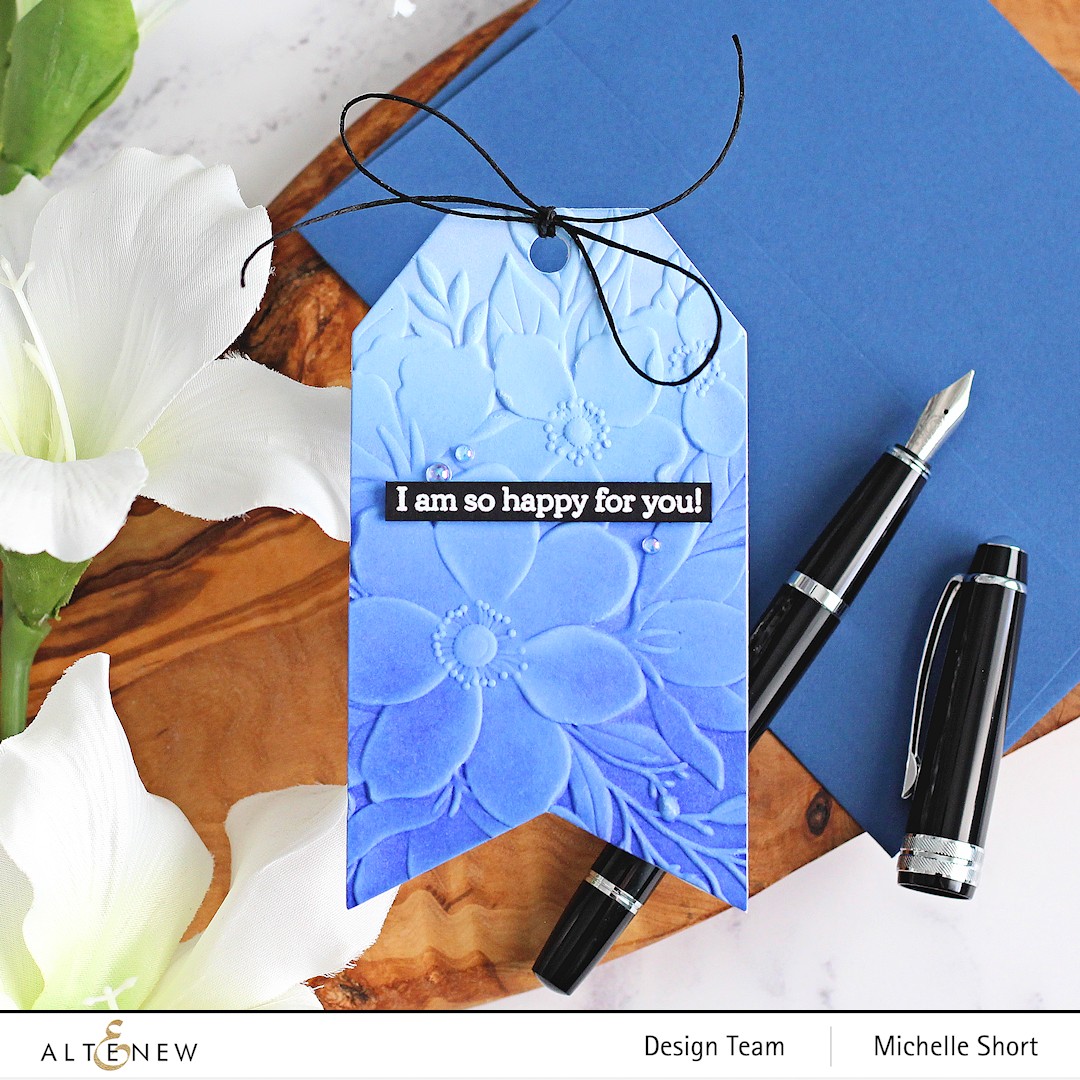
Hello there, today I have two tags to share with you using products from the new Spellbinders Inspired Basics Collection. The Create a Decorative Tag die comes with a base layer of a tag plus lots of other dies that you can use to embellish and decorate it. For today's tags, I thought I would use the Create a Flutter & Flower Bow dies instead. Look at the dimension on those bows!

PLEASE NOTE: This post contains affiliate links. Please see below for my full disclosure.


I started off by die cutting four tags - two for the front and two for the back from the Spellbinders Create a Decorative Tag Etched Dies Set. On two of the tags, I stamped a sentiment from the Spellbinders Let's Celebrate Sentiments Clear Stamp Set using Spellbinders Clear Embossing & Watermark Ink. I applied Spellbinders Silver Embossing Powder and heat set. 


I then took the Spellbinders Create a Flutter & Flower Bow Etched Dies. I cut the bows themselves from Spellbinders Cardstock. For the butterfly one, I die cut the bow from Waterfall Cardstock. For the flower, I die cut the bow from Pink Sand Cardstock


The bows themselves have two pieces - the bow part that folds over and secures in the middle with adhesive, and the tail part which adheres to the back of the bow. I then die cut the butterfly and flower using the new Spellbinders Pop-Up Die Cutting Glitter Foam Sheets. 


These are so cool as they die cut beautifully, have beautiful sparkle on them that does not shed and they are pretty flexible too. They actually would have been great for the bow part! The butterfly was cut from the teal in the Shimmering Tropics set and the flower from the darker pink in the Peony Pinks set.


I adhered the bows to the tags with double-sided tape and then adhered the butterfly and flower inside the bows with more tape. I added two Spellbinders Silver Mix Color Essential Gems to the centre of the butterfly and for the flower, I die cut the centre from Spellbinders Beeswax Cardstock and then added a yellow enamel dot to the center. To finish off, I added Spellbinders Black Twine through the top and tied in a bow. 

SUPPLIES:


Here are the links to what I have used on the projects. Affiliate links are used on some products. This means that if you make a purchase after clicking on my link, I receive a small commission with no extra cost to you. I truly appreciate your support when using these links. Please click on the logo below the product to shop at your favourite store. All products were personally purchased except those from Clearly Besotted, Hero Arts or those marked with an asterisk (*) which were kindly sent to me to use. You can read my full disclosure here.


These bows would look great on cards too but I thought these tags would look great tied on to presents/gifts. Thanks so much for stopping by today, I really do appreciate it. I hope you have a wonderful day! 

14 April 2022

Altenew | Gardens Around the World Collection Release Blog Hop + Giveaway

Hello there, today sees the release of the new Altenew Gardens Around the World Collection. What a beautiful collection! Lots of florals to choose from but the Castel Garden set called my name! This post is part of a fun, inspiration filled blog hop with prizes. Please see below for more details. 

PLEASE NOTE: This post contains affiliate links. Please see below for my full disclosure.


I started off my card by stamping the large floral image form the Altenew Castle Garden Stamp Set on to watercolor paper using Altenew Embossing Ink. I applied Pure White Crisp Embossing Powder and heat set. I then watercoloured the image using Altenew Artists' Watercolor 24 Pan Set


I very much took inspiration for my colour palette from the packaging, using Cherry Blossom, Shades of Purple, Fiery Sunset and Summer Afternoon for the flowers and Green Meadows and Summer Afternoon for the leaves. The image was then die cut out using the Altenew Castle Garden Die Set


It was adhered to an A2 white card base with Altenew Instant Dimension Foam Tape and the excess cut off with scissors. I took the sentiment from the set and heat embossed it on to black cardstock. I cut it in to a strip and adhered it to the card. To finish off, I added Altenew Essential Black & White Enamel Dots

SUPPLIES:


Here are the links to what I have used on the project. Affiliate links are used on some products. This means that if you make a purchase after clicking on my link, I receive a small commission with no extra cost to you. I truly appreciate your support when using these links. Please click on the logo below the product to shop at your favourite store. All products were personally purchased except those from Clearly Besotted, Hero Arts or those marked with an asterisk (*) which were kindly sent to me to use. You can read my full disclosure here.


BLOG HOP:


As mentioned, this post is part of a fun, inspiration filled blog hop with prizes. For the hop, you should have arrived here from the wonderful Teresa Litchfield. Next on the hop is the fabulous Preeti Chandran. If you get lost along the way, or want to start the hop from the beginning, please head over to the Altenew Blog

FREE GIFTS:

There are lots of ways to grab a freebie this month:

GIVEAWAY:

$300 in total prizes! To celebrate this release, Altenew is giving away a $50 gift certificate to 2 lucky winners and a $25 gift certificate to 8 winners! Please leave a comment on the Altenew Card Blog and/or each designer’s blog post on the blog hop list below by 290th April 2022 for a chance to win. Altenew will draw 10 random winners from the comments left on each stop of this blog hop and announce the winners on the Altenew Winners Page on 22nd April 2022.

Thanks so much for stopping by today, I really do appreciate it. I hope you are well and have a wonderful rest of the day! 

12 April 2022

Altenew | Craft Your Life Project Kit: Fragrant Florals Release Blog Hop + Giveaway

Hello there, today sees the release of this month's Craft Your Life Project Kit from Altenew. This month is called Fragrant Florals and is so pretty! The kit, as always, contains a stamp set, coordinating dies, stencils and an embossing folder. More on the kit below. This post is part of a fun, inspiration filled blog hop with prizes. Please see below for more details. 

PLEASE NOTE: This post contains affiliate links. Please see below for my full disclosure.


I have created a card and tag for my projects today, using all of the products in the kit. I started off the card by stamping the large image from the Altenew Craft Your Life Project Kit: Fragrant Florals stamp set on to white cardstock with Altenew Obsidian Pigment Ink


I then placed the stencils from the kit on top, one by one. Using Altenew Small Ink Blending Brushes, I blended on Altenew Glacier Caves Crisp Dye Ink for the flower petals, Altenew Fall Harvest Crisp Dye Inks for the centres and Altenew Green Fields Crisp Dye Inks for the leaves. 


The image was die cut out using the coordinating die in the kit and then adhered to an A2 white card base with Altenew Instant Dimension Foam Tape. I took the sentiment from the stamp set and stamped it on to black cardstock with Altenew Embossing Ink. I applied Altenew Pure White Crisp Embossing Powder and heat set. It was cut in to a strip and added to the card with thin foam tape. To finish off, I added a few Bubble embellishments. 


For the tag, I started off by die cutting an Altenew Terrific Tag from white cardstock. I then blended on more Glacier Caves ink. I placed it inside of the embossing folder and ran it through my die cutting machine. Using a flat ink blending tool, I then applied white pigment ink to the raised areas. 


I added another clean white tag to the back and then tied twine through the top of the tag and tied in a bow. The sentiment was heat embossed, cut out and added to the tag with foam tape. To finish off, I added a few more Bubble embellishments. 

SUPPLIES:


Here are the links to what I have used on the project. Affiliate links are used on some products. This means that if you make a purchase after clicking on my link, I receive a small commission with no extra cost to you. I truly appreciate your support when using these links. Please click on the logo below the product to shop at your favourite store. All products were personally purchased except those from Clearly Besotted, Hero Arts or those marked with an asterisk (*) which were kindly sent to me to use. You can read my full disclosure here.


CRAFT YOUR LIFE KIT: FRAGRANT FLORALS


Send hugs and snuggles to your loved ones with this beautiful arrangement of anemones. The large stamp size makes it quite versatile, as you will be able to stamp it off of your card base at different angles and proportions to get different looks. It is a lovely image to color or use stamped as is. We have also incorporated some heartfelt sentiments in bold fonts to contrast the delicate nature of the flowers.


Enjoy our Craft Your Life Project Kit, an exciting monthly package that is sure to get the creative juices flowing! Featuring a 6x8 stamp set, coordinating die set, as well as a stencil set and an embossing folder to fit the theme, this project kit has almost everything you need to start crafting. Just add ink and cardstock, and you'll be good to go!

BLOG HOP:


As mentioned, this post is part of  a fun, inspiration filled blog hop with prizes. For the hop, you should have arrived here from the amazing Jennifer McGuire. Next on the hop is the wonderful Cheryl Espie. If you get lost along the way, or want to start the hop from the beginning, please head over to the Altenew Blog

GIVEAWAY:


$300 in total prizes! To celebrate this release, Altenew is giving away a $50 gift certificate to 2 lucky winners and a $25 gift certificate to 8 winners! Please leave a comment on the Altenew Card Blog and/or each designer’s blog post on the blog hop list below by 18th April 2022 for a chance to win. Altenew will draw 10 random winners from the comments left on each stop of this blog hop and announce the winners on the Altenew Winners Page on 20th April 2022.

The kit can be purchased separately, or as part of the Craft Your Life Project Kit Subscription. Thanks so much for stopping by today, I really do appreciate it. Wishing you a wonderful day! 

8 April 2022

Spellbinders | For You Gift Bag

Hello there, today I have a gift bag to share with you made using new Spellbinders goodies from the Celebrate You Collection. As soon as I saw the gift bag, I thought it would be perfect for gift cards, little gifts, a little sweet treat bag - lots of different uses and occasions. 

PLEASE NOTE: This post contains affiliate links. Please see below for my full disclosure.


I started off by die cutting the Spellbinders Gift Bag Etched Dies from 80lb white cardstock. I almost always use heavyweight cardstock, but for this, 80lb was great! You need to cut two of the main die and two of the handles. I then ran the bag pieces through the Platinum 6 with the Diamond Plaid Embossing Folder and then adhered it together using double-sided tape. I used this wonderful tutorial from Bonnie Crane to help with the assembly. 


I then took the Spellbinders Be Bold Blooms Etched Dies and die cut the elements from Spellbinders Cardstock. I used Pink Sand and Wild Berry for the flowers themselves, with Beeswax and Saffron for the centres. The leaves were cut from Peridot and Rainforest. They were assembled together using Bearly Art Glue and then adhered to the bag with the same glue and in some areas, thin foam tape. 


I took the sentiment from the Spellbinders Let's Celebrate Sentiments Clear Stamp Set and stamped it on to Wild Berry Cardstock with Spellbinders Clear Embossing & Watermark Ink Pad. I applied Spellbinders White Embossing Powder and heat set. It was cut in to a circle and added to the centre of the largest flower. To finish off, I added a few Hero Arts Enamel Dots. 

SUPPLIES:


Here are the links to what I have used on the project. Affiliate links are used on some products. This means that if you make a purchase after clicking on my link, I receive a small commission with no extra cost to you. I truly appreciate your support when using these links. Please click on the logo below the product to shop at your favourite store. All products were personally purchased except those from Clearly Besotted, Hero Arts or those marked with an asterisk (*) which were kindly sent to me to use. You can read my full disclosure here.


I think this bag would be perfect to decorate for so many occasions - Easter, Christmas, Birthday's, just because - I love it! Thank you so much for stopping by today, I really do appreciate it. I hope you have a wonderful day! 

7 April 2022

Altenew | Craft-A-Flower African Daisy Release Blog Hop + Giveaway

Hello there, today sees the release of this month's Craft-A-Flower Layering Die Set from Altenew. This month is the African Daisy and it is so pretty! I did a bit of research on these flowers and it looks like they come in lots of different colours, so I opted for purple for today. This blog post is part of a fun, inspiration filled blog hop with prizes. Please see below for more details. 

PLEASE NOTE: This post contains affiliate links. Please see below for my full disclosure.


I started off by die cutting the Altenew Craft-A-Flower African Daisy Layering Die Set from Altenew New Purple Gradient Cardstock and Summer Afternoon Gradient Cardstock (for the flower centres). The leaves and stem were cut from Altenew Green Meadows Gradient Cardstock. I did add some ink blending on these with Hunter Green Ink (Green Meadows Crisp Dye Inks).


The flower heads were assembled together using Altenew 2 in 1 Precision Glue Pen. I took a 4" x 5.5" white card base and added Altenew Caribbean Sky Ink (Glacier Caves Crisp Dye Inks) in the bottom right hand corner using an Altenew Large Ink Blending Tool. The leaves and stem were then adhered on top. 


The flower heads were adhered with Altenew Instant Dimension Foam Tape. I took the sentiment, from the Altenew Sentiment Strips 2 Stamp Set, and stamped it on to black cardstock with Altenew Embossing Ink. I applied Altenew Pure White Crisp Embossing Powder and heat set. It was cut in to a strip and added to the card with more foam tape. To finish off, I added a few Bubbles embellishments. 

SUPPLIES:


Here are the links to what I have used on the project. Affiliate links are used on some products. This means that if you make a purchase after clicking on my link, I receive a small commission with no extra cost to you. I truly appreciate your support when using these links. Please click on the logo below the product to shop at your favourite store. All products were personally purchased except those from Clearly Besotted, Hero Arts or those marked with an asterisk (*) which were kindly sent to me to use. You can read my full disclosure here.


BLOG HOP:


As mentioned, this post is part of  a fun blog hop. For the hop, you should have arrived here from the fabulous Bridget Casey. Next on the hop is the wonderful Rosie Neustaedter. If you get lost along the hop, or want to start from the beginning, please head over to the Altenew Blog

GIVEAWAY:


$200 in total prizes! To celebrate this release, Altenew is giving away a $50 gift certificate to 2 lucky winners and a $20 gift certificate to 5 winners! Please leave a comment on the Altenew Card Blog and/or each designer’s blog post on the blog hop list below by 13th April 2022 for a chance to win. Altenew will draw 7 random winners from the comments left on each stop of this blog hop and announce the winners on the AltenewWinners Page on 15th April 2022. 


The Craft-A-Flower African Daisy Layering Die Set can be purchased on it's own, or as part of the Craft-A-Flower Subscription Plan. Thank you so much for stopping by today, I hope you have a wonderful day! 

6 April 2022

Altenew | 8th Anniversary Blog Hop Day 3 + Giveaway

Hello there, I am delighted to be joining Altenew today for their 8th Anniversary Blog Hop. This is day three and there is still lots of more celebrating to happen! There is lots of inspiration to be had, as well as prizes! Please see below for more information on the hop. 

PLEASE NOTE: This post contains affiliate links. Please see below for my full disclosure.


For my card today, I wanted to use one of my favourite sets released over the last year - Craft-A-Flower Peruvian Lily Layering Die Set. It is just so pretty! I started off by die cutting the flower pieces from Altenew Gradient Cardstock in Cherry Blossom and Summer Afternoon. The stamens were cut from Altenew Gilded Glitter Cardstock. They were layered up and adhered with Altenew 2 in 1 Precision Glue Pen


The leaves were cut using Altenew Green Meadows Gradient Cardstock. The stem was cut from the Altenew Craft-A-Flower Cosmos Layering Die Set. I took a 4" x 5.5" white card base and splattered on Altenew Jet Black Ink Spray. It was set aside to dry and once dry, I adhered the lily on top using Altenew Glue Tape


I took the sentiment from the Altenew Sentiment Strips 2 Stamp Set and stamped it on to black cardstock with Altenew Embossing Ink. I applied Altenew Pure White Crisp Embossing Powder and heat set. It was cut in to a strip and added to the card with Altenew Instant Dimensional Foam Tape. To finish off, I added a few Altenew Essential Black & White Enamel Dots

SUPPLIES:


Here are the links to what I have used on the project. Affiliate links are used on some products. This means that if you make a purchase after clicking on my link, I receive a small commission with no extra cost to you. I truly appreciate your support when using these links. Please click on the logo below the product to shop at your favourite store. All products were personally purchased except those from Clearly Besotted, Hero Arts or those marked with an asterisk (*) which were kindly sent to me to use. You can read my full disclosure here.


CELEBRATING ALTENEW

We (the Design Team) were asked by Altenew what our favourite projects we have made are from the last year. Here is a look at mine:


We were also asked if we wanted to say anything about Altenew and being on the Design Team. Here is what I said -

"Joining the Altenew Card Design Team, as well as the Video Design Team has been a dream come true and such a huge honour. I have followed Altenew since the beginning. I fell in love with the floral stamps but have since fallen in love with the dies, embellishments, paper, coloring mediums, and tools! I have only been on the team for seven months now, but I love working as part of such an amazing team! Happy anniversary, Altenew!"

SPECIAL OFFER:


Enjoy FREE U.S. shipping with code HAPPY8TH or $8 OFF international shipping with code ANNIV22 at checkout. Offer valid from 4th April 2022 at 12:01 am EDT through 6th April 2022 at 11:59 pm EDT. Not valid on prior purchases. Cannot be combined with other promo codes. 

BLOG HOP:


As mentioned, this post is part of a fun, inspiration filled blog hop with prizes. For the hop, you should have arrived here from the amazing Emily Midgett. Next on the hop are the wonderful people at Butterfly Reflections Ink. If you get lost along to the way, or want to start the hop from the beginning, please head over to the Altenew Blog.

GIVEAWAY:


Over $2,000 in total prizes! Altenew is giving away a $80 Gift Certificate to 5 lucky winners and one Altenew Academy Online Class ($8.95 value) to 15 lucky winners. There are also 26 awesome companies/crafty friends who are celebrating with us, and they are offering the following prizes:


Altenew: 5 x $80 Altenew Gift Certificate
Altenew Academy: 15 x Online Monthly Class Spot
Jennifer McGuire Ink: Share Handmade Kindness Goodie Bag 
A Cherry on Top: $50 Gift Certificate
Auzz Trinklets N Krafts: $50 Gift Certificate 
Avery Elle: $50 Gift Certificate
Bumbleberry Papercrafts:  £25 Gift Certificate
Butterfly Reflections Ink: $25 Gift Certificate
CiLi in Papers: €75 Gift Certificate
Concord & 9th: 1 $50 Gift Certificate & 1 Eclectic Garden Bundle ($38 Value)
Craft Stash: $100 Gift Certificate
Dare 2B Artzy: $30 Gift Certificate
Ellen Hutson LLC: $25 Gift Certificate
Gina K. Designs: $50 Gift Certificate
Hero Arts: $50 Gift Certificate
Lawn Fawn: $25 Gift Certificate
MarkerPop: 4 x $40 Gift Certificate
Michelle's Cards & Stamps: AUD$100 Gift Certificate
My Little Attic: $50 Gift Certificate 
My Sweet Petunia: $50 Gift Certificate
Online Card Classes: 3 Online Class Spots to 1 Winner
Pink and Main: $50 Gift Certificate
Pinkfresh Studio: $50 Gift Certificate
Scrapbook & Cards Today: $50 Gift Certificate
Scrapbook.com: $50 certificate
Simon Says Stamp: $50 Gift Certificate
Studio Katia: $50 Gift Certificate
Waffle Flower: $25 Gift Certificate

Be sure to leave comments by 15th April 2022 for a chance to win one of 50 prizes! To make the hop more exciting, start your comment with "Hi from (city or country where you're from)!" 50 winners will be chosen at random from the comments left on any of the blogs listed below and will be announced on the Altenew Card Blog on 21st April 2022.

Thank you so much for stopping by today, I really do appreciate it. I hope you have a great time on the rest of the hop and a wonderful day! 

5 April 2022

Spellbinders | Spring Into Stitching

Hello there, today I have a card to share with you using the Spellbinders Stitching Flower Etched Dies from the Spring Into Stitching Collection. If you like stitching, this is definitely a collection you need to check out! All of the sets are beautiful but I fell in love with these flowers straight away and knew I wanted to use them. 

PLEASE NOTE: This post contains affiliate links. Please see below for my full disclosure.


I started off by die cutting the Spellbinders Stitched Flower Etched Dies from Spellbinders Raindrop Cardstock. I cut two layers for the flowers so that I could adhere them together to make them more substantial for sewing. I also cut the base layer (with no stitching holes) from Spellbinders Cosmic Sky Cardstock, so that I could add this layer to the back of the flowers and some of the colour will peep through. 


The leaves were cut from Spellbinders Peridot Cardstock. I just did one layer for these and they held up well. I then took some older WRMK Sew Easy Needles (I like these because they are blunt at the end and I don't stab myself multiple times while stitching!) and DMC Embroidery Floss (three threads thick) and sewed the flowers and leaves. There are guide lines on the die cuts to follow but you can do your own thing too. 


I took a 5.25" x 4" white card base and adhered the leaves on top first, using Bearly Art Glue. I then added the flowers on top, adding a small amount of foam tape to some areas and Bearly Art Glue to others. I took the sentiment from the Spellbinders Yana's Sentiments Glimmer Hot Foil Plate & Die Set and foiled it on to white cardstock with Spellbinders Black Glimmer Foil Roll. It was die cut using the die and then adhered to the card with foam tape. To finish off, I added Little Things from Lucy's Cards Blue Skies and Glossy Eggshell Pearls. 

SUPPLIES:


Here are the links to what I have used on the project. Affiliate links are used on some products. This means that if you make a purchase after clicking on my link, I receive a small commission with no extra cost to you. I truly appreciate your support when using these links. Please click on the logo below the product to shop at your favourite store. All products were personally purchased except those from Clearly Besotted, Hero Arts or those marked with an asterisk (*) which were kindly sent to me to use. You can read my full disclosure here.


Even though this card did take me quite some time to make (the stitching took at least an hour and a half!), I really like how it turned out. It is fairly dimensional though, with the stitching, so it would probably need to go in a bubble mailer or be hand delivered. Thank you so much for stopping by today, I really do appreciate it. Wishing you a wonderful day!

4 April 2022

Hero Arts | My Monthly Hero April 2022 Release Blog Hop + Giveaway

Hello there and welcome as we celebrate the Hero Arts My Monthly Hero April 2022 Release. The theme this month is spring and celebrating the amazing people in our lives. I love the addition of the bees too! I have already shared one project using the main kit, which you can see here. Today I have another project using the main kit, as well as a project using one of the wonderful add-on products. This post is part of a fun, inspiration filled blog hop with prizes. Please see below for more details. 

PLEASE NOTE: This post contains affiliate links. Please see below for my full disclosure.


My first card uses the main Hero Arts April 2022 My Monthly Hero Kit. I started off by stamping the 6" x 6" Cling Stamp in the kit on to white cardstock using Hero Arts Intens-ified Black Ink. I then kept the stamp in my MISTI and re-stamped it using Hero Arts Clear Embossing & Watermark Ink. I applied Hero Arts Clear Embossing Powder and heat set. 


I took the stencils in the kit and one by one placed them over the top, securing in place with memo tape. Using Ink Blending Brushes, I blended on Hero Arts Thistle and Purple Galaxy Reactive Inks for the flowers and Hero Arts Key Lime Fizz and Green Apple Reactive Inks for the leaves. There isn't a layer for the bees, so I simply coloured them with Copic Markers (Y17, Y15, Y13, B00). 


The panel was cut down and added to an A2 white card base with foam tape. I took the sentiment from the Clear Stamp Set in the kit and stamped it on to Hero Hues Pitch Black Cardstock with more Hero Arts Clear Embossing & Watermark Ink. I applied Hero Arts White Embossing Powder and heat set. It was cut in to a strip and added to the card with more foam tape. 


Next up is a card using the Hero Arts Lookin Glass Swan Family Dies. I cut all three layers from white cardstock, twice. I then added ink blending to the water using Hero Arts Splash and Blue Hawaii Reactive Inks. I used Hero Arts Green Apple Reactive Ink and Hero Arts Cup O 'Joe Mid-Tone Shadow Ink for the bulrushes. 


For the swans, I coloured them lightly with Copic Markers (C3, C1, YR16). Each layer was adhered two high with Hero Arts Precision Glue and then adhered one on top of another. I took an A2 white card base and added ink blending for the sky, I used Hero Arts Pool Party Reactive Ink for this. The swans were then added on top.


I die cut the Hero Arts Looking Glass Fine Art Frame Die from more white card stock and adhered it over the swans, with foam tape. The sentiment, from the Hero Arts Mother and Father Animals Stamp Set, was stamped below using Hero Arts Intens-ified Black Ink. To finish off, I added Hero Arts Iridescent EarthSafe Glitter to the bulrushes. 

SUPPLIES:


Here are the links to what I have used on the project. Affiliate links are used on some products. This means that if you make a purchase after clicking on my link, I receive a small commission with no extra cost to you. I truly appreciate your support when using these links. Please click on the logo below the product to shop at your favourite store. All products were personally purchased except those from Clearly Besotted, Hero Arts or those marked with an asterisk (*) which were kindly sent to me to use. You can read my full disclosure here.


MY MONTHLY HERO KIT:


Our fun and floral April kit is a celebration of spring as well as the amazing people in all of our lives. It features a gorgeous cling background with bees and flowers. Three layering stencils make the coloring process easy; simply pair them with the inks and blending brush included in the kit, and you'll quickly have cards in fresh spring colors. Combine the "amazing" word die with the mix and match messages in the stamp set for expressing thanks, celebrating birthdays, sending Mother's Day greetings and more. We've also included dies for highlighting select images from the background, and the kit is rounded out with enamel embellishments which complement the ink colors perfectly.


KIT CONTENTS:

6" x 6" Cling Stamp
3" x 4" Clear Stamp Set
3 6" x 6" Color Layering Stencils
3 Frame Cuts
Word Fancy Die & Frame
3 Ink Cubes (Rose Madder, Green Apple , Cotton Candy)
Ink Blending Brush (size may vary)
Spring Enamel Dots

The Hero Arts April 2022 My Monthly Hero Kit is valued at $75 but you can get it for $34.99 (approximately £28 depending on exchange rate, not including VAT/customs charges). The kits are exclusive to the Hero Arts store and often sell out quickly, so you can subscribe here, so that you never miss a kit. Kits begin shipping 8th April 2022.

ADD-ONS:

There are lots of add-on products released each month. These work alongside the kit, or work on their own too. These can be purchased from Hero Arts when you order a kit, on their own or from your favourite Hero Arts retailer (these are not exclusive and are restocked if sold out). Here is a look at them:


BLOG HOP:

As mentioned, this post is part of a fun, inspiration filled blog hop with prizes. For the hop, you should have arrived here from the wonderful Maria Willis. Next on the hop is the fabulous Mindy Eggen. If you get lost along the way, or want to start the hop from the beginning, please head over to the Hero Arts Blog.

GIVEAWAY:

Hero Arts are giving away a $50 gift card drawn from the comments left across all of the stops in the hop. Enter by 10th April 2022 at 11.59pm PT. The winner will be announced the following week on the Hero Arts Blog.

Thanks so much for stopping by today. I really do appreciate it. I hope you have a lovely time on the rest of the hop and a great rest of the day. 
End of code