12 August 2021

Altenew | Craft Your Life Project Kit: Lush Garden Release Blog Hop + Giveaway

Hello there, I am delighted to be joining Altenew today for the release of their second monthly Craft Your Life Kit. This month is Lush Garden and let me tell you, it really is lush! It's so pretty! The kit is a monthly kit that can be purchased on it's own or as part of a subscription, so that you never miss a kit. More details on the hop and the kit below. 


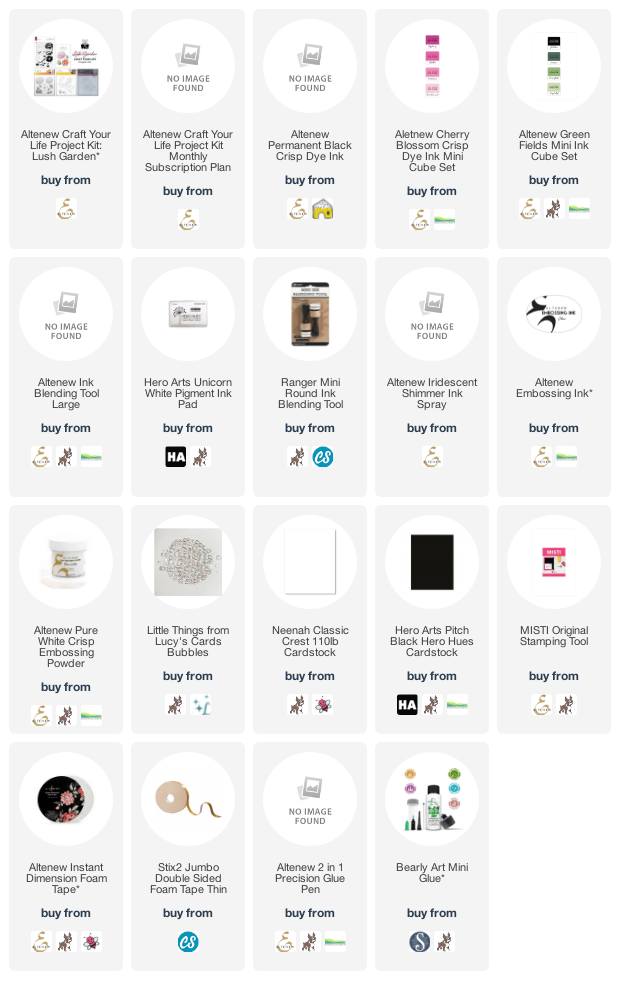
For my first card, I started off by stamping the flowers from the Lush Garden stamp set in the Altenew Craft Your Life Lush Garden Project Kit. I stamped the outlines in Altenew Permanent Black Ink and the layers in Altenew Cherry Blossom Crisp Dye Inks. The leaves were stamped with Altenew Green Fields Crisp Dye Inks. 


They were die cut out with the Lush Garden Dies that also come in the kit. I took an A2 white card base and using an Altenew Ink Blending Tool, blended Cherry Blossom Inks on to it, focusing most of the colour in the top right hand corner. The flowers were then added on top with thin foam tape and the leaves with Altenew 2 in 1 Precision Glue Pen. 


I took the sentiment from the set and stamped it on to black cardstock with Altenew Embossing Ink. I applied Altenew Pure White Crisp Embossing Powder and heat set. It was cut in to a strip and added to the card with more thin foam tape. To finish off, I added a few Lucy's Bubbles. Since the flowers are hanging off the side of the card, I will create a custom sized envelope for this card. 


My second card uses the beautiful embossing folder that comes in the kit. I took a panel of white cardstock and blended Altenew Cherry Blossom Crisp Dye Inks on to it using an Ink Blending Tool. I then ran the piece through my die cutting machine with the Lush Garden 3D Embossing Folder. 


I took Hero Arts Unicorn White Pigment Ink and ran this over the raised areas of the embossing to highlight them. I then spritzed the panel with Altenew Iridescent Shimmer Spray and set it aside to dry. Sadly, you cannot see the shimmer in the photos but it is lovely and sparkly in real life!


Once dry, the panel was adhered to an A2 white card base with Altenew Instant Dimension Foam Tape. I took the same sentiment that I used on the card and stamped and heat embossed it again. It was cut out and added to the card with thin foam tape. To finish off, I added a few Lucy's Bubbles. 

SUPPLIES:


Here are the links to what I have used on the project. Affiliate links are used on some products. This means that if you make a purchase after clicking on my link, I receive a small commission with no extra cost to you. I truly appreciate your support when using these links. Please click on the logo below the product to shop at your favourite store. All products were personally purchased except those from Clearly Besotted, Hero Arts or those marked with an asterisk (*) which were kindly sent to me to use. You can read my full disclosure here.

CRAFT YOUR LIFE KIT: LUSH GARDEN

Enjoy our Craft Your Life Project Kit, an exciting monthly package that is sure to get the creative juices flowing! Featuring a 6x8 stamp set, coordinating die set, as well as a stencil and embossing folder to fit the theme, this project kit has almost everything you need to start crafting. Just add ink and cardstock, and you'll be good to go!
 
This project kit contains the following exclusive products:
  • one 6" x 8" clear stamp set containing 24 stamps made in the USA from high-quality photopolymer
  • four coordinating dies
  • one simple coloring and layering stencil which coordinates with the stamp set 
  • one 6" x 6" 3D embossing folder
  • one simple coloring stencil set (3 stencils) which coordinates with the embossing folder
 Note: These products are NOT sold separately.

BLOG HOP:


As mentioned, this post is part of a fun, inspiration filled blog hop with prizes (see below). For the hop, you should have arrived here from the wonderful Tenia Nelson. Next on the hop is the fabulous Nathalie DeSousa. If you get lost along the way, or would like to start the hop from the beginning, please head over to the Altenew Blog. 

GIVEAWAY:

$300 in total prizes! To celebrate this release, Altenew is giving away a $50 gift certificate to 2 lucky winners and a $ 25 gift certificate to 8 winners! Please leave a comment on the Altenew Card Blog and/or each designer’s blog post on the blog hop list below by 18th August 2021 for a chance to win. Altenew will draw 10 random winners from the comments left on each stop of this blog hop and announce the winners on the Altenew Winners Page on 20th August 2021.

Thank you so much for stopping by today. I really do appreciate it. I hope you are keeping well and still staying safe. I hope you have a great time on the rest of the hop and a wonderful rest of the day! 

11 August 2021

Reverse Confetti | Thanks For Being You

Hello there, today I have a card to share with yuo using the Reverse Confetti Tropical Leaves set, along with the Lovely Day Sentiments set that were part of their July release. I love that the sentiments in the set are really big and bold so you do not need much to accompany them. I thought the leaves would work well with one of them.


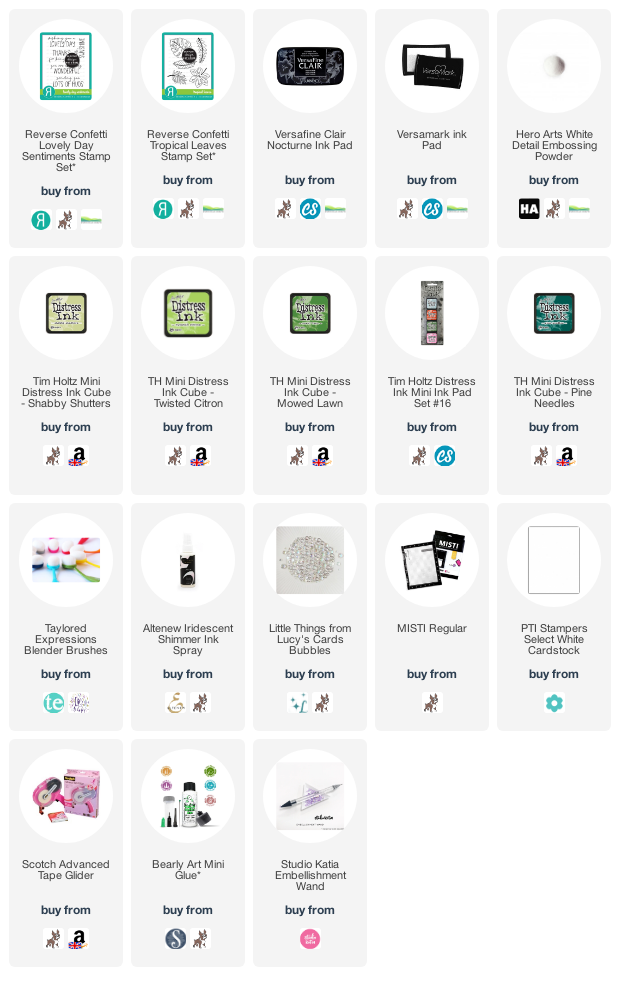
I started off by taking a panel of white cardstock and stamping the sentiment from the Reverse Confetti Lovely Day Sentiments Stamp Set on to the top middle using Versafine Clair Nocturne Ink. I let it dry for a few minutes and then stamped the leaves from the Reverse Confetti Tropical Leaves Stamp Set at the top. 


They were stamped one by one on to the panel using Versamark Ink. I applied Hero Arts White Detail Embossing Powder and heat set before moving on the next one so that the top part of the panel was stamped. Using ink blending brushes, I blended on Tim Holtz Distress Inks. 


I used Shabby Shutters, Twisted Citron, Mowed Lawn, Rustic Wilderness and Pine Needles. I then splattered on a little water, followed by Altenew Iridescent Shimmer Spray. It was set aside to dry and once dry, adhered flat to an A2 white card base with tape runner. To finish off, I added a few Lucy's Cards Bubbles. 

SUPPLIES:


Here are the links to what I have used on the project. Affiliate links are used on some products. This means that if you make a purchase after clicking on my link, I receive a small commission with no extra cost to you. I truly appreciate your support when using these links. Please click on the logo below the product to shop at your favourite store. All products were personally purchased except those from Clearly Besotted, Hero Arts or those marked with an asterisk (*) which were kindly sent to me to use. You can read my full disclosure here.


Green isn't a colour that I use that often but I really like how it turned out on this card! Thank you so much for stopping by today, I really do appreciate it. I hope you have a wonderful day! 

9 August 2021

Clearly Besotted | Sweet Floral Gnomes

Hello there, today I have a card to share with you using the Clearly Besotted Sweet Floral Gnomes set. I fell in love with it as soon as I saw it but didn't get a chance to use it before the release. So I had to rectify that and colour it up!


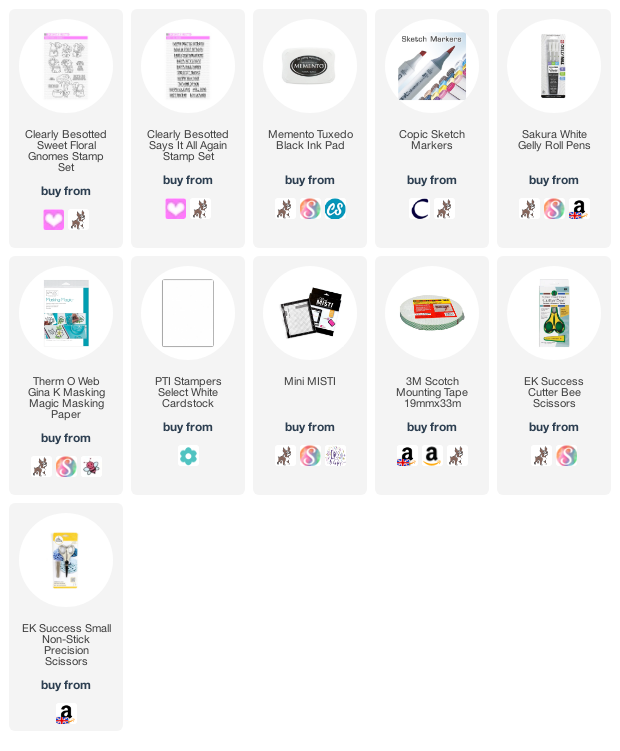
I started off with a 5.25" x 4" white panel of cardstock and stamped the gnome from the Clearly Besotted Sweet Floral Gnomes Stamp Set on top with Memento Tuxedo Black Ink. I made a mask for him from masking paper, fussy cut it out and adhered it on top. 


I then stamped the background image so that the gnome would be sitting on the tree stump. The mask was removed to reveal him sitting on the stump. I love doing little masking like this to create scenes, but I also love that the background image is all one so no masking involved for that part! I then took the sentiment from the Clearly Besotted Says It All Again Stamp Set and stamped it below the images with more Memento Tuxedo Black Ink. 


The images were coloured using Copic Markers (the colours that I used are listed below the supplies area for reference) and added a light blue shadow for the sky and dot details for the grass. The panel was adhered to an A2 white card base with foam tape and then to finish off, I added white gel pen highlights to the images. 

SUPPLIES:


Here are the links to what I have used on the project. Affiliate links are used on some products. This means that if you make a purchase after clicking on my link, I receive a small commission with no extra cost to you. I truly appreciate your support when using these links. Please click on the logo below the product to shop at your favourite store. All products were personally purchased except those from Clearly Besotted, Hero Arts or those marked with an asterisk (*) which were kindly sent to me to use. You can read my full disclosure here.


COPIC MARKERS: Gnome skin - E13, E11, E00. Gnome beard - W5, W3, W1. Gnome hat and shoes - B39, B18, B16, B12. Flower - V09, V17, V15, V12. Stem, leaves and grass - G29, YG17, YG23, YG03, YG01. Tree stump - E49, E59, E57, E55. Mushroom - E79, E77, E74, E71, E70, R89, R39, R37, R35, R32, E41, E40. Sky - B00, B000, 0. 

Thank you so much for stopping by to see me today, I really do appreciate it. I hope you have a wonderful day. Stay safe!

7 August 2021

Altenew | Create-A-Flower California Giants Release Blog Hop + Giveaway

Hello there, I am delighted to be joining Altenew today to celebrate the release of the new Craft-A-Flower California Giants Layering Die Set. If you have followed me at all this year then you will know that I love these sets! They are so fun to layer up. I have to admit though, I hadn't heard of California Giants, but I did a little research and found that they are a variety of Zinnia that can grow as tall as four feet and have 5" blooms! 

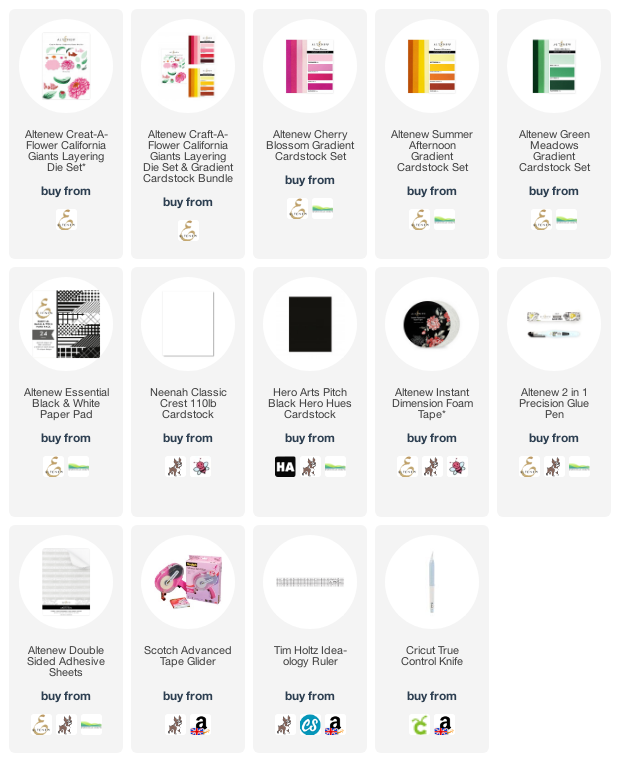
I started off my card by die cutting the Altenew Craft-A-Flower California Giants Layering Die Set from Altenew Cherry Blossom Gradient Cardstock for the main flower, with the centre being cut from Altenew Summer Afternoon Gradient Cardstock. I used Altenew Green Meadows Gradient Cardstock for the leaf and stem. The layers were adhered together using Altenew Precision 2 in 1 Glue Pen. 

I then took a panel of white cardstock and adhered a sheet of Altenew Essential Black & White Paper Pad on top, towards the bottom. Using a craft knife and ruler, I then cut the bottom part in to a fishtail banner. The I also added a strip of black cardstock where the paper ended to cover the seam. It was adhered on to an A2 white card base with Altenew Instant Dimension Foam Tape. 

I then added the flower, stem and leaves on top with tape runner. I took the hello die from the set and cut it three times from white cardstock with Altenew Double Sided Adhesive Sheet on the back. They were adhered together, one on top of another and added to the card. 

SUPPLIES:


Here are the links to what I have used on the project. Affiliate links are used on some products. This means that if you make a purchase after clicking on my link, I receive a small commission with no extra cost to you. I truly appreciate your support when using these links. Please click on the logo below the product to shop at your favourite store. All products were personally purchased except those from Clearly Besotted, Hero Arts or those marked with an asterisk (*) which were kindly sent to me to use. You can read my full disclosure here.


BLOG HOP:

This blog post is part of a fun, inspiration filled blog hop with prizes too (see below for details). For the hop, you should have arrived here from the amazing Erum Tasneem. Next on the hop is the wonderful Virginia Lu. If you get lost or want to start the hop from the beginning, please head over to the Altenew Blog. 

GIVEAWAY:

$200 in total prizes! To celebrate this release, Altenew is giving away a $50 gift certificate to 2 lucky winners and a $20 gift certificate to 5 winners! Please leave a comment on the Altenew Card Blog and/or each designer’s blog post on the blog hop list below by 13th August 2021 for a chance to win. Altenew will draw 7 random winners from the comments left on each stop of this blog hop and announce the winners on the AltenewWinners Page on 15th August 2021.

The California Giants Layering Die Set can be purchased on it's own or as part of a bundle with Gradient Cardstock. Thank you so much for stopping by today, I really do appreciate it. I hope you have a wonderful time on the rest of the hop and a fabulous day! Take care! 

6 August 2021

Spellbinders | Hex Kaleidoscope Tile

Hello there, today I have a card to share with you using the Spellbinders Small Die of the Month Club Kit for August 2021. The kit this month is called Hex Kaleidoscope Tile and you can see why! You get a hexagon kaleidoscope layering die set, as well as the frame (I didn't use the frame on my card but it frames three of the hexagon shapes). 


I started off my card by die cutting the bottom of the hexagon from Spellbinders Royal Amethyst Cardstock three times. I cut the middle layer from Spellbinders Lilac Blossom Cardstock and the top from Spellbinders Snowdrift Cardstock. They were were layered up and adhered together using Bearly Art Glue. 


I took a mini slimline card base (6" x 3.5") made from Snowdrift Cardstock and scored two horizontal lines at the top and the bottom of the card base. Sadly, these can't really be seen in the photos but in real life, I think they finish the card off nicely. I adhered the hex kaleidoscope tiles in the middle of the embossed lines with more Bearly Art Glue. 


I took the sentiment from the Spellbinders Yana's Tiny Sentiments Glimmer Hot Foil Plate & Die Set and foiled it on to Spellbinders Onyx Cardstock with Spellbinders Lavender Petal Foil. It was cut in to a strip and adhered on top of the middle hexagon with foam squares. To finish off, I added a Spellbinders Silver Color Essentials Gem to the centre of the other hexagons. 

SUPPLIES:


Here are the links to what I have used on the project. Affiliate links are used on some products. This means that if you make a purchase after clicking on my link, I receive a small commission with no extra cost to you. I truly appreciate your support when using these links. Please click on the logo below the product to shop at your favourite store. All products were personally purchased except those from Clearly Besotted, Hero Arts or those marked with an asterisk (*) which were kindly sent to me to use. You can read my full disclosure here.


I hope that you will check out the Spellbinders Small Die of the Month Club Kit. It is a wonderful monthly subscription where you receive the kit each month. Designers like myself share inspiration using the kit at the beginning of the month to show you lots of different ways that you can use it. There are also lots of other club kits too, like the Clear Stamp of the Month, so there is something for everyone! If you do subscribe, you will get other benefits from Spellbinders too. Please see here for more information. You can also buy older kits here too.

Thank you so much for stopping by today, I really do appreciate it. I hope you have a lovely day! 

4 August 2021

Altenew | Modern & Edgy Stamps/Dies/Stencils/Embossing Folders Collection Release Blog Hop + Giveaway

Hello there, I am delighted to be joining Altenew today to celebrate the release of the new Modern & Edgy Collection. This is such a wonderful collection! As usual, I have focused on florals for my projects but there are lost of wonderful sets in the release. This post is part of a fun, inspiration filled blog hop with prizes too. Please see below for details. 


For my first card, I am using the new Inky Lily set. This set features an outline plus layers to create the colour of the lily, plus the speckles that you usually get on lilies. I decided to go a bit different and use the speckles as more paint splatters on my card. I started off by first stamping the open lily from the Altenew Inky Lily Stamp Set on to white cardstock using Altenew Obsidian Black Ink. 


I die cut it out using the Altenew Inky Lily Die Set and then using it as a guide, I took a white A2 panel and stamped the slightly closed Lily on to it plus the leaves multiple times. I stamped the speckles on to the flowers using Sunray ink from the Altenew Golden Sunset Crisp Dye Ink Set and Rubellite from the Altenew Cherry Blossom Crisp Dye Ink Set.


Using the negative part of the (the actual positive pieces) Altenew Inky Lily Simple Coloring Stencil, I stamped the speckles again around the lilies, this time in Altenew Obsidian Black Ink. The panel was adhered flat to an A2 white card base and then the lily added on top. I took the sentiment from the Altenew Sentiment Strips Stamp Set and stamped it on to black cardstock with Versamark Ink. I applied Altenew Pure White Crisp Embossing Powder and heat set. It was cut in to two strips and added to the card with Altenew Instant Dimension Foam Tape. 


My next card uses the new Fresh Bloom set. This set is so pretty and modern but elegant too. I started off by stamping the outline from the Altenew Fresh Bloom Stamp Set on to white cardstock with black ink. I then stamped the layers of the flower using Altenew Shades of Purple Crisp Dye Ink and the insides with Altenew Green Fields Crisp Dye Ink. The leaves also use these inks. 


The flowers and leaves were die cut using the Altenew Fresh Bloom Die Set and simply adhered to an A2 white card base. I used glue for the leaves and Altenew Instant Dimension Foam Tape for the flowers. I took the sentiment form the set and heat embossed it on to black cardstock. I cut it in to a strip and added it to the card with more foam tape. To finish off, I added a few Raindrops. 


My next projects use the new Rose Bouquet 3D Embossing Folder, as well as the new Mixed Media Inks. The Mixed Media Inks are pigment based and can be used for lots of different things - you can use them as I have for simply ink blending and adding lighter colours over darker ones but you can also stamp them on to fabric and use them for lots of mixed media techniques. 


I started off my card by taking a panel of white cardstock and using Ink Blending Tools, blended Altenew Glacier Caves Pigment Ink Set on top. I concentrated the darker colours at the bottom, moving to lighter at the top. I then ran the piece through my die cutting machine with the Altenew Rose Bouquet 3D Embossing Folder. 


I took the lightest shade of the inks (Arctic) and swiped it over the raised areas of the panel (direct to paper). This highlighted the embossing but kept the background a darker colour. Due to the inks being pigment, I did heat set the panel before adhering on to an A2 white card base. I took the new Altenew Fancy Hugs Die and cut it three times from white cardstock with Altenew Double Sided Adhesive Sheet on the back. They were stacked up and added to the card. To finish off, I added a few white dots from the new Altenew Essential Black & White Enamel Dots pack.  


I couldn't resist creating a tag too! I took an Altenew Terrific Tag Die and die cut it from white cardstock. Using Ink Blending Tools, I blended on Altenew Summer Afternoon Pigment Inks. I concentrated most of the colour in the bottom left hand corner, moving lighter towards the top right. I then ran it through my die cutting machine with the Altenew Rose Bouquet 3D Embossing Folder. 


This time, I swiped the two middle shades (Caramel Toffee and Warm Sunshine) over the embossed areas before heat setting it. I took the sentiment from the Altenew Sentiment Strips Stamp Set and stamped it on to black cardstock with Versamark Ink. I applied Altenew Pure White Crisp Embossing Powder and heat set. It was cut in to a strip and added to the tag with foam tape. To finish off, I added black enamel dots from the Altenew Essential Black & White Enamel Dots pack

SUPPLIES:


Here are the links to what I have used on the project. Affiliate links are used on some products. This means that if you make a purchase after clicking on my link, I receive a small commission with no extra cost to you. I truly appreciate your support when using these links. Please click on the logo below the product to shop at your favourite store. All products were personally purchased except those from Clearly Besotted, Hero Arts or those marked with an asterisk (*) which were kindly sent to me to use. You can read my full disclosure here.


BLOG HOP:


As mentioned, this post is part of a fun, inspiration filled blog hop (see below for prizes). For the hop, you should have arrived here from the amazing Erum Tasneem. Next on the hop is the wonderful Nathalie DeSousa. If you get lost along the hop or want to start from the beginning, please head over to the Altenew Blog. 

FREE GIFTS:

Here are THREE ways to get a FREEBIE to kickstart your creativity! Free gift will be added to cart automatically. 

·  Get a FREE brand new Modern & Edgy Release Inspiration Guide (worth $5.99) with every order of high-value Modern & Edgy release bundles. *Exclusions apply.
·  Get a FREE brand new Creative Jump Start Class with every order from the new Modern & Edgy release collection from 4th August 2021 through 10th August 2021.
·  Get a FREE brand new Modern & Edgy Release Mini Inspiration Guide with every order from 4th August 2021 through 6th August 2021.

GIVEAWAY:

$300 in total prizes! To celebrate this release, Altenew is giving away a $50 gift certificate to 2 lucky winners and a $25 gift certificate to 8 winners! Please leave a comment on the AltenewCard Blog and/or each designer’s blog post on the blog hop list below by 10th August 2021 for a chance to win. Altenew will draw 10 random winners from the comments left on each stop of this blog hop and announce the winners on the Altenew Winners Page on 12th August 2021.

Thank you so much for stopping by today, I really do appreciate it. I hope you have a wonderful rest of the hop and a great day! 

VIDEO | MFT Camp Create - Delightful Die Cutting

Hello there, have you been participating in MFT's Camp Create? It is a five day event where MFT is sharing crafty ideas and challenges and you can win a prize by participating! Head over to the blog to find out more details. Today is all about Delightful Die Cutting and I am delighted to have a video to share with you where I have created a wreath using layered die cutting. 


I started off my card by die cutting the elements for the wreath in advance. I cut the MFT Grande Greenery Solid Die-Namics from MFT Sno Cone Cardstock, MFT Cornflower Cardstock and C9 Midnight Blue Cardstock four times each. I also die cut the MFT Grande Greenery Outline Die-namics four times from MFT Translucent Vellum. I took an A2 white card base and using a circle die as a guide drew a faint pencil line circle to guide me for the shape of the wreath. 


I cut the Grande Greenery die cuts down so that I only used the top part and then adhered them one under and other until the wreath was complete. With the darker blue colour, I also popped in the vellum ones but slightly off-set for more interest. I then die cut the MFT Sweet Hello Die-namics three times from white cardstock (with adhesive sheet on the back) and sacked them up. It was added on top of the wreath. 


I took a sentiment from the MFT Bitty Holiday Wishes Stamp Set and stamped it on to more white cardstock with MFT Extereme Black Ink. It was die cut out using an MFT Skinny Strips Die-namics. I added foam tape to the centre and then adhered that below the hello. To finish off, I die cut the MFT Sweet Snowflakes Die-namics from MFT Silver Sparkle Cardstock and added them to the wreath, followed by a Bubble to the centre of each. 


While I was creating the card, I thought it would be fun to create wreaths in different colours and use different elements (instead of the snowflakes) to embellish it. I thought it would look lovely with hearts, stars, flowers etc. Sadly, I only had time to make one other card, so I went with a birthday star theme.


I created the wreath in the same way as the first card but this time cut the Grande Greenery Solid from MFT Black Licorice Cardstock and splattered on Dr Ph. Martin's Bleed Proof White paint on top. I cut the Grande Greenery Outline from the same MFT Translucent Vellum. They were alternated to complete the wreath. The sentiment on the strip is from the MFT Balloon Bouquet Stamp Set and the stars from the MFT Slumbering Sloths Die-namics. 

VIDEO:

Here is the video showing how I made the card:


If you are viewing this blog post via email subscription, you can watch the video HERE on YouTube. 

SUPPLIES:


Here are the links to what I have used on the project. Affiliate links are used on some products. This means that if you make a purchase after clicking on my link, I receive a small commission with no extra cost to you. I truly appreciate your support when using these links. Please click on the logo below the product to shop at your favourite store. All products were personally purchased except those from Clearly Besotted, Hero Arts or those marked with an asterisk (*) which were kindly sent to me to use. You can read my full disclosure here.


I do hope that you will give Camp Create Delightful Die Cutting a try. I am really looking forward to seeing what you create! Have a wonderful day! 

2 August 2021

Hero Arts August 2021 My Monthly Hero Release Blog Hop + Giveaway

Hello there and welcome as we celebrate the release of the Hero Arts August 2021 My Monthly Hero Kit and Add-On products. The theme this month is Color Your World In Friendship and there are lots of opportunities to add colour to your projects, as well as send encouragement to friends too. This post is part of a fun, inspiration filled blog hop with prizes too. More information on that below. 


For my card using the main kit, I decided to create a love you card. I first took a panel of white cardstock and a panel of masking paper. I took the Hero Arts Nesting Hearts Infinity Dies and cut one from the panel of masking paper. This piece was then added on top of the cardstock panel. I placed the stencil from the Hero Arts August 2021 My Monthly Hero Kit on top, securing in place with tape and then using Hero Arts Ink Blending Brushes, blended Reactive Inks on top. 


I used Hero Arts Grape Slush Reactive Ink, followed by Hero Arts Blue Hawaii Reactive Ink and then Hero Arts Pool Party Reactive Ink. The stencil and mask were removed. I then took the love fancy die from the kit and die cut it from the panel. I also die cut it another 4 times so that I could stack them up for dimension. I added the panel to a top folding A2 card base and then added the letters inside for the inlay. 


To create the eclipse, I added the stenciled letters on top. I then took one of the sentiments from the kit stamp set and masked off the word 'you'. It was stamped on to Hero Arts Pitch Black Cardstock using Hero Arts Clear Embossing & Watermark Ink. I applied Hero Arts White Detail Embossing Powder and heat set. It was cut in to a strip and added to the card. 


My next card uses two new add-on sets. I started off by die cutting the Hero Arts Rays of Color Window Fancy Die from Hero Arts Dove White Cardstock with adhesive sheet on the back. I then cut the die a further 13 times from various shades of Hero Arts cardstock to create a rainbow of colour. I adhered the outline piece to a top folding A2 card base and then using Hero Arts On-Point Precision Glue, adhered the colourful pieces inside for the inlay. 


I took the Hero Arts Paper Hug Stamp & Cut XL and die cut the word happy three times from Dove White Cardstock, they were adhered one on top of another and added to the card. I took the stamp set and masked off a sentiment to read 'here is a paper' and stamped it on to Hero Arts Pitch Black Cardstock with Hero Arts Clear Embossing & Watermark Ink. I applied Hero Arts White Detail Embossing Powder and heat set. It was cut in to a strip and added to the card with foam tape. 

SUPPLIES:


Here are the links to what I have used on the project. Affiliate links are used on some products. This means that if you make a purchase after clicking on my link, I receive a small commission with no extra cost to you. I truly appreciate your support when using these links. Please click on the logo below the product to shop at your favourite store. All products were personally purchased except those from Clearly Besotted, Hero Arts or those marked with an asterisk (*) which were kindly sent to me to use. You can read my full disclosure here.


THE KIT:


4" x 6" Clear Stamp Set
Coordinating Fancy Dies
5.4" Square Cling Stamp
5.25" x 6.5" Stencil
3 Liquid Watercolors (Pink, Indigo, Dandelion)
6 5.5" x 8.5" Sheets Watercolor Paper

 
The kit is valued at $70 but you can get it for $34.99 (approximately £28 depending on exchange rate, not including VAT). The kits are limited edition and often sell out quickly, so grab one while you can! You can also subscribe here so that you never miss a kit. International subscribers will get a discount off shipping. Kits begin shipping on 6th August 2021.

ADD-ONS:

There are lots of add-on sets released each month too. These are products that work well alongside the kit, or can be used on their own. These are not limited edition and can be purchased when you buy the kit for Hero Arts or from your favourite Hero Arts retailer. Here is a look at them:

BLOG HOP:

Here are all of the participants taking part in the hop today:

Special Guests:

GIVEAWAY:

Hero Arts are giving away one $50 gift certificate to one lucky blog hop winner. To be in with a chance of winning, please leave comments on every stop on the hop. The more you comment, the more chances there are to win! Enter by Sunday 8th August 2021 at 11.59pm PT. The winner will be announced the following week on the Hero Arts Blog. Good luck!

Thanks so much for stopping by today, I really do appreciate it. I hope you have a wonderful time on the rest of the hop and a great rest of the day! 

1 August 2021

Hero Arts | My Monthly Hero August 2021 Countdown

Hello there and welcome as we countdown to the release of the Hero Arts August 2021 My Monthly Hero Kit and add-on release, which are out tomorrow. The kit this month is all about colour! It is called Color Your World in Friendship and there are lots of opportunities in the kit for lots of colour, but you can use it in lots of different ways too. Be sure to check out the Hero Arts Blog for lots more inspiration! 


For my card, I started off by die cutting the hand dies in the kit from cardstock. I used white cardstock for the hand on the left and the hand on the right from the Colors of Earth Papers (that are an add-on product this month). I then used them as a guide to mask off the areas around them on a panel of white cardstock. 


Using Ink Blending Tools, I blended Reactive Inks inside of the masked area. I used Taffy, Creamsicle, Lemon Drop, Key Lime Fizz, Splash and Thistle. I then removed the masking tape and stamped the sentiment from the kit stamp set below, using Intense Black Ink. 


I then cut a further two hands for each side so that I could layer them up for dimension (three high in total). They were adhered around the ink blending to create a heart of rainbow colours in the centre of the hands. The panel was then simply adhered to a top folding card base with tape runner. 

SUPPLIES:


Here are the links to what I have used on the project. Affiliate links are used on some products. This means that if you make a purchase after clicking on my link, I receive a small commission with no extra cost to you. I truly appreciate your support when using these links. Please click on the logo below the product to shop at your favourite store. All products were personally purchased except those from Clearly Besotted, Hero Arts or those marked with an asterisk (*) which were kindly sent to me to use. You can read my full disclosure here.


We have been sharing countdown to creativity all weekend long, so do be sure to check out what my teamies have been up to over on the Hero Arts Blog. Also make sure to leave a comment over there for a chance to win a kit! Thank you so much for stopping by today, I really do appreciate it. I hope you have a wonderful rest of the weekend! 
End of code