
Hello there and happy Spellbinders release day! I have two cards to share today using the new Monster Birthday Collection. These characters are made so that their legs can move (so cute!), but I decided for these cards, that I would just keep them static and I think they are still as cute!
PLEASE
NOTE: This post contains affiliate links. Please see below for my full
disclosure.
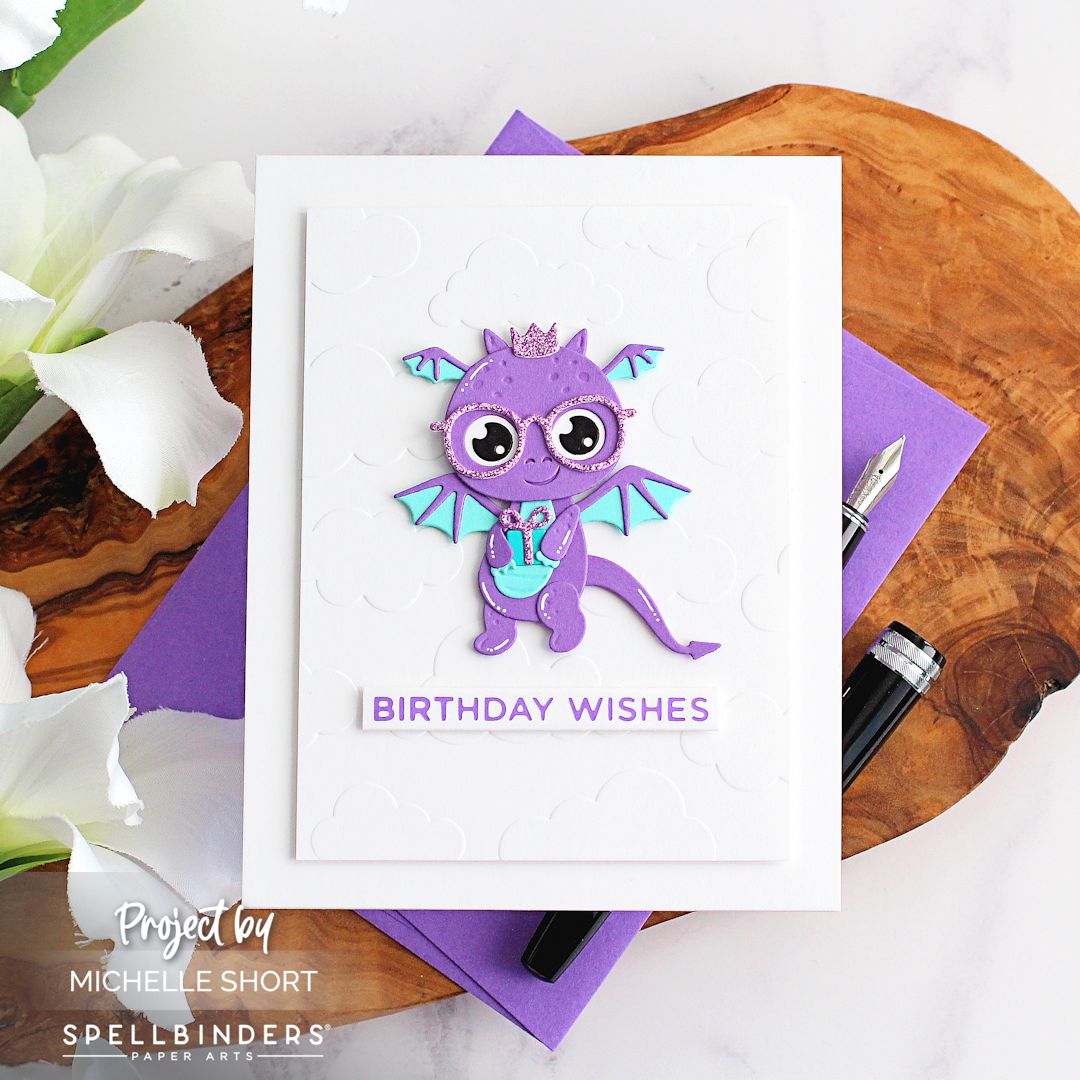
For my first card, I started off by die cutting the Spellbinders Dancin' Birthday Dragon Etched Dies from Spellbinders Cardstock. I used Spellbinders Lilac Blossom and Waterfall for the main parts of the body, tail and wings and Onyx for his eyes. I cut the present/gift from Spellbinders Teal Topaz Cardstock and the bow from Simon Says Stamp Glitter Cardstock. I also used the glitter cardstock for his crown and glasses.

The glasses are from the Spellbinders Smart Glasses Etched Dies set and they are so fun! They are a great size and fit lots of different characters! I assembled the dragon and adhered with Bearly Art Glue. I then took a panel of white cardstock and ran it through my die cutting machine inside the Spellbinders Head in the Clouds Embossing Folder.

It was adhered onto a US A2 sized white card base, followed by the dragon (both using thin foam tape). I hot foiled the sentiment from the Spellbinders Everyday Sentiments II Glimmer Hot Foil Plate using Spellbinders Lavender Petal Foil and the Glimmer Hot Foil Machine. It was cut into a strip and adhered to the card with thin foam tape. To finish off, I added a few white gel pen highlights.

My next card uses Spellbinders Dancin' Birthday Panda Etched Dies. I die cut her from Spellbinders Onyx and Snowdrift Cardstock and added a little Spellbinders Wild Berry Cardstock behind the head piece for her mouth. The bow and glasses were cut from Simon Says Stamp Glitter Cardstock.

For the glasses on this one, I added small pieces of acetate behind the openings to look like real glasses! I took a panel of white cardstock and ran it through my die cutting machine inside the Spellbinders Party Spots Embossing Folder. It was adhered to a US A2 sized white card base with thin foam tape.

The panda was adhered on top, also with thin foam tape. I hot foiled the sentiment from the Spellbinders Everyday Sentiments II Glimmer Hot Foil Plate using Spellbinders Black Foil. It was cut into a strip and adhered to the card with more thin foam tape. To finish off, I added a few white gel pen highlights.
SUPPLIES:
Here are the links to
what I have used on the projects. Affiliate
links are used on some products. This means that if you make a purchase after
clicking on my link, I receive a small commission with no extra cost to you. I
truly appreciate your support when using these links. Please click on the logo below
the product to shop at your favourite store. All products were personally
purchased except those from Clearly Besotted, Hero Arts or those marked with an
asterisk (*) which were kindly sent to me to use. You can read my full
disclosure here.
These characters are just absolutely adorable! The glasses just make them ever better! But they would still look cute without them as well. Thank you so much for stopping by today, I really do appreciate it. I will be back later with another project but in the mean-time, I hope you have a wonderful day!
so super cute
ReplyDeleteWhen I saw this collection I didn't think it was for me but I totally wish I had picked a few things. I especially love the dragon in purple and aqua but I love love love the glittery glasses and other glitter accents! So so cute! And I might need to order that party spots embossing folder - it's good for so many occasions!
ReplyDelete