
PLEASE
NOTE: This post contains affiliate links. Please see below for my full
disclosure.


A LITTLE GIFT FOR YOU
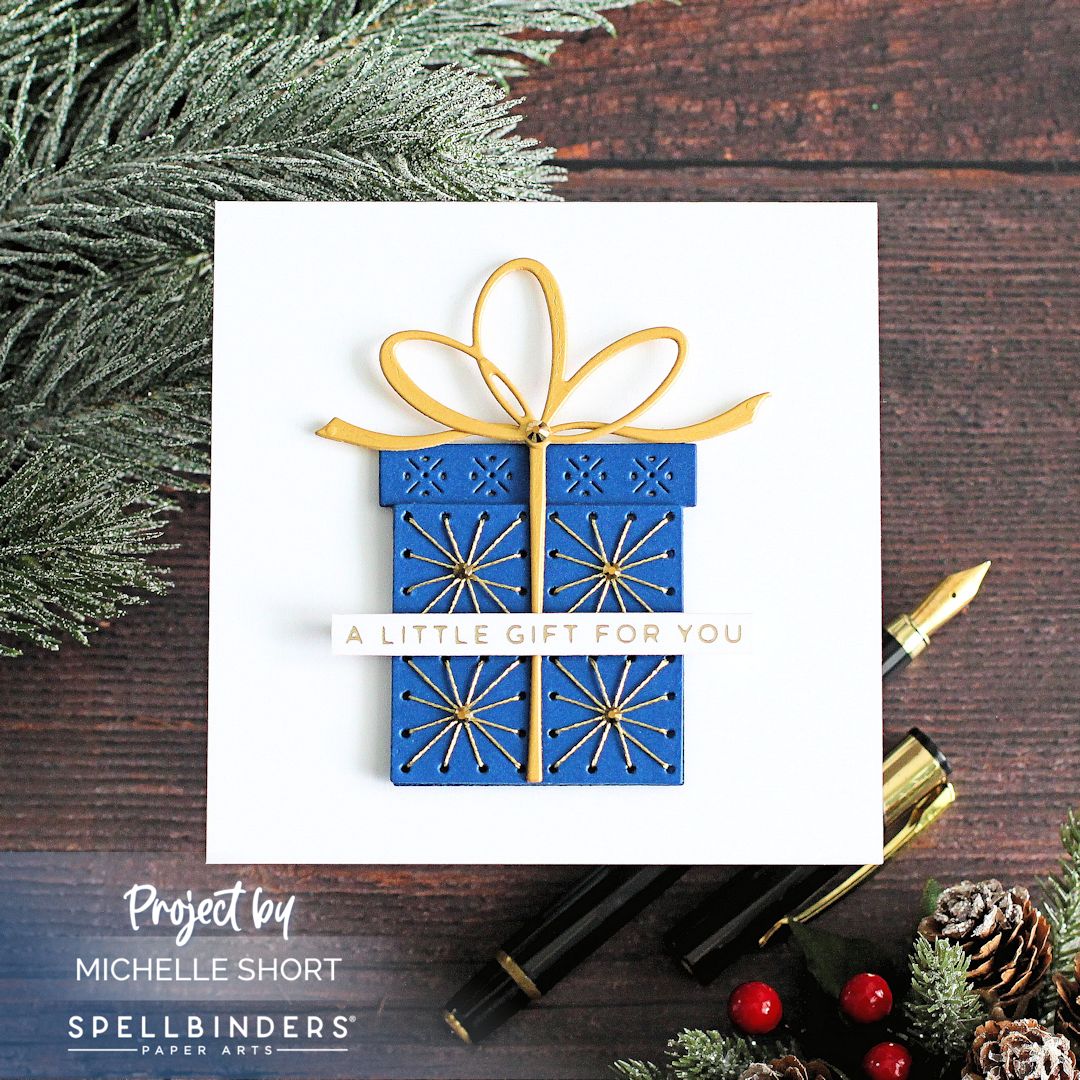
I secured the thread to the back of the piece using Spellbinders Best Ever Craft Tape. I adhered the gift topper piece, also cut from Cosmic Sky Cardstock twice, at the top and then adhered the backer piece behind using double sided tape, to hide the thread. I die cut the ribbon/bow twice from Spellbinders Brushed Gold Cardstock (also in the kit), adhered them together first (for added dimension) and then onto the gift.
I adhered the gift to a white 4 ¼” x 4 ¼” card base using thin foam tape. I hot foiled a sentiment from Spellbinders Glitter Wishes Glimmer Hot Foil Plate & Die Set onto white cardstock using Spellbinders Champagne Foil. It was cut into a strip and adhered to the card using foam tape. To finish off, I embellished with Spellbinders Gold Mix Color Essentials Gems.
I thought this card would work well as a gift card/money
holder. Perfect for the holidays, but also for birthdays and other occasions
too!
SEASON FILLED WITH JOY
For my second card, I wanted to keep to the same colour
palette, but reversed! I die cut the gift from Spellbinders Snowdrift Cardstock (in the kit)
twice and adhered them together. For the stitching this time, I used the
Variegated 121 Delft Blue Floss from the kit. I focussed on the darker shades (the
darkest blue and slightly lighter blue) of the floss to really make it pop from
the white.
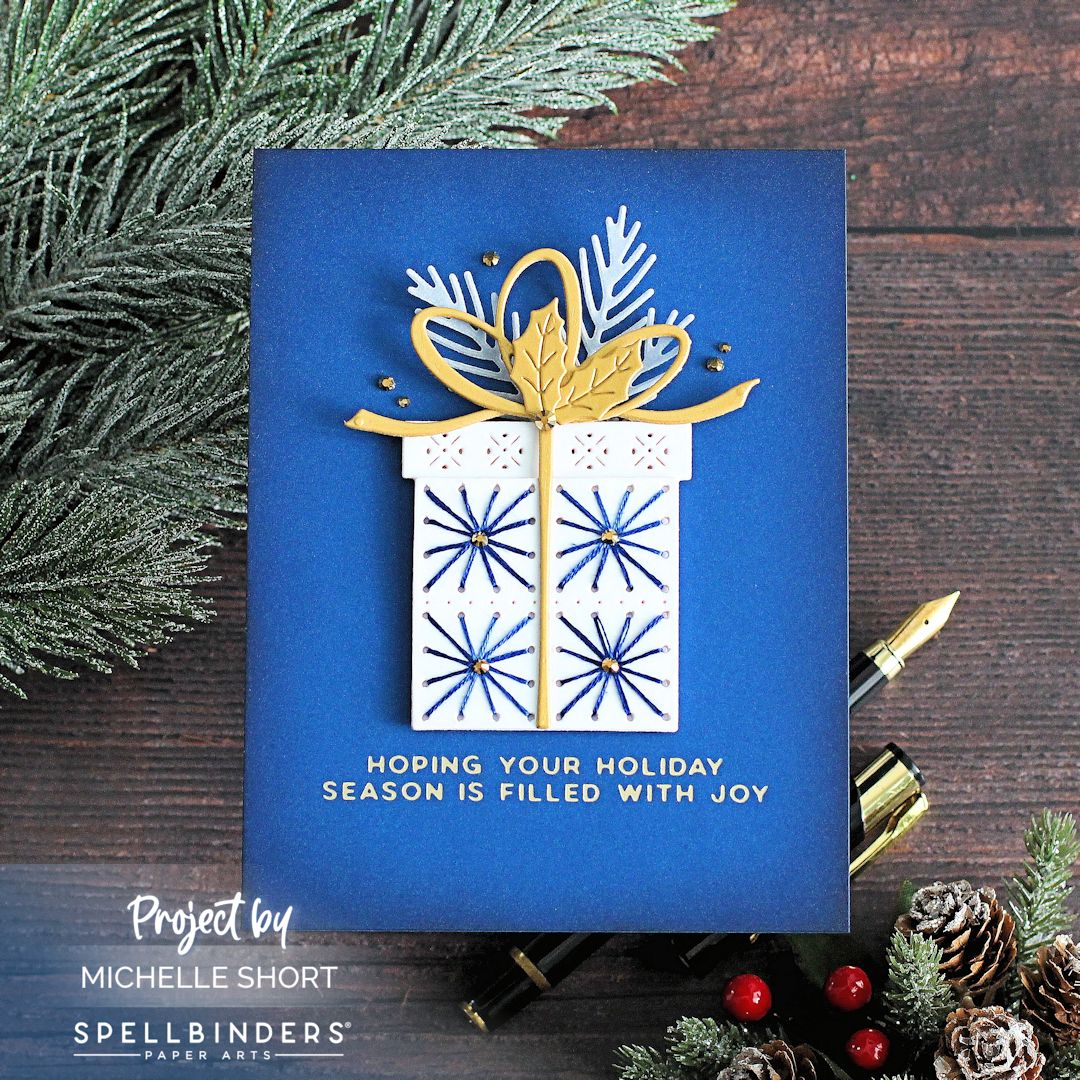
I separated the floss to three strands thick and stitched the gift so that the darker of the floss was in the top left and bottom right, and the slightly lighter shade was in the bottom left and top right. I adhered the gift together as per the first card but left off the bow at this point. I wanted to add some foliage from the Spellbinders Snowflake Card Creator Etched Dies behind for a more Christmassy look!

I die cut the branches from vellum and the holly leaves from Brushed Gold Cardstock. For the card base, I hot foiled a sentiment from Spellbinders A Merry Little Christmas Sentiments Glimmer Hot Foil Plate onto Spellbinders Cosmic Sky Cardstock using Spellbinders Champagne Foil. I added ink blending around the edges using Spellbinders Betterpress Inks (Cosmic Sky and Letterpress Black) before adhering to a US A2 sized card base made from Cosmic Sky Cardstock. The gift was adhered on top using thin foam tape and the foliage adhered with Bearly Art Glue. To finish, I embellished with Spellbinders Gold Mix Color Essentials Gems.
VIDEO:
SUPPLIES:
Here are the links to
what I have used on the projects. Affiliate
links are used on some products. This means that if you make a purchase after
clicking on my link, I receive a small commission with no extra cost to you. I
truly appreciate your support when using these links. Please click on the logo below
the product to shop at your favourite store. All products were personally
purchased except those from Clearly Besotted, Hero Arts or those marked with an
asterisk (*) which were kindly sent to me to use. You can read my full
disclosure here.
No comments:
Post a Comment
Thank you for visiting my blog today! Please feel free to leave me a comment. I really appreciate receiving them. Please note that if you comment as unknown on a hop, you will not be entered into the prize draw unless you leave your email address in the comment. Please see my Privacy Policy for details on how your data is used when leaving me a comment. Thank you so much :)