30 January 2024

Spellbinders | Cosmos Backdrop

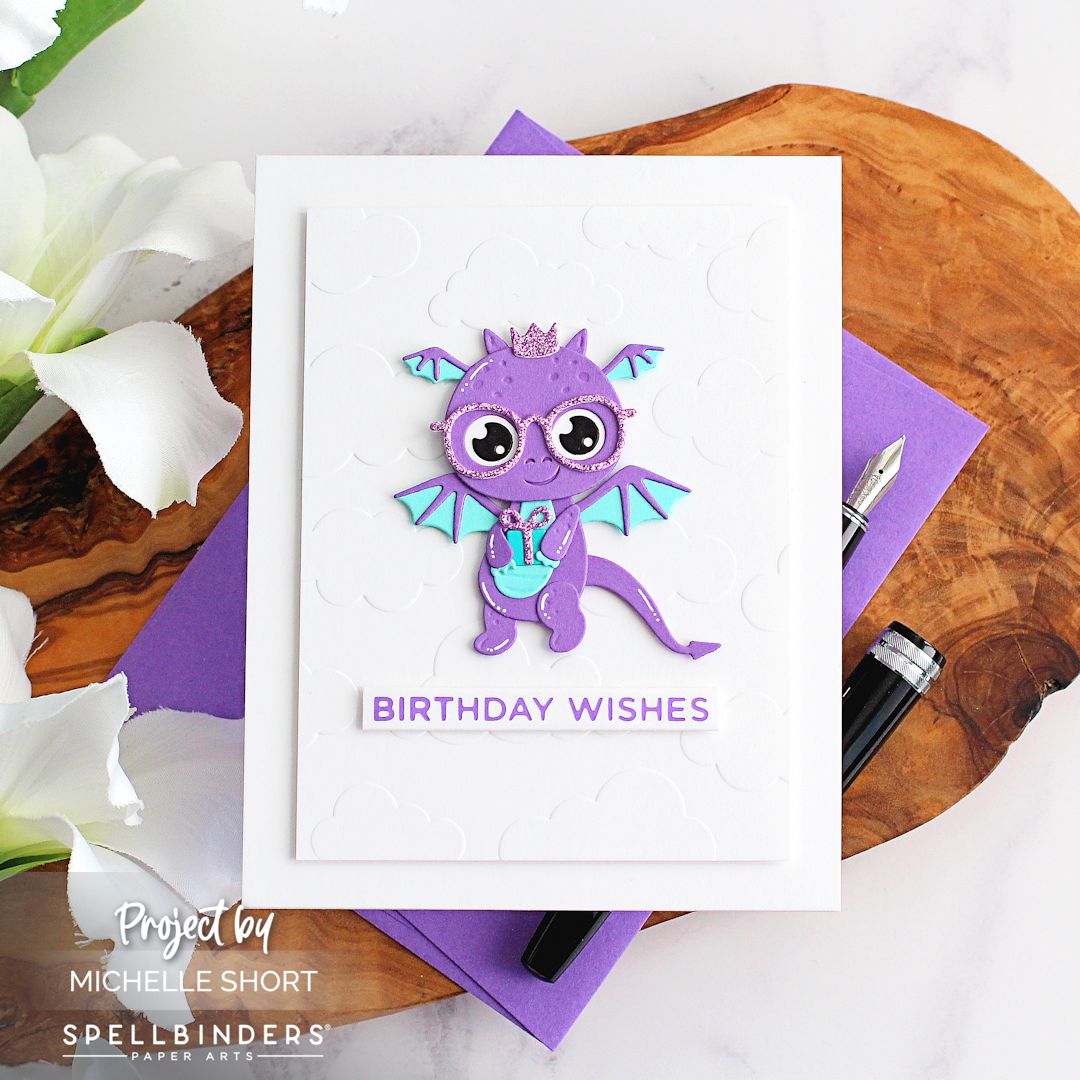
Hello there, today I have a card to share using the beautiful Cosmos Backdrop Press Plate from the Spellbinders Pressed Posies Collection. Whilst I wouldn't usually go for a whole over plate pattern (preferring to stick to a set focal point), this plate is gorgeous and I couldn't resist! 

PLEASE NOTE: This post contains affiliate links. Please see below for my full disclosure.


Although these are press plates that I am using today (to be used with the Spellbinders BetterPress System), I opted to hot foil with them instead. I find that the press plates give beautiful foiled results! I started off by hot foiling the Spellbinders Cosmos Backdrop Press Plate onto white cardstock using Spellbinders Silver Foil and the Spellbinders Glimmer Hot Foil System


I then took the coordinating stencils for the plate, and one by one, placed them on top of the image, adding ink blending to colour it in. I used Altenew Enchanted Garden Crisp Dye Inks for the flower petals, Altenew Golden Sunset Fresh Dye Inks for the flower centres, and Altenew Green Valley Crisp Dye Inks for the leaves. 


I then simply cut the panel down and adhered it onto a US A2 sized white card base with thin foam tape. I took the Spellbinders You Are Everything Sentiments Press Plate & Die Set and foiled it onto white cardstock using Spellbinders Silver Foil. They were die cut out and then I also die cut it another two times, so that I could stack them up to create dimension. The sentiment was then adhered to the card using Bearly Art Glue

SUPPLIES:


Here are the links to what I have used on the project. Affiliate links are used on some products. This means that if you make a purchase after clicking on my link, I receive a small commission with no extra cost to you. I truly appreciate your support when using these links. Please click on the logo below the product to shop at your favourite store. All products were personally purchased except those from Clearly Besotted, Hero Arts or those marked with an asterisk (*) which were kindly sent to me to use. You can read my full disclosure here.


I decided to keep the card as is without embellishment as there is a lot of foil on there and that sparkles and glistens enough, I think! I would love to try colouring this image too and hopefully I will get time to do that soon! Thank you so much for stopping by today, it is most appreciated. I hope you have a wonderful day! 

23 January 2024

Hero Arts | U Are Loved

Hello there, I am over on the Hero Arts Blog today sharing a card using I Love U Stamp & Cut XL, alongside the Flowers and Hearts Cover Plate. 

PLEASE NOTE: This post contains affiliate links. Please see below for my full disclosure.


I created a simple focal point for my card by die cutting the 'U' from Hero Arts I Love U Stamp & Cut XL four times from white cardstock and stacking them up one on top of another. The accompanying sentiment from the set was heat embossed in white onto black cardstock and cut into a strip. 


I die cut the Hero Arts Flowers and Hearts Cover Plate from white cardstock and added ink blending on top using Hero Arts Core Inks. The flowers were arranged on an A2 sized white card base, cutting down the flowers as required, and then the sentiment popped on top. For some added sparkle, I die cut the dots in the cover plate from white glitter cardstock and adhered them around the flowers. 

SUPPLIES:


Here are the links to what I have used on the project. Affiliate links are used on some products. This means that if you make a purchase after clicking on my link, I receive a small commission with no extra cost to you. I truly appreciate your support when using these links. Please click on the logo below the product to shop at your favourite store. All products were personally purchased except those from Clearly Besotted, Hero Arts or those marked with an asterisk (*) which were kindly sent to me to use. You can read my full disclosure here.


For the full details on how I made the card, please head over to the Hero Arts Blog. Thank you so much for stopping by today, I really appreciate it. I hope you have a wonderful day! 

19 January 2024

VIDEO | MFT Paper Planes

Hello there, I am delighted to be over on the My Favorite Things YouTube channel today, sharing a card using the Paper Planes set from the January release. This is such a cute set that is perfect for lots of different occasions. For my card today, I created a hugs card with a rainbow colour scheme.  

PLEASE NOTE: This post contains affiliate links. Please see below for my full disclosure.


I started off by creating the background. I partially die cut one of the MFT Jumbo Fishtail Banner STAX Die-namics from white cardstock. I just cut the bottom banner piece only, so that I can could make the shape longer in height. I then cut the sides using a guillotine. I placed the MFT Cloud Stencil on top and then using blending brushes, I blended Distress Inks on top to create the colourful clouds. 


After using Picked Raspberry for the top layer, I removed the stencil, rotated it and placed it back below the first cloud layer. This layer was blended with Dried Marigold. I continued this with all the layers (roating the stencil as I went) using the following colours - Mustard Seed, Cracked Pistachio, Mermaid Lagoon and Wilted Violet. I finished off with Picked Raspberry at the bottom. 


I then stamped the images from the MFT Paper Planes Stamp Set onto white cardstock using black ink. They were coloured using Copic Markers (the colours that I used are listed below the supplies area) and then die cut out using the coordinating Paper Planes Die-namics. The sentiment from the set was stamped onto MFT Black Licorice Cardstock using Versamark Ink


I applied white embossing powder and heat set. It was then cut into a strip. I adhered the clouds to the banner piece using liquid glue and adhered the birds and dog/plane with thin foam tape. I added thin foam tape to the back of the banner and then adhered it to a US A2 sized white card base. To finish off, I added Nuvo Crystal Glaze to the googles. 

VIDEO:

Here is the video showing how I made the card:


If you are viewing this blog post via email subscription, you can watch the video HERE on YouTube. 

SUPPLIES:


Here are the links to what I have used on the project. Affiliate links are used on some products. This means that if you make a purchase after clicking on my link, I receive a small commission with no extra cost to you. I truly appreciate your support when using these links. Please click on the logo below the product to shop at your favourite store. All products were personally purchased except those from Clearly Besotted, Hero Arts or those marked with an asterisk (*) which were kindly sent to me to use. You can read my full disclosure here.


COPIC MARKERS: Dog - E49, E59, E57, E55. Googles & scarf - B18, B06, B04, B02. Plane - C7, C5, C3, C0, C00. Pink cloud - RV55, RV52, 0. Pink bird - RV66, RV55, RV52/Y13. Orange clouds - YR65, YR61, YR0000, 0. Green/mint cloud - G02, G00, G000, 0. Blue cloud - B01, B000, B0000, 0. Blue bird - B04, B02, B01, B000/Y13. Violet clouds - V15, V12, V01, 0. 

I really like how the stamped clouds and birds colour coordinate with the clouds in the background. I thought it was just a fun touch to the card! Thank you so much for stopping by today, I really do appreciate it. I hope you have a wonderful day and a great weekend too! Take care! 

17 January 2024

Spellbinders | Fresh Picked Daffodils

Hello there, today I have a card to share using the Fresh Picked Daffodils dies from the new Spellbinders Fresh Picked Collection. I had planned on making the card in a traditional colour palette but then I saw a planner/notebook with a floral design on. It had a dark background and grey leaves and I really liked it, so I popped some purple in as an accent colour too. 

PLEASE NOTE: This post contains affiliate links. Please see below for my full disclosure.


I started off the card by die cutting the Spellbinders Fresh Picked Daffodils Etched Dies leaves from Spellbinders Fog Cardstock twice. I then cut the daffodil petals from Spellbinders Snowdrift Cardstock. For the flower centres, I used Spellbinders Purple Mist and Lilac Blossom Cardstock. 


I stacked the leaves one on top of another using Bearly Art Glue first and then adhered them onto a black US A2 sized white card base. I adhered the flower centres to the petals using Bearly Art Glue and then adhered them to the card using thin foam tape. 


I took the thanks word from the Spellbinders Yana's Layered Script Sentiments Etched Dies from black cardstock three times and adhered them one on top of another onto the shadow piece cut from white cardstock. It was then adhered to the card with more thin foam tape. To finish off, I added three Spellbinders Silver Mix Color Essentials Gems to the stamens on the flower. 

SUPPLIES:


Here are the links to what I have used on the project. Affiliate links are used on some products. This means that if you make a purchase after clicking on my link, I receive a small commission with no extra cost to you. I truly appreciate your support when using these links. Please click on the logo below the product to shop at your favourite store. All products were personally purchased except those from Clearly Besotted, Hero Arts or those marked with an asterisk (*) which were kindly sent to me to use. You can read my full disclosure here.


These sets are made to fit inside an A2 card base in a stylized way, but you can use them in different ways too. Thank you so much for stopping by today, I hope you have a wonderful day! 

11 January 2024

VIDEO | MFT Darling Dragons

Hello there, I am delighted to be over on the My Favorite Things YouTube Channel again, sharing a circle card using the new Darling Dragons set that was released on Tuesday.

PLEASE NOTE: This post contains affiliate links. Please see below for my full disclosure.


I started off by stamping the dragon and clouds from the MFT YUZU Darling Dragons Stamp Set onto white cardstock using black ink. I then coloured them using Copic Markers and Polychromos Pencils (the colours that I used are listed below the supplies area). They were die cut out using the MFT YUZU Darling Dragons Die-namics


I then die cut three circles using the MFT A2 Stitched Circle STAX Die-namics from white cardstock. On one, I die cut it further using the MFT Tall Grass Die-namics. I added ink blending to it using Twisted Citron, Mowed Lawn and Rustic Wilderness Distress Inks. I then added Peacock Feathers Distress Ink to the centre of one of the other circles. 


I adhered the grass to the bottom of it and then set it aside to work on the other circle. I cut a little off the bottom (to help the card stand up better) and then added a score line towards the top to create a hinge. I added adhesive to this and then adhered it to the front piece to create a card base. The clouds and dragon were adhered to the front of the card with thin foam tape. 


I took the 'thank you' sentiment from the MFT Smooches Stamp Set and stamped it onto black cardstock using Versamark Ink. I applied white embossing powder and heat set. It was cut into a strip using the MFT Itty Bitty Strips Die-namics. It was adhered to the card with more thin foam tape. To finish off, I added clear glaze pen to the centre of the flower, as well as the nostrils. I then added black glaze pen to the eyes, followed by white gel pen highlights to the dragon. 

VIDEO:

Here is the video showing how I made the card:


If you are viewing this blog post via email subscription, you can watch the video HERE on YouTube. 

SUPPLIES:


Here are the links to what I have used on the project. Affiliate links are used on some products. This means that if you make a purchase after clicking on my link, I receive a small commission with no extra cost to you. I truly appreciate your support when using these links. Please click on the logo below the product to shop at your favourite store. All products were personally purchased except those from Clearly Besotted, Hero Arts or those marked with an asterisk (*) which were kindly sent to me to use. You can read my full disclosure here.


COPIC MARKERS: Dragon - V09, V17, V15, V12/BG13, BG11, BG10 + Polychromos 153, 156. Flower - Y17, Y13/RV66, RV55, RV52/YG23. Clouds - BG13, BG10, 0. 

The Darling Dragons set is so cute! I love that although they are Valentine's themed, you can use them for other occasions too. Thank you so much for stopping by, have a great rest of the day! 

Simon Says Stamp | Printmaking Hearts

Hello there, today I have two cards to share with you using the new Printmaking Hearts Stamp Set from the Simon Says Stamp Sweetheart Collection, which is out today. Whilst the set is more on the Valentine's theme, I decided to use non-traditional colours and make more generic cards that could be used for other occasions (especially the aqua one). 

PLEASE NOTE: This post contains affiliate links. Please see below for my full disclosure.


I started off my cards by stamping the Simon Says Stamp Printmaking Hearts stamp onto white cardstock. The image has three layers (all nine hearts on one layer), so that you can use different colours for the different layers if you want to. Whilst my hearts are not perfect, I did find the layers pretty easy to line up. 


For the aqua card I used Altenew Sweet Dreams Fresh Dye Inks (Dew Drops, Aqualicious and Teal Cave). For the blue card, I used Altenew Blue Mountains Fresh Dye Inks (Water Hyacinth, Alpine Aster and Crystal Violet). The panels were then die cut out using a Hero Arts Rectangle Infinity Die and adhered to US A2 sized white card bases with thin foam tape. 


I stamped the sentiments from the Simon Says Stamp Printmaking Hearts Stamp Set onto black cardstock using Versamark Ink. I applied white embossing powder and heat set. They were cut into strips using the Simon Says Stamp Sentiment Labels Dies and adhered to the cards using more thin foam tape. 


To finish off, I adhered Concord & 9th Dew Drops to the hearts using Bearly Art Glue. I do love the non-traditional colours but I think I am going to make some in pinks and reds for anniversary cards too! 

SUPPLIES:


Here are the links to what I have used on the projects. Affiliate links are used on some products. This means that if you make a purchase after clicking on my link, I receive a small commission with no extra cost to you. I truly appreciate your support when using these links. Please click on the logo below the product to shop at your favourite store. All products were personally purchased except those from Clearly Besotted, Hero Arts or those marked with an asterisk (*) which were kindly sent to me to use. You can read my full disclosure here.


Thank you so much for stopping by today, I really do appreciate it. I will be back later with another post, but in the mean-time, I hope you have a wonderful day! 

10 January 2024

Altenew | January 2024 Release Blog Hop + Giveaway

Hello there, I am delighted to be joining Altenew today to celebrate the January 2024 release with a fun blog hop. I have lots to share today, so I hope you will grab a drink and a snack and enjoy the inspiration! 

PLEASE NOTE: This post contains affiliate links. Please see below for my full disclosure.


My first card today uses Altenew Build-A-Garden: Daisy Crown & Add On Die Bundle (it can be purchased without the die also). I started off by stamping the main image from the stamp set onto white cardstock using Altenew Obsidian Pigment Ink


Using the stencil in the kit, as well as Altenew Mini Blending Brushes, I blended ink on top to colour the image. I used Altenew Enchanted Garden Crisp Dye Inks for the petals, Altenew Golden Sunset Fresh Dye Inks for the centres and Altenew Green Valley Crisp Dye Inks for the leaves and stems. It was then die cut out using the coordinating die. I adhered it onto a US A2 sized white card base with Altenew Instant Dimension Foam Tape


I then stamped the 'thanks' sentiment from the set onto white cardstock using Obsidian Pigment Ink. It was die cut out using the coordinating die. For the accompanying sentiment, I used the sentiment from Altenew Paint-A-Flower: Iceland Poppies Stamp Set. It was stamped onto black cardstock using Altenew Embossing Ink. I applied Altenew Pure White Crisp Embossing Powder, heat set and cut into a strip. Both were adhered to the card with more foam tape. To finish off, I added a few Altenew Enchanted Garden Enamel Dots


My next card uses the beautiful Altenew Mega Blossom Stencil Set (4 in 1). One by one, I placed the stencils onto a panel of white cardstock and added ink blending with an Altenew Mini Blending Brush. I used Altenew Sweet Dreams Fresh Dye Ink for the petals and Altenew Green Valley Crisp Dye Ink for the stem and leaves. 


I adhered the panel to a US A2 sized white card base with tape runner adhesive. I then stamped the 'hello' from Altenew Build-A-Garden: Daisy Crown onto white cardstock using Altenew Obsidian Pigment Ink. It was die cut using the coordinating die. 


I took the sentiment from the Altenew Soft Blossoms Stamp Set and stamped it onto black cardstock and heat embossed. It was then cut into a strip. Both were adhered to the card with Altenew Instant Dimension Foam Tape. To finish off, I added a few iridescent bubble embellishments. 


My next card uses the new Altenew Zero-Waste: Field of Flowers Die. If you are not familiar with this concept, the idea is that you can use both the negative and positive of the die, so not to waste anything! I only used the negative on my card today but you can definitely use both! 


I started off by die cutting the die from white cardstock. I then used the Altenew Zero-Waste Layering Stencil Set to colour the pieces in. I used Altenew Enchanted Evening, Green Valley and Sweet Dreams Inks. I scored an A2 sized white card base with horizontal lines and then adhered the flowers and leaves on top. I adhered some flat and some with foam tape. 


I then die cut the 'hello' sentiment from the Altenew Timeless Sentiments Die Set from white cardstock. On the word itself, I added ink blending with Altenew Enchanted Garden Inks, stacked it up on another white die cut and then adhered it to the shadow piece. It was then adhered to the card with thin foam tape. To finish off, I added a few silver gems. 


My last card for today uses the new Altenew Enchanted Beginnings 3D Embossing Folder. I placed a panel of white cardstock inside it and ran it through my die cutting machine. Using the Altenew Enchanted Beginnings Simple Coloring Stencil, I added ink blending to the image to colour it in. 


I used Altenew Enchanted Garden Crisp Dye Inks for the dress and flowers, Altenew Jet Black Fresh Dye Ink for the suit and Altenew Green Valley Crisp Dye Inks for the leaves. It was adhered to an A2 white card base with tape runner adhesive. 


I stamped the 'congrats' from Altenew Build-A-Garden: Daisy Crown onto white cardstock using Altenew Obsidian Pigment Ink. It was die cut using the coordinating die. The accompanying sentiment is from the same set. It was heat embossed in white onto black cardstock. It was cut into a strip and both sentiments adhered to the card using Altenew Instant Dimension Foam Tape. To finish off, I added a few silver gems to the dress. 


Next up are more new pouches. These are great for organisation! The first one is the new Altenew Zip 'n' Stash pouch. The mesh zipper pouches are 13" x 9.5" and available in three colours - teal (pictured), yellow and blue. They hold a lot of stuff! perfect for storing items or using as project pouches. 


Next are the Altenew Zip 'n' Keep pouches. These 13" x 9.5" pouches are available in packs of three. There is a white back and a clear front. They are available in three colours - grey, white and blue (pictured). 


Also releasing today are Altenew Acrylic Markers 24 Set Vol. 1. These opaque, water based acrylic markers are acid free and have a medium tip. I love the colour selection! Releasing alongside them are Altenew Color-by-Number: Instant Artist - Blossoming Florals 12 Sheets. These sheets are a color by number concept where you can use the acrylic markers (or other mediums) to colour them in. There are six designs, each with a sheet with black outlines and one with a no-line look. 


Although I think the markers look great on the colouring sheets, I have to be honest and say that I couldn't get as neat as a result as I would have liked. So I tried using them on an envelope for some (very simple!) envelope art and loved the results! They will be perfect to colour and draw on lots of different mediums too! 

BLOG HOP:

This blog post is part of a fun, inspirational blog hop with prizes. Please click the links below for the other participants in the hop:

You are invited to the Inlinkz link party!

Click here to enter

GIVEAWAY:

$300 in total prizes! To celebrate this release, Altenew is giving away a $100 gift certificate to 1 lucky winner and a $50 gift certificate to 4 winners! Please leave a comment on the Altenew Card Blog and/or each designer’s blog post on the blog hop list below by 17th January 2024 for a chance to win. Altenew will draw 5 random winners from the comments left on each stop of this blog hop and announce the winners on the Altenew Winners Page on 19th January 2024*The winner of the $100 gift certificate will be chosen from comments left on the Altenew blog.

SUPPLIES:


Here are the links to what I have used on the projects. Affiliate links are used on some products. This means that if you make a purchase after clicking on my link, I receive a small commission with no extra cost to you. I truly appreciate your support when using these links. Please click on the logo below the product to shop at your favourite store. All products were personally purchased except those from Clearly Besotted, Hero Arts or those marked with an asterisk (*) which were kindly sent to me to use. You can read my full disclosure here.


Thank you so much for stopping by today, it really is very appreciated. I hope you have a great rest of the day! 

Spellbinders | Monster Birthday

Hello there and happy Spellbinders release day! I have two cards to share today using the new Monster Birthday Collection. These characters are made so that their legs can move (so cute!), but I decided for these cards, that I would just keep them static and I think they are still as cute! 

PLEASE NOTE: This post contains affiliate links. Please see below for my full disclosure.


For my first card, I started off by die cutting the Spellbinders Dancin' Birthday Dragon Etched Dies from Spellbinders Cardstock. I used Spellbinders Lilac Blossom and Waterfall for the main parts of the body, tail and wings and Onyx for his eyes. I cut the present/gift from Spellbinders Teal Topaz Cardstock and the bow from Simon Says Stamp Glitter Cardstock. I also used the glitter cardstock for his crown and glasses. 


The glasses are from the Spellbinders Smart Glasses Etched Dies set and they are so fun! They are a great size and fit lots of different characters! I assembled the dragon and adhered with Bearly Art Glue. I then took a panel of white cardstock and ran it through my die cutting machine inside the Spellbinders Head in the Clouds Embossing Folder


It was adhered onto a US A2 sized white card base, followed by the dragon (both using thin foam tape). I hot foiled the sentiment from the Spellbinders Everyday Sentiments II Glimmer Hot Foil Plate using Spellbinders Lavender Petal Foil and the Glimmer Hot Foil Machine. It was cut into a strip and adhered to the card with thin foam tape. To finish off, I added a few white gel pen highlights. 


My next card uses Spellbinders Dancin' Birthday Panda Etched Dies. I die cut her from Spellbinders Onyx and Snowdrift Cardstock and added a little Spellbinders Wild Berry Cardstock behind the head piece for her mouth. The bow and glasses were cut from Simon Says Stamp Glitter Cardstock


For the glasses on this one, I added small pieces of acetate behind the openings to look like real glasses! I took a panel of white cardstock and ran it through my die cutting machine inside the Spellbinders Party Spots Embossing Folder. It was adhered to a US A2 sized white card base with thin foam tape. 


The panda was adhered on top, also with thin foam tape. I hot foiled the sentiment from the Spellbinders Everyday Sentiments II Glimmer Hot Foil Plate using Spellbinders Black Foil. It was cut into a strip and adhered to the card with more thin foam tape. To finish off, I added a few white gel pen highlights. 

SUPPLIES:


Here are the links to what I have used on the projects. Affiliate links are used on some products. This means that if you make a purchase after clicking on my link, I receive a small commission with no extra cost to you. I truly appreciate your support when using these links. Please click on the logo below the product to shop at your favourite store. All products were personally purchased except those from Clearly Besotted, Hero Arts or those marked with an asterisk (*) which were kindly sent to me to use. You can read my full disclosure here.


These characters are just absolutely adorable! The glasses just make them ever better! But they would still look cute without them as well. Thank you so much for stopping by today, I really do appreciate it. I will be back later with another project but in the mean-time, I hope you have a wonderful day! 
End of code