Showing posts with label Purple Onion Designs. Show all posts

22 December 2021

Merry & Bright Christmas

Hello there, I am back to share my last Christmas card of 2021 with you. Unfortunately, I didn't get a chance to use all of the products that I wanted for my Christmas cards this year. Every year I tell myself to start earlier and every year I fail! Never mind! Today I have a card to share with you using the adorable Muriel from Purple Onion Designs. Isn't he/she just adorable skating on the ice?

PLEASE NOTE: This post contains affiliate links. Please see below for my full disclosure.


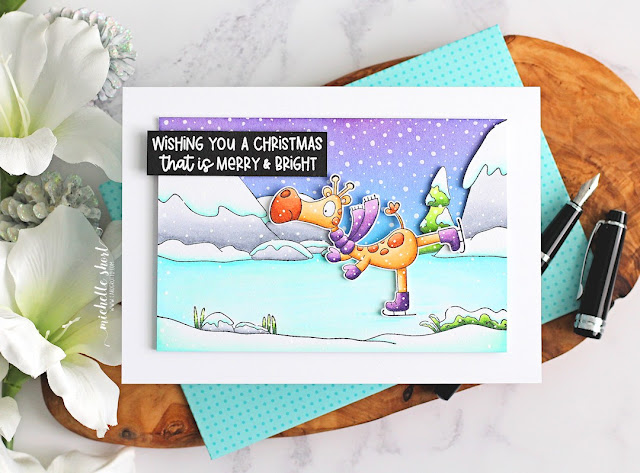
I started off by stamping Purple Onion Designs Muriel with Memento Tuxedo Black Ink on to white cardstock. I also stamped the Purple Onion Designs Snow Much Fun Background Stamp on to another piece of cardstock. Muriel was coloured using Copic Markers (the colours that I used are listed below the supplies list) and fussy cut it out with scissors. 


I then coloured the background scene with Copic Markers before cutting around the top part. I took another panel of white cardstock and added ink blending to it with Distress Inks and blending brushes. I used Mermaid Lagoon at the bottom, Blueprint Sketch in the middle and Seedless Preserves at the top. It was adhered to a 5" x 7" white card base with thin foam tape. I then added the background image on top.


Before adding Muriel on top, I added Arteza White Gel Pen snow to the background. Muriel was added on top with more foam tape. I took the sentiment from the Purple Onion Designs Holiday Messages Sentiment Set and stamped it on to black cardstock with Versamark Ink. I applied white embossing powder and heat set. It was added to the card with more foam tape. 

SUPPLIES:


Here are the links to what I have used on the project. Affiliate links are used on some products. This means that if you make a purchase after clicking on my link, I receive a small commission with no extra cost to you. I truly appreciate your support when using these links. Please click on the logo below the product to shop at your favourite store. All products were personally purchased except those from Clearly Besotted, Hero Arts or those marked with an asterisk (*) which were kindly sent to me to use. You can read my full disclosure here.


COPIC MARKERS: Muriel - YR27, YR24, YR31/E39, E99, E97/R12. Scarf - V09, V17, V15, V12. Mountains - C5, C3, C2, C1, C0. Grass & tree - G29, YG17, YG23, YG03, YG01. Snow - BG13, BG11, BG10. Ice - BG13, BG11, BG10, BG01, BG000, B00, B000, B0000. 

I wouldn't usually use this much foam tape on my cards, it is three layers high, but since I am hand delivering it, I thought it would be ok! Thank you so much for stopping by today, I very much appreciate it. Wishing you a wonderful day! 

4 December 2020

Merry & Bright

Hello there, today I have a card to share with you using stamps from Purple Onion Designs that were released recently. I fell in love with this trio of cuties and I couldn't resist inking them up! 

I started off by creating my background. I blended Distress Inks on to a panel of white cardstock using ink blending brushes. I used Mermaid Lagoon, Blueprint Sketch, Chipped Sapphire and Seedless Preserves. I then sprayed on Sparkle Sheer Shimmer Spritz, followed by Tim Holtz Picket Fence Distress Spray Stain. This does cover up a lot of the ink blending but it gives a lovely frosty look to the sky! 

While the panel was drying, I took another panel of white cardstock and stamped the Purple Onion Designs Sweet Snow Friends Stamp at the bottom with Memento Tuxedo Black Ink. I then extended the lines of snow at the bottom and fussy cut around the image, leaving a small white border. I coloured the critters with Copic Markers (the colours that I used are listed below the supplies area). 

Once the panel was dry, it was adhered to an A2 white card base with foam tape. I then added the image piece on top with tape runner. I took the sentiment from the Purple Onion Designs Holiday Messages Sentiment Set and stamped it on to black cardstock with Versamark Ink. I applied white embossing powder and heat set. It was cut in to a strip and added to the card with foam tape. To finish off, I added  a few Lucy's Bubbles around the sentiment. 

SUPPLIES:

Here are the links to what I have used on the card. Affiliate links are used on some products. This means that if you make a purchase after clicking on my link, I receive a small commission with no extra cost to you. I truly appreciate your support when using these links. Please click on the logo below the product to shop at your favourite store. All products were personally purchased except those from Clearly Besotted, Hero Arts or those marked with an asterisk (*) which were kindly sent to me to use. You can read my full disclosure here.


COPIC MARKERS: Penguin - BV29, BV25, BV23, BV20, YR23, YR21. Scarf - BG49, BG15, BG13, BG11. Snowman - BG11, BG000, BG0000. Hat - C10, C8, C7, C6, C5, V17, V15, V12. Nose - YR18, YR15, YR12. Scarf - V17, V15, V12. Rabbit - W5, W4, W3, W2, W1, W0, R01, R000. Scarf - V17, V15, V12. Hat & jumper - BG49, BG15, BG13, BG11. 

Purple Onion Designs currently has 25% off all stamps (some exclusions apply) until 6th December 2020. If you have been wanting to order from there, now is the time to do it! Thank you so much for stopping by to see me today, I really do appreciate it. I hope you have a lovely day! 

22 May 2020

Purple Onion Designs | Make A Splash!

Hello there, I am back to share my last card using the new Sunshine Lake collection from Purple Onion Designs. This is such a fun collection and I have really enjoyed using the images. Today I have a pool scene to share with you using Cosmo, Peony and Daphne. I have to admit, it didn't quite come out as I had planned, but I guess you win some and you lose some, sadly!
 

I started off by stamping Cosmo (Bear with Float), Peony (Mouse Floating) and Daphne (Beaver Swimming) on to white cardstock with Memento Tuxedo Black Ink. I then coloured them with Copic Markers (the colours that I used are listed below the supplies area) and cut them out with scissors. Once cut out, I ran a black pen around the edges to neaten them up.
 
 
I set the images aside while I worked on my background using Copic Markers. I wanted to have them in/by a swimming pool so I first drew a pool in the bottom left hand corner and then drew a line above it where the tiling would end and the grass started. I used the lightest colours of Copics to map out the drawing and then coloured in using the darker shades. I added lines to the area around the pool to create tiles.
 
I had originally planned to stamp the images directly on the background piece and draw the scene around them but forgot and only realised half way through! Hence why they are stamped on to separate pieces. I think it would have worked better stamping and masking but never mind!
 
 
I stamped the sentiment in the top left hand corner from the Sunshiny Sentiments Set and then adhered the background piece to an A2 white card base with foam tape. I then added Peony with tape runner in the pool, Daphne jumping in to the pool with foam tape and Cosmo standing at the side with thin foam tape. To finish off, I added a few white gel pen highlights.
 
SUPPLIES:
 
Here are the links to what I have used on the card. Affiliate links are used on some products. This means that if you make a purchase after clicking on my link, I receive a small commission with no extra cost to you. I truly appreciate your support when using these links. Please click on the logo below the product to shop at your favourite store. All products were personally purchased except those from Clearly Besotted, Hero Arts or those marked with an asterisk (*) which were kindly sent to me to use. You can read my full disclosure here.
 
 
COPIC MARKERS: Mouse - W5, W3, W1, W0, R12, R00. Costume - R85, R83, R81. Rubber rings/floats - V17, V15, V12, Y17, Y15, Y13, Y11. Goggles - V15, B00, B000. Beaver - E49, E29, E27, E25, E23, E21. Outfit - V17, V15, V12, Y17, V15, V13, Y11. Bear - E59, E57, E55, E53, E51, R12, R00. Costume - BG49, BG15, BG13.
 
You can buy the new stamps from the Sunshine Lake release separately, or as a bundle of 27 image stamps and 6 sentiments for a 30% discount. This offer is valid until 31st May 2020.
 
If I get a chance, I would like to remake this card and try and get it to more like I was thinking it would look in my head. I sadly ran out of time though! Thanks so much for stopping by today, I do very much appreciate it. I hope you are doing well and have a lovely day and weekend. Take care.

20 May 2020

Purple Onion Designs | Treat Yourself!

Hello there, today I have another card to share using the new Sunshine Lake collection from Purple Onion Designs. Today I am using the super cute Marigold and Juliet, who are enjoying their ice creams!
 

I started off by stamping Juliet (Bird at Picnic Table) and Marigold (Bunny with Ice Cream) on to white cardstock with Memento Tuxedo Black Ink. I then coloured them using Copic Markers (the colours that I used are listed below the supplies area). I then fussy cut them out using scissors.
 
 
I took an A2 white card base and placed the Taylored Expressions Rectangle Masking Stencil over the top. I then blended green ink at the bottom for grass. I used Twisted Citron and Mowed Lawn Distress Inks. I then took the MFT Cloud Stencil and placed this towards the top. Using Mermaid Lagoon Distress Ink, I blended on clouds, moving the stencil down as I went.
 
 
The stencils were removed and the sentiment from the Sunshiny Sentiments Set stamped in the top right hand corner. I then added the images on top with foam tape. To finish off, I added a few Hero Hues Enamel Dots and white gel pen highlights to the images.
 
SUPPLIES:

Here are the links to what I have used on the card. Affiliate links are used on some products. This means that if you make a purchase after clicking on my link, I receive a small commission with no extra cost to you. I truly appreciate your support when using these links. Please click on the logo below the product to shop at your favourite store. All products were personally purchased except those from Clearly Besotted, Hero Arts or those marked with an asterisk (*) which were kindly sent to me to use. You can read my full disclosure here.
 
 
COPIC MARKERS: Bird - N5, N3, N1, N00, Y26. Picnic Table - E59, E57, E55, E53. Umbrella - C5, C3, C1, BV09, V17, V15, V12, V01. Bunny - W5, W3, W1, W0, R12, R00. Ice creams - E51, E50, BG11, BG10, R83, R81.
 
You can buy the new stamps from the Sunshine Lake release separately, or as a bundle of 27 image stamps and 6 sentiments for a 30% discount. This offer is valid until 31st May 2020.
 
Thanks so much for stopping by today, I really do appreciate it. I hope you have a wonderful day!

15 May 2020

Purple Onion Designs | Waving Hello

Hello there, I am delighted to share the new Stacey Yacula release from Purple Onion Designs with you! The new Sunshine Lake release is on sale today and for my first card I am using the super cute Maverick, Miki and Gladys who are having fun on the water!
 

I started off by taking a panel of white cardstock. I first stamped the Dock using Memento Tuxedo Black Ink and then made a mask for it using mask paper and added it on top. I then stamped the Grassy Shore on either side. I then took Maverick & Miki and stamped them towards the left of the panel. Made a mask for them and then stamped Gladys to the right. The masks were then all removed.
 
 
The panel was coloured using Copic Markers (the colours that I used are listed below the supplies area). I first drew in a big rock/land to the left. I started colouring this with cool grey markers, then changed to warm grey markers. In the end, I added in brown shades, so the colour does look a bit odd! I then coloured the sky followed by the boat and critters, the sea and then the grass and dock. I added sparkles, dots and highlights to the sea using a white gel pen.
 
 
I adhered the panel to a 8 7/8" x 3 7/8" card base with foam tape. I took the sentiment from the Sunshiny Sentiments Set and stamped it on to black cardstock with Versamark Ink. I applied white embossing powder and heat set. It was cut in to a strip with a banner end and then added to the right bottom corner with more foam tape.
 
SUPPLIES:

Here are the links to what I have used on the card. Affiliate links are used on some products. This means that if you make a purchase after clicking on my link, I receive a small commission with no extra cost to you. I truly appreciate your support when using these links. Please click on the logo below the product to shop at your favourite store. All products were personally purchased except those from Clearly Besotted, Hero Arts or those marked with an asterisk (*) which were kindly sent to me to use. You can read my full disclosure here.
 
 
COPIC MARKERS: Sky - B02, B01, B00, B000, B000. Rock/island - C5, C3, C1, W5, W3, W1, E44, E43, E41. Dock - E57, E55, E53. Grass - G46, YG25, YG03. Sea - BG49, BG15, BG13, BG11, BG000. Life jackets - Y17, Y15, Y13, Y11. Boat - C10, C8, C7, C6, C5, C3, C1, C0, B000, V17, V15, V12. Raccoon - W8, W7, W6, W5, W3, W2, W1, R12, R000. Mouse - E37, E35, E34, E31, R12, R000. Fox - E18, E19, E09, E07, E15, E13, E31, E30, E50. Skis - V17, V15, V12.
 
You can buy the new stamps from the Sunshine Lake release separately, or as a bundle of 27 image stamps and 6 sentiments for a 30% discount. This offer is valid until 31st May 2020.

I haven't made a slimline card for a while. I used to make them all the time when I first started crafting. I am glad that they have become popular again! For more inspiration using the new release, please head over to the Purple Onion Designs Blog. Thanks so much for stopping by today, I do very much appreciate it. I hope you have a wonderful day and a great weekend. Take care!

3 November 2019

Purple Onion Designs | Snow Much Fun

Hello there, I am back to day to share my final card with you using the new Pine Cone Trail release from Purple Onion Designs (but I will be making more cards using it in the future, they are too cute not to!). Today's card uses Blaze (Skiing Skunk) and isn't she just so cute!
 

I started off by stamping Purple Onion Designs Blaze (Skiing Skunk) on to white cardstock with Memento Tuxedo Black Ink. I then coloured her using Copic Markers (the colours that I used are listed below the supplies area) and fussy cut her out with scissors. She was then set aside while I worked on my background.
 
 
I took a panel of white cardstock and placed the MFT Drifts & Hills Stencil at the bottom for a snow bank. I then blended Distress Inks above it. I used Wilted Violet and Shaded Lilac. I then spritzed the panel with Sparkle Sheer Shimmer Spritz and set it aside to dry.
 
 
Once dry, I took the sentiment from the Purple Onion Designs Warming Winter Thoughts Sentiment Set and stamped it in to the top right hand corner. The panel was adhered to an A2 white card base with foam tape. I then added the skunk on with more foam tape to finish.
 
SUPPLIES:

Here are the links to what I have used on the card. Affiliate links are used on some products. This means that if you make a purchase after clicking on my link, I receive a small commission with no extra cost to you. I truly appreciate your support when using these links. Please click on the logo below the product to shop at your favourite store. All products were personally purchased except those from Clearly Besotted, Hero Arts or those marked with an asterisk (*) which were kindly sent to me to use. You can read my full disclosure here.
 
 
COPIC MARKERS: Skunk - C9, C7, C6, C5, C3, C1, C00. Skis - E57, E55, E53. Scarf - V17, V25, V22, V20.
 
I think she looks so cute skiing down the hill! For more inspiration using the new release, please head over to the Purple Onion Design Blog. Thank you so much for stopping by today. I really do appreciate it. I hope you have a great day!

26 October 2019

Purple Onion Designs | Winter Wishes

Hello there, today I have another card to share with you using the new Pine Cone Trail release from Purple Onion Designs. This time I am using the adorable Ember. Isn't she so cute, skiing down the mountain?
 

I started off my card by stamping Purple Onion Designs Ember (Skiing Bunny) on to white cardstock with Memento Tuxedo Black Ink. I then coloured her with Copic Markers (the colours that I used are listed below the supplies section) and fussy cut her out with scissors. I set her aside while I worked on my background.
 
 
I took a piece of mylar that I had cut using a Hero Arts Nesting Circle Infinity Die and placed this over a panel of white cardstock to use as a mask. I then stamped the Purple Onion Designs Snow Day Hill stamp on top using black ink. Before the mask was removed, I drew a faint pencil line on the inside of the circle so that it gave me a guide of where to colour.
 
 
The background image was then coloured with Copic Markers before erasing the pencil lines. I took the sentiment from the Purple Onion Designs Warming Winter Thoughts Sentiment Set and masked off the top part of the sentiment and stamped out the 'winter' and 'wishes' separately. These were cut in to strips. I adhered the background panel to an A2 white card base and then added the bunny and sentiments on top with foam tape. To finish off, I added Tonic Nuvo Aqua Shimmer Pen to the scarf.
 
SUPPLIES:

Here are the links to what I have used on the card. Affiliate links are used on some products. This means that if you make a purchase after clicking on my link, I receive a small commission with no extra cost to you. I truly appreciate your support when using these links. Please click on the logo below the product to shop at your favourite store. All products were personally purchased except those from Clearly Besotted, Hero Arts or those marked with an asterisk (*) which were kindly sent to me to use. You can read my full disclosure here.
 
 
COPIC MARKERS: Bunny - W6, W4, W3, W2, W1, W0, R00, R000. Scarf & gloves - V17, V15, V12. Skis - C5, C3, C1. Trees - G21. Sky - B02, B00, B000, B0000. Snow - BG11, BG000, BG000.
 
I love Stacey Yacula's critters, they are just so cute! For more inspiration using the new release, please head over to the Purple Onion Designs Blog. Thank you so much for stopping by today, I really do appreciate it. I hope you have a great weekend!

25 October 2019

Purple Onion Designs | Christmas Snowman

Hello there, I am delighted to be joining Purple Onion Designs for their new Pine Cone Trail release. The wonderful new collection is in the shops now and let me tell you, it is so cute! Today I am using the new Bianca & Neve stamp.
 

For my card today, I started off by creating the background. I took a panel of watercolour paper and blended on Distress Inks in Blueprint Sketch and Seedless Preserves (at the top) to create a sky for my snowman to be in. I then spritzed the piece with water before splattering on some Picket Fence Distress Paint. The piece was then set aside to dry.
 
 
I took the Purple Onion Designs Bianca & Neve (Snowman with Winter Bird) stamp and stamped it on to white cardstock with Memento Tuxedo Black Ink. I then coloured it using Copic Markers (the colours that I used are listed below the supplies area) before fussy cutting out with scissors. I took the Purple Onion Designs Merry Christmas stamp and stamped it on to black cardstock with Versamark Ink. I applied White Embossing Powder and heat set. This was then cut in to a strip.
 
 
Once the background was dry, I adhered it flat to an A2 white card base and then added a strip of MFT Black & White Stripes Paper, as well as a strip of black cardstock to the left of the panel so that my snowman and bird could sit on top. The image was added on with foam tape. I then added the sentiment with more foam tape into the top right hand corner. To finish off, I added Tonic White Blizzard Nuvo Drops to the snowman's hat and Nuvo Crystal Glaze to his buttons.
 
SUPPLIES:

Here are the links to what I have used on the card. Affiliate links are used on some products. This means that if you make a purchase after clicking on my link, I receive a small commission with no extra cost to you. I truly appreciate your support when using these links. Please click on the logo below the product to shop at your favourite store. All products were personally purchased except those from Clearly Besotted, Hero Arts or those marked with an asterisk (*) which were kindly sent to me to use. You can read my full disclosure here.
 
 
COPIC MARKERS: Snowman - BG11, BG000, BG000, E57, E55, E53, YR18, YR16, YR15. Buttons - C8, C5. Scarf & Hat - BV08, BV04, BV02. Bird - E51, E50, B18, B16, B14.
 
I went a bit heavy handed with the paint so my snowman and bird look like they are in a blizzard, poor things, but they are still smiling, so that's ok! :) For more inspiration using the new release, please head over to the Purple Onion Designs Blog. Thanks so much for popping by today, I hope you have a great day!

27 July 2019

Have A Great Day!

Hello there, I am back today to share a card using Purple Onion Designs stamps. Although I love all the cute critters, for my card today, I thought I would use the beautiful Sunflowers stamp.
 

I started off by taking a panel of mask paper and cutting a Hero Arts Nesting Circle Infinity Die from it. I placed this over a panel of white cardstock and then stamped the Purple Onion Designs Sunflowers Stamp inside the opening with black ink. I then made a mask for the sunflowers and placed them on top of the image.

 
Using an ink blending tool, I blended on Distress Inks in Mermaid Lagoon and Blueprint Sketch. I then took a paintbrush and water and flicked on some water to great the reaction on the inks. I removed all the masks and the panel was set aside to dry. Once dry, I coloured the sunflowers using Copic Markers (the colours that I used are listed below the supplies area).


The panel was then added to an A2 white card base with tape runner. I took the sentiment from the Purple Onion Designs Everyday Blurb Stamp Set and stamped this on to a separate piece of white cardstock with more black ink. It was then cut out and added to the card with foam tape. To finish off, I added a few Raindrops as well as white gel pen dots on the sunflowers.
 
SUPPLIES:

Here are the links to what I have used on the card. Affiliate links are used on some products. This means that if you make a purchase after clicking on my link, I receive a small commission with no extra cost to you. I truly appreciate your support when using these links. Please click on the logo below the product to shop at your favourite store. All products were personally purchased except those from Clearly Besotted, Hero Arts or those marked with an asterisk (*) which were kindly sent to me to use. You can read my full disclosure here.
 
 
COPIC MARKERS: Y19, Y15, Y11, E79, E77, E74, E71, YG17, YG23, YG03, YG01.
 
 
The Purple Onion Designs Anniversary sale is still going on. All stamps are 25% off until 29th July. There isn't much time left so I hope that you will check it out. For more inspiration using their stamps, please head over to the Purple Onion Designs Blog.
 
This card is winging it's way to a sunflower loving friend as we speak and I hope that it will brighten up her day when she receives it! Thank you so much for stopping by to see me today, I really do appreciate it. I hope you have a great weekend!

19 July 2019

Purple Onion Designs Birthday Billy + Sale News

Hello there, today kicks off the start of the Purple Onion Designs Anniversary sale. I will have more details on that below but to celebrate the sale, I have made a couple of cards. My first card uses a few different stamps to create a little scene.
 

I started off my card by taking a panel of white cardstock and stamping Billy (Goat) on to it using Memento Tuxedo Black Ink. I then made a mask for him and stamped the balloon from the Fair Accessories Set so that it looked like her was holding it. I also made a mask for this and then stamped the Spring Fence Stamp on top.
 
 
I then took the Clouds stamps and stamped these in the sky, followed by the sentiment from the Carnival Blurb Set. The masks were then removed and the image panel coloured with Copic Markers (the colours that I used are listed below the supplies area).
 
 
I started off by colouring the background first - the sky and grass and then coloured the goat, balloon, fence and clouds. The image panel was then simply adhered to an A2 white card base with foam tape.
 
SUPPLIES:

Here are the links to what I have used on the card. Affiliate links are used on some products. This means that if you make a purchase after clicking on my link, I receive a small commission with no extra cost to you. I truly appreciate your support when using these links. Please click on the logo below the product to shop at your favourite store. All products were personally purchased except those from Clearly Besotted, Hero Arts or those marked with an asterisk (*) which were kindly sent to me to use. You can read my full disclosure here.
 

COPIC MARKERS: Goat - E47, E44, E43, E42, E41, E40, R00, R000. Balloon & bowtie - V17, V15, V12. fence - E57, E55, E53. Clouds - C3, C0. Sky - B02, B00, B000, B0000. Grass - YG17, YG25, YG23, YG03, YG01.
 
SALE NEWS
 
For the anniversary sale, all stamps are 25% off from now until July 29th. So if you have been thinking of making an order, now is the time to do it!
 
Purple Onion Designs stamps are perfect for scene building, I love how you can easily combine them. For more inspiration using them, please head over to the Purple Onion Designs Blog. I will have another card using more POD stamps next week. Thank you so much for visiting me today. I very much appreciate it. I hope you have a lovely day and an excellent weekend!

3 May 2019

Have A Little Fun On Your Birthday!

Hello there, today I am back to share another card that I have made with the new Sunny Meadow Fair collection from Purple Onion Designs. Today I am using the super cute Roller Coaster image. This is a large image that can take the full focal point on card.
 

I started off by stamping the Roller Coaster stamp on to a panel of white cardstock. I then made a mask for this and added it on top. I stamped the sentiment from the new Carnival/Marquee Sentiments set in to the top right hand corner and then started blending on inks for the background. Using a blender brush I blended on Squeezed Lemonade, Worn Lipstick and Wilted Violet Distress Oxide Inks.
 
 
I removed the masks and then coloured in the image with Copic Markers (the colours that I used are listed below the supplies area). The panel was then simply added to a 5.5" x 5.5" card base with foam tape.
 
SUPPLIES:

Here are the links to what I have used on the card. Affiliate links are used on some products. This means that if you make a purchase after clicking on my link, I receive a small commission with no extra cost to you. I truly appreciate your support when using these links. Please click on the logo below the product to shop at your favourite store. All products were personally purchased except those from Clearly Besotted, Hero Arts or those marked with an asterisk (*) which were kindly sent to me to use. You can read my full disclosure here.
 
 
COPIC MARKERS: Pig - R21, R30, R00, R0000. Neck Tie - V17, V15, V12.Owl - E47, E44, E43, E42, E41, E40, Y26. Roller-coaster track - E59, E57, E55, C5, C3, C1. Train - C10, C8, C7, C6, V17, V15, V12.
 
It was nice to do some different colours in the background for this image. I think it helps with the fun factor! For more inspiration using the new release, please do check out the Purple Onion Designs Blog. Thanks so much for popping by to see me today, I really do appreciate it.

2 May 2019

You're So Sweet!

Hello there, I am delighted to be joining Purple Onion Designs this week for the release of their new Sunny Meadow Fair collection. These images are absolutely adorable and I will have cards to share with you today and tomorrow using a few of the new stamps.
 

My card today uses the adorable Pinky (Pig with Cotton Candy/Ice Cream) and  Cotton Candy Cart images. I started off by stamping Pinky the pig onto a panel of white cardstock with Memento Tuxedo Black Ink. I then made a mask for him and stamped the Cotton Candy Cart so that it will be behind him slightly. I made a mask for this too so that I could do some ink blending in the background. I added a strip of Post-It tape below the images and then added in some clouds. I used The MFT Mini Cloud Edges Stencil and Tumbled Glass Distress Ink for this.
 
 
I then added in some Twisted Citron and Mowed Lawn Ink for the grass. I removed the masks and coloured the images with Copic Markers (the colours that I used are listed below the supplies section). The panel was then added to a white A2 card base with foam tape. I took the sentiment from the Carnival Blurb Set, stamped it on to white cardstock with black in and then cut it out in to a strip. This was added to the card with more foam tape. To finish off, I added Crystal Glaze to the pig's nose.
 
 
SUPPLIES:

Here are the links to what I have used on the card. Affiliate links are used on some products. This means that if you make a purchase after clicking on my link, I receive a small commission with no extra cost to you. I truly appreciate your support when using these links. Please click on the logo below the product to shop at your favourite store. All products were personally purchased except those from Clearly Besotted, Hero Arts or those marked with an asterisk (*) which were kindly sent to me to use. You can read my full disclosure here.
 
 
COPIC MARKERS: Pig - R20, E02, E01, E00, R000. Neck Tie - V17, V15, V12. Candy Floss - RV55, RV52, RV000. Stand - R85, R83, R81, Y15, Y11, Y00, C5, C3, C1.
 
Isn't he absolutely adorable? I thought the sentiment worked perfectly with the candy floss/cotton candy. For more inspiration, please head over to the Purple Onion Design Blog. Thanks so much for visiting me today, I hope you have a wonderful day!

20 April 2019

Happy Easter

Hello there, wishing you all a very happy Easter, if you celebrate, if not, happy weekend! I am here today to share a card that I made for my mum for Easter. I used the adorable Bella from Purple Onion Designs. I have used her before for general cards but I thought she would look cute on an Easter card too.
 

I started off by stamping Bella (Bunny Holding Long Flower) on to white cardstock with Memento Tuxedo Black Ink. I coloured her with Copic Markers (the colours that I used are listed below the supplies section) and then fussy cut her out with scissors. I took an A2 white card base and blended clouds on to the top section. I used Broken China Distress Ink, along with the MFT Mini Cloud Edges Stencil.
 
 
I then took the MFT Grassy Edges Stencil and added a little grass section at the bottom of the clouds. I used Twisted Citron and Mowed Lawn Distress Inks for this. I took the sentiment from the Purple Onion Designs Sweet Occasions Sentiment Set and stamped it on to the grass with Memento Tuxedo Black Ink. Bella was then added on with foam tape. To finish off, I added a few dots of Spica Glitter Pen to the flower.
 
SUPPLIES:

Here are the links to what I have used on the card. Affiliate links are used on some products. This means that if you make a purchase after clicking on my link, I receive a small commission with no extra cost to you. I truly appreciate your support when using these links. Please click on the logo below the product to shop at your favourite store. All products were personally purchased except those from Clearly Besotted, Hero Arts or those marked with an asterisk (*) which were kindly sent to me to use. You can read my full disclosure here.
 
 
COPIC MARKERS: Bunny - N5, N3, N2, N1, N0, R00, R000. Flower - Y17, Y15, Y13, Y11, Y00, G43.
 
A very simple card but I thought it was sweet! Thank you so much for stopping by today, I really do appreciate it. I hope you have a wonderful weekend, whatever you are up to!
End of code