Showing posts with label Pinkfresh Studio. Show all posts

29 August 2025

VIDEO | Pinkfresh Studio Whispers of Poinsettia

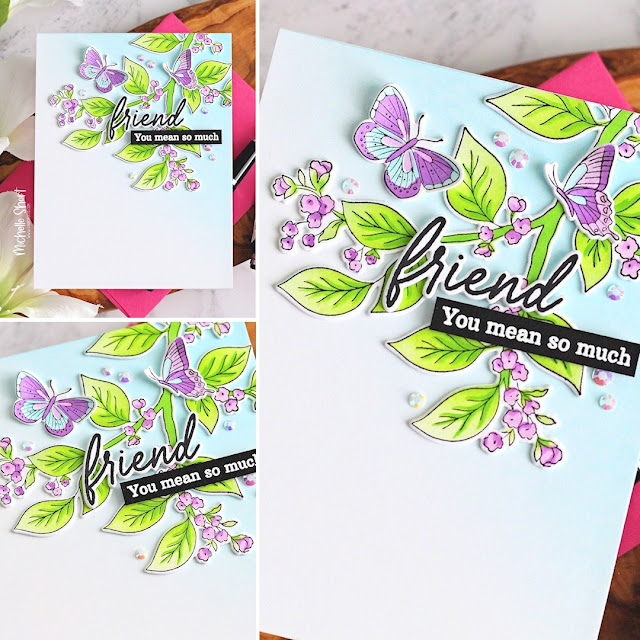
Hello there, I was over on the Pinkfresh Studio YouTube channel yesterday, sharing a card using Whispers of Poinsettia, which was a definite favourite of mine from the August 2025 release! 

PLEASE NOTE: This post contains affiliate links. Please see below for my full disclosure.


I started off my card by adding ink blending to the Pinkfresh Studio Whispers of Poinsettia Stencils. I used Pinkfresh Studio Summer Shower, Seaside, Sapphire and Stargazer Inks for the petals, and Pinkfresh Studio Grassy Knoll, Key Lime and Mermaid Cove for the leaves. I then die cut it out using the Pinkfresh Studio Whispers of Poinsettia Die. Watch the video below to see which layers of the stencil I missed out! 

I wanted just part of the image for my card, so using my scissors, I cut away one of the poinsettias. I added ink blending to a US A2 sized card base made from Spellbinders Cosmic Sky ColorWheel Cardstock using Pinkfresh Studio Sapphire and Stargazer Inks. I then splattered Dr Ph. Martin's Bleed Proof White on top. 

The poinsettia piece was adhered on top using thin foam tape. I hot foiled the sentiment from Pinkfresh Studio The Shelf Edit: Magic of the Season Press Plate using Spellbinders Silver Foil and the Glimmer Hot Foil System. It was die cut out using the coordinating die and adhered to the card. To finish, I embellished with Pinkfresh Studio Iridescent Dew Drops

VIDEO:

Here is the video showing how I made the card:

If you are viewing this post via email subscription, you can watch the video HERE on YouTube. 

SUPPLIES:


Here are the links to what I have used on the project. Affiliate links are used on some products. This means that if you make a purchase after clicking on my link, I receive a small commission with no extra cost to you. I truly appreciate your support when using these links. Please click on the logo below the product to shop at your favourite store. All products were personally purchased except marked with an asterisk (*) which were kindly sent to me to use. You can read my full disclosure here.


Whilst not traditional, I love the poinsettias in blue! Thank you so much for stopping by today, I really do appreciate it. I hope you have a wonderful day and a great weekend! 

20 August 2025

Pinkfresh Studio | Snowy Cottage Lantern Landscape

Hello there, I am delighted to be joining Pinkfresh Studio today to celebrate the Twinkle & Traditions release with a fun Instagram Hop (more info on the hop below). I already shared two projects using the release here and today I have another to share. I am not sure what I am calling this project today - it could be a tag, it could be an ornament, it could just be a little keepsake to give, but I will probably call it a tag for now! 

PLEASE NOTE: This post contains affiliate links. Please see below for my full disclosure.


I started off my tag by creating the landscape image. I took the Pinkfresh Studio Lantern Landscapes: Snowy Cottage Stencils and one by one, placed them onto a panel of white cardstock and added ink blending to them to colour/create the image using Pinkfresh Studio inks and Blending Brushes (I used all three sizes of brushes on this piece). 


I used Pinkfresh Studio Inks in Wisteria, Hydrangea and Opulence for the sky and door, Sheer Freesia and Wisteria for the mountains, Waterfall for the snow, Grassy Knoll for the greenery, Misty Coast and Rocky Slope for the house and pathway, Lemon Whip for the windows, and Bubble Gum for the bow on the wreath. It was then die cut out using the coordinating die in the Pinkfresh Studio Lantern Landscapes Die set. 


I took a panel of Spellbinders Lilac ColorWheel Cardstock and placed the Pinkfresh Studio Lantern Landscapes Stencils on top. I added ink blending with Pinkfresh Studio Hydrangea and Opulence Inks to create the lantern itself. It was then die cut out using the coordinating die from the Pinkfresh Studio Lantern Landscapes Die set. I cut it another three times from the same Lilac cardstock. 


I placed a piece of acetate over one of the lantern pieces and drew a line of where I needed to cut it. I then adhered it to one of the lantern pieces. I adhered two more lantern pieces on top, using Pinkfresh Studio Precision Clear Craft Glue. I adhered the scene into the centre and then adhered the ink blended lantern piece on top. I added ink blending to the last lantern layer and adhered it on the back (since the shape is symmetrical). I also cut another of the die for the landscape piece and adhered that to the back too, so that there is somewhere to write a personal message and it hides the glue on the back too! 


I then took the Pinkfresh Studio Timeless Tidings Stencils and added ink blending to the holly leaves and berries using Pinkfresh Studio Inks in Grassy Knoll, Key Lime and Mermaid Cove for the leaves, and Bubble Gum and Raspberry Bliss for the berries. They were die cut out using the Pinkfresh Studio Timeless Tidings Die and adhered to the top of the lantern. To finish, I tied DMC Silver Metallic Thread through the top of and tied in a loop and then added white gel pen dots to the sky for snow. 

SUPPLIES:


Here are the links to what I have used on the project. Affiliate links are used on some products. This means that if you make a purchase after clicking on my link, I receive a small commission with no extra cost to you. I truly appreciate your support when using these links. Please click on the logo below the product to shop at your favourite store. All products were personally purchased except marked with an asterisk (*) which were kindly sent to me to use. You can read my full disclosure here.


This was so fun to make! You can definitely add this to a card or you could make it into a shaped card too by scoring one of the lantern pieces to create a hinge and adhere it to the back, so that it stands up. To follow along with the hop (and potentially win a prize!) please head over to the Pinkfresh Studio Instagram Page HERE and you can visit mine HERE. Thank you so much for stopping by today, I really do appreciate it. I hope you have a wonderful day! 

19 August 2025

Pinkfresh Studio | Twinkle & Tradition August 2025 Release Blog Hop + Giveaway

Hello there, I am delighted to be joining Pinkfresh Studio today to celebrate the Twinkle & Tradition release with a fun blog hop. The release is Christmas and holiday themed and so very beautiful! I have a card and ornament to share today but I will be back tomorrow sharing more inspiration too! 

PLEASE NOTE: This post contains affiliate links. Please see below for my full disclosure.


My card and ornament today both use the new Pinkfresh Studio Tied with Cheer Die & Stencil Bundle. There are three different wreath designs in the set, plus stencils to ink blend the bow and then the die to cut it out too. 


For the card, I started off by die cutting the three wreaths from the Pinkfresh Studio Tied with Cheer Die & Stencil Bundle from white cardstock. I then added ink blending to them using Pinkfresh Studio Inks in Mermaid Cove for the bottom layer, Grassy Knoll for the middle layer, and Ocean Breeze for the top layer. 


For the bow, I used Pinkfresh Studio Inks in Waterfall, Turquoise and Paradise. I then used the coordinating die to cut it out. I also cut it again another two times from white cardstock and adhered them onto the back of the stencilled one, for added dimension. 


I adhered the wreath layers, one by one, onto a white 4.5" x 4.5" card base using Pinkfresh Studio Precision Clear Craft Glue. I added the glue to the main body of the wreath layers and left the leaf pieces without glue, so that I could lift them up to create a little more dimension. The bow was then adhered at the top. 


I took the 'Warm Holiday Wishes' sentiment from the Pinkfresh Studio Once Upon a Holiday Press Plate set and hot foiled it onto white cardstock using Spellbinders Silver Foil and the Glimmer Hot Foil System. It was then die cut out using the coordinating Pinkfresh Studio Once Upon a Holiday Die. I cut the die another two times from white cardstock and adhered them behind the foiled one before adhering to the card. 


To finish, I embellished with Pinkfresh Studio Dew Drops: Iridescent embellishments, adhering with Precision Clear Craft Glue. 


I thought the wreath would look lovely as an ornament too, so I die cut the layers from Pinkfresh Studio Tied with Cheer again. This time for the ink blending I used Pinkfresh Studio Inks in Mermaid Cove for the bottom layer, Grassy Knoll for the middle layer, and Fresh Pear for the top layer. 


I then took the tree stencils from Pinkfresh Studio Holiday Express Stencils and placed them onto a panel of white cardstock. I added ink blending using Pinkfresh Studio Inks in Grassy Knoll, Key Lime, Olive and Mermaid Cove for the trees themselves. I used Doe and Gathered Twigs for the tree trunks. I then die cut them out using the Pinkfresh Studio Holiday Express Die


I die cut a Pinkfresh Studio Essentials: Double Stitched Circle Die from acetate that was just slightly bigger than the inside of the wreath dies. I then adhered the wreath dies on top, using Pinkfresh Studio Precision Clear Craft Glue, leaving a gap at the top without glue so that I could tie thread through it. I then adhered the trees inside the wreaths. 


To finish, I embellished with Pinkfresh Studio Clear Drops: Ice embellishments. I then threaded DMC Diamant Metallic Thread (Light Silver) through the wreaths, and tied in a loop at the top, so that it could be hung up. I also tied some of the thread into a bow and then adhered the bow on top. 

BLOG HOP:


As mentioned, this post is part of a fun, inspirational blog hop. Please click on the participants below to visit their blogs. 

You are invited to the Inlinkz link party!

Click here to enter

GIVEAWAY:

Pinkfresh Studio will give away ten $50 gift cards along the hop, selected from the comments left along the hop at random. They will also give away the full release over on the Pinkfresh Studio blog and YouTube Channel. Winners will be announced on the Pinkfresh Studio Giveaway Page on 26th August 2025. Please make sure to check if you are a winner and claim your prize within two weeks. 

SUPPLIES:


Here are the links to what I have used on the projects. Affiliate links are used on some products. This means that if you make a purchase after clicking on my link, I receive a small commission with no extra cost to you. I truly appreciate your support when using these links. Please click on the logo below the product to shop at your favourite store. All products were personally purchased except marked with an asterisk (*) which were kindly sent to me to use. You can read my full disclosure here.


Thank you so much for stopping by today, I really do appreciate it. I hope you have a great time on the rest of the hop and a wonderful day too! Take care! 

16 July 2025

Pinkfresh Studio | Whispering Views July 2025 Release Instagram Hop

Hello there, I am delighted to be joining Pinkfresh Studio today to celebrate the July 2025 release with a fun Instagram Hop. In case you missed it, I shared one card using the new release here yesterday and today I have another. 

PLEASE NOTE: This post contains affiliate links. Please see below for my full disclosure.


I started off my card by stamping the main floral image from the Pinkfresh Studio Blushing Blooms Stamp onto white cardstock using Pinkfresh Studio Detail Black Hybrid Ink. I then placed the Pinkfresh Studio Blushing Blooms Stencils over the top, one by one, to add ink blending to the flowers, leaves and stems using blending brushes


I used Pinkfresh Studio Soft Lilac, Candy Violet and Regal Kiss Inks for the petals, Lemon Whip for the centres, and Fresh Pear and Grassy Knoll for the stems and leaves. I repeated the process twice, so that I had two sets of flowers/stems/leaves for my card. 


I then arranged them on my US A2 sized white card base, adhering them using a combination of Pinkfresh Studio Precision Clear Glue and thin foam tape. I did cut some of the leaf clusters down so that I could pop bits behind the flowers. 


I stamped the sentiment from the Pinkfresh Studio Blushing Blooms Stamp onto white cardstock using Pinkfresh Studio Detail Black Hybrid Ink. It was die cut out using the Pinkfresh Studio Blushing Blooms Die. I cut the die another three times from white cardstock and adhered them behind the stamped one for added dimension. I then adhered it to the card using thin foam tape. To finish, I embellished with Pinkfrsh Studio Ice Clear Drops

SUPPLIES:


Here are the links to what I have used on the project. Affiliate links are used on some products. This means that if you make a purchase after clicking on my link, I receive a small commission with no extra cost to you. I truly appreciate your support when using these links. Please click on the logo below the product to shop at your favourite store. All products were personally purchased except marked with an asterisk (*) which were kindly sent to me to use. You can read my full disclosure here.


To follow along the hop (and potentially win a prize!) please head over to the Pinkfresh Studio Instagram Page HERE and you can visit mine HERE. Thank you so much for stopping by today, I really do appreciate it. I hope you have a wonderful day! 

15 July 2025

Pinkfresh Studio | Whispering Views July 2025 Release Blog Hop + Giveaway

Hello there, I am delighted to be joining Pinkfresh Studio today to celebrate the July 2025 Whispering Views release with a fun and inspirational blog hop. This is such a beautiful release! I have one card to share today and will have another tomorrow. 

PLEASE NOTE: This post contains affiliate links. Please see below for my full disclosure.


For my card today, I am using the new Pinkfresh Studio Tranquil Water Liles Die & Stencil. I started off with the stencilling. I used Pinkfresh Studio Premium Dye Ink Cubes for the all the layers. I used Grassy Knoll, Key Lime and Mermaid Cove for the lily pads. I then used the same greens for the water lily leaves and then Pinkfresh Studio Fairy Dust Premium Dye Inks for the flowers (all four shades of pink in the pack). 

I placed the Pinkfresh Studio Tranquil Water Lilies Die over the top (lining it up with the stencilled triangles), and ran it through my die cutting machine to cut them all out. I cut the die again from white cardstock and adhered the second layer of the lily pads behind the first for added dimension. 

There are two stencils that create water in the Tranquil Water Lilies Stencil set but for my card today, I wanted to focus the water at the top of the card, so just did some simple smooth ink blending with Ocean Breeze and Mermaid Cove Inks and Pinkfresh Studio 1" Blending Brushes. I focussed the inks at the top of a US A2 sized white card base. I then adhered the lily pads onto the card using Pinkfresh Studio Precision Clear Glue cutting off  the excess from sides using scissors. 

The water lily flowers were adhered on top, cupping them slightly with a ball stylus. I stamped a sentiment from the new Pinkfresh Costal Paradise Stamp onto black cardstock using Versamark Ink. I applied white embossing powder and heat set. It was cut into a strip and adhered to the card using thin foam tape. To finish, I embellished with Pinkfresh Studio Iridescent Dew Drops

BLOG HOP:

As mentioned, this post is part of a fun and inspirational blog hop with prizes. Please click on the other participants in the hop below to visit their blogs. 

You are invited to the Inlinkz link party!

Click here to enter

GIVEAWAY:

Pinkfresh Studio will give away ten $50 gift cards along the hop, selected from the comments left along the hop at random. They will also give away the full release over on the Pinkfresh Studio blog and YouTube Channel. Winners will be announced on the Pinkfresh Studio Giveaway Page on 22nd July 2025. Please make sure to check if you are a winner and claim your prize within two weeks. 

SUPPLIES:


Here are the links to what I have used on the project. Affiliate links are used on some products. This means that if you make a purchase after clicking on my link, I receive a small commission with no extra cost to you. I truly appreciate your support when using these links. Please click on the logo below the product to shop at your favourite store. All products were personally purchased except marked with an asterisk (*) which were kindly sent to me to use. You can read my full disclosure here.


Thank you so much for stopping by today, I really do appreciate it. I hope you have a wonderful day! 

20 May 2022

Your Heart Is So Big

Hello there, today I have a card to share with you using the beautiful Lily Frame from Pinkfresh Studio. I guest designed with them for the February release and although I used this set, I only used it for a sentiment, not the frame itself, so I wanted to use it on my card today. 

PLEASE NOTE: This post contains affiliate links. Please see below for my full disclosure.


I started off by stamping the Pinkfresh Lily Frame Stamp Set image on to MFT Heavyweight Translucent Vellum using Versamark Ink. I applied white embossing powder and heat set. I also stamped two butterflies from the Pinkfresh Studio Botanicals & Butterflies Stamp Set and heat embossed those on vellum too. I added Altenew Double-Sided Adhesive Sheet on to the back of the Lily Frame and then die cut out using the coordinating die. 


When die cutting the butterflies, I also die cut them from solid colours of cardstock too. Speaking of cardstock, I took Concord & 9th Cardstock in Ballet Slippers, Honeysuckle, Sprout, Aqua Sky and Oceanside and cut them in to strips. They were added to a white card base in a diagonal. The lily frame was then adhered on top. 


I took the sentiment, from the Pinkfresh Studio Just A Hello Floral Set, and stamped it on to white cardstock with Versafine Clair Nocturne Ink. It was die cut with the coordinating die and added to the card with thin foam tape. The butterflies were adhered to the cardstock layers with vellum adhesive (just on the bodies) and then adhered to the card. To finish off, I added a few Pinkfresh Studio Glacier Jewels

SUPPLIES:


Here are the links to what I have used on the project. Affiliate links are used on some products. This means that if you make a purchase after clicking on my link, I receive a small commission with no extra cost to you. I truly appreciate your support when using these links. Please click on the logo below the product to shop at your favourite store. All products were personally purchased except those from Clearly Besotted, Hero Arts or those marked with an asterisk (*) which were kindly sent to me to use. You can read my full disclosure here.


The card did end up a little busier than I would usually go, but I like the colours and embossing on vellum is always pretty! Thank you so much for stopping by today, I really do appreciate it. Wishing you a wonderful day and a great weekend! 

1 March 2022

Pinkfresh Studio | Songbirds on Branches

Hello there, I am delighted to be joining Pinkfresh Studio today for the February 2022 Release Instagram Hop. All of the fun, including giveaways, is happening over there, so please be sure to head over to my Instagram account and Pinkfresh Studio's as well. I wanted to post over here on my blog too though, so that I could share more information on my projects. 

PLEASE NOTE: This post contains affiliate links. Please see below for my full disclosure.


Today I am using the beautiful Songbirds on Branches collection. This collection features a cling stamp, hot foil plate, stencils and die. These can be purchased separately, so you can mix and match as you like. I love that the sets are a whole item - so for example, the die cuts out all of the images in one, so you only need to run it through your die cutting machine once. So cool! 


For the card, I started off by foiling the Pinkfresh Studio Songbirds on Branches Hot Foil Plate on to Simon Says Stamp 120lb White Cardstock with Spellbinders Silver Glimmer Hot Foil Roll. To add colour to the images, I placed the Pinkfresh Studio Songbirds on Branches Stencils on top. There are four stencils, enabling you to colour in all of the images with ink blending. I used Pinkfresh Studio Premium Dye Ink Cube Sets in Morning Sky for the birds and Over the Hills for the leaves. I also used Soul of Provence for the flowers, which are coming up a little later!


The images were then die cut out using the Pinkfresh Studio Songbirds on Branches Die. I cut it again another two times just as is, so that I could pop the images up (so that I didn't have to use foam tape!). I die cut the largest of the Pinkfresh Studio Essentials Shaker Tags Dies twice (doubled up again for dimension) and adhered the branches and birds on top, using Bearly Art Glue. 


The tag was adhered to an A2 white card base with tape runner adhesive. I then stamped the sentiment from the Pinkfresh Studio Just a Hello Floral Stamp Set on to white cardstock with black ink. It was die cut out using the Pinkfresh Studio Just a Hello Floral Die and again, I popped it up on more die cuts before adhering to the card. To finish off, I added Pinkfresh Studio Glacier Jewels


When creating the card, I had leftover pieces that would create a whole panel if you wanted to. I couldn't let these go to waste, so I had to create a little tag with them! I die cut the smaller of the tags from the Pinkfresh Studio Essentials Shaker Tags Dies from white cardstock. The floral branches were then adhered on top, again popping them up and cutting off the excess in places. 


I took the sentiment from the Pinkfresh Studio Lily Frame Stamp Set and stamped it on to black cardstock with Versamark Ink. I applied white embossing powder and heat set. It was cut in to a strip and added to the tag with tape runner adhesive. To finish off, I added twine through the top of the tag and more Pinkfresh Studio Glacier Jewels

INSTAGRAM HOP:


As mentioned, this is part of an fun Instagram Hop. There is lots of inspiration and giveaways happening over there. Please head over to my Instagram account here. You can also find a full list of participants in the hop over on the Pinkfresh Studio account here

SUPPLIES:


Here are the links to what I have used on the projects. Affiliate links are used on some products. This means that if you make a purchase after clicking on my link, I receive a small commission with no extra cost to you. I truly appreciate your support when using these links. Please click on the logo below the product to shop at your favourite store. All products were personally purchased except those from Clearly Besotted, Hero Arts or those marked with an asterisk (*) which were kindly sent to me to use. You can read my full disclosure here.


Thanks so much for stopping by today, I really do appreciate it. A huge thank you to Heather and the whole Pinkfresh Studio team for having me guest with them. I have loved it! Wishing you a great rest of the day! 

28 February 2022

Pinkfresh Studio | Botanicals & Butterflies

Hello there, I am delighted to be joining Pinkfresh Studio for their February 2022 release which is out today. There is so much yummyness releasing today! Lots of stamp/die/stencil/foil plate collections, as well as standalone cover plates. Today I am using the new Botanicals & Butterflies collection. 

PLEASE NOTE: This post contains affiliate links. Please see below for my full disclosure.

I started off by stamping the Pinkfresh Studio Botanicals & Butterflies Stamp on to white cardstock with Pinkfresh Detail Black Hybrid Ink. I then placed the Pinkfesh Studio Botanicals & Butterflies Layering Stencils on top. I love that everything lines up, so that you can use one colour per stencil if you want, to colour in your images, or you can mask bits off and use multiple colours. 

Using ink blending brushes, I blended on colours from the Pinkfresh Studio Over the Hills Premium Dye Ink Cube Set for the leaves and stems. For the flowers, I used Pinkfresh Studio Soul of Provence Premium Dye ink Cube Set. The butterflies use the Soul of Provence set, as well as the Pinkfresh Studio Island Oasis Premium Dye ink Cube Set. It was then die cut using the Pinkfresh Studio Botanicals & Butterflies Die

I took an A2 white card base and blended blue ink in the top right hand corner using Pinkfresh Studio Morning Sky Premium Dye Ink Cube Set. The branch/leaves and butterflies were then added on top, popping them up with another die cut, for some added dimension. I took the 'friend' sentiment from the new Pinkfresh Studio Lily Frame Stamp and stamped it on to white cardstock with black ink. It was die cut out with the Pinkfresh Studio Lily Frame Die

The accompanying sentiment is from the same set. I stamped it on to black cardstock with Versamark Ink and applied white embossing powder. It was heat set and then cut in to a strip. The friend word was popped up with two die cuts and then the strip added below with foam tape. To finish off, I added a few Pinkfresh Studio Glacier Jewels

SUPPLIES:


Here are the links to what I have used on the project. Affiliate links are used on some products. This means that if you make a purchase after clicking on my link, I receive a small commission with no extra cost to you. I truly appreciate your support when using these links. Please click on the logo below the product to shop at your favourite store. All products were personally purchased except those from Clearly Besotted, Hero Arts or those marked with an asterisk (*) which were kindly sent to me to use. You can read my full disclosure here.


I will be back tomorrow sharing another set with you but in the mean-time, please do head over to the Pinkfresh Studio Blog for more inspiration and to see the rest of the release. Thank you so much for stopping by today, I really do appreciate it. Have a wonderful rest of the day! 

End of code