31 December 2021

Clearly Besotted Teasers | Merci

Hello there and welcome to day four of the Clearly Besotted January 2022 Teasers. Release day is tomorrow but I have one last teaser to share with you before the release. Today I am using the new Scene It Love set. This is another set that is perfect for love themed cards but also cards throughout the year too (like I have been doing with my teasers). It features two landscape scenes inside of hearts - the Paris skyline and the Venice skyline. 

PLEASE NOTE: This post contains affiliate links. Please see below for my full disclosure.


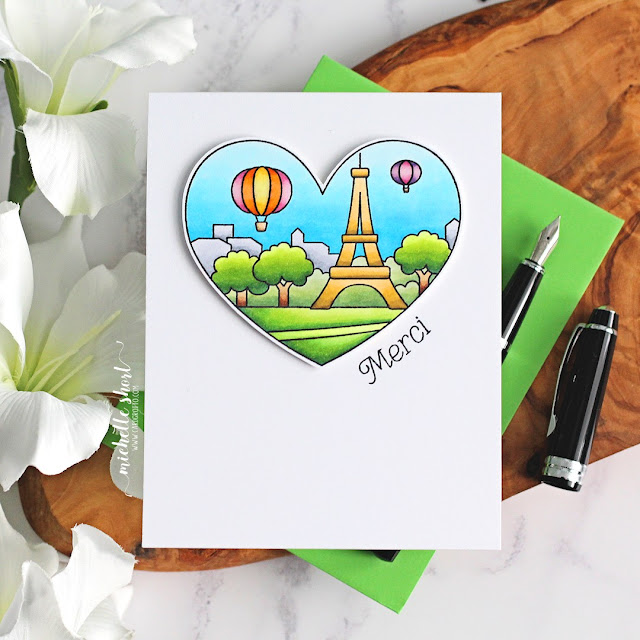
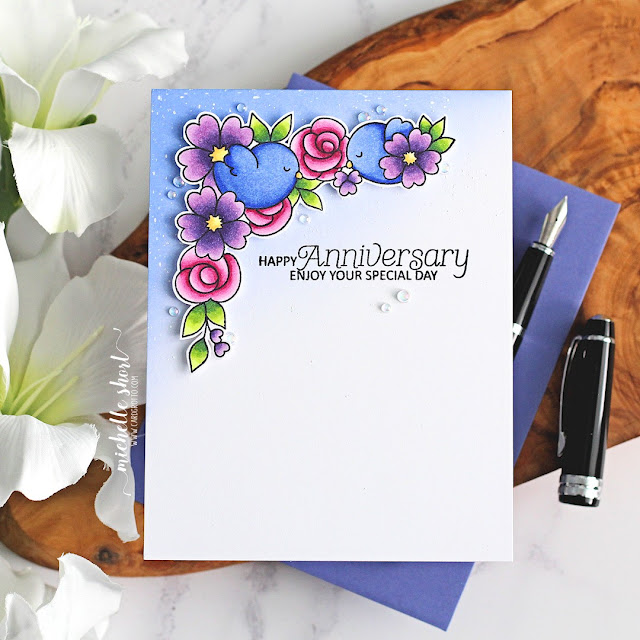
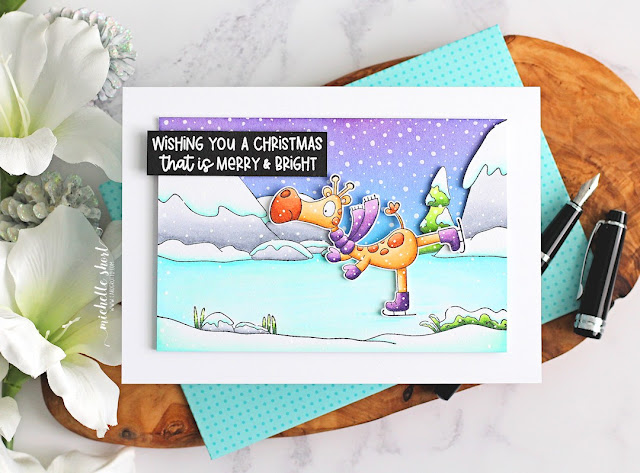
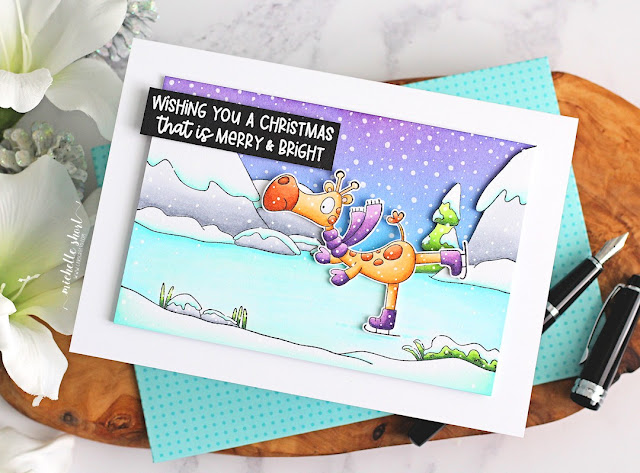
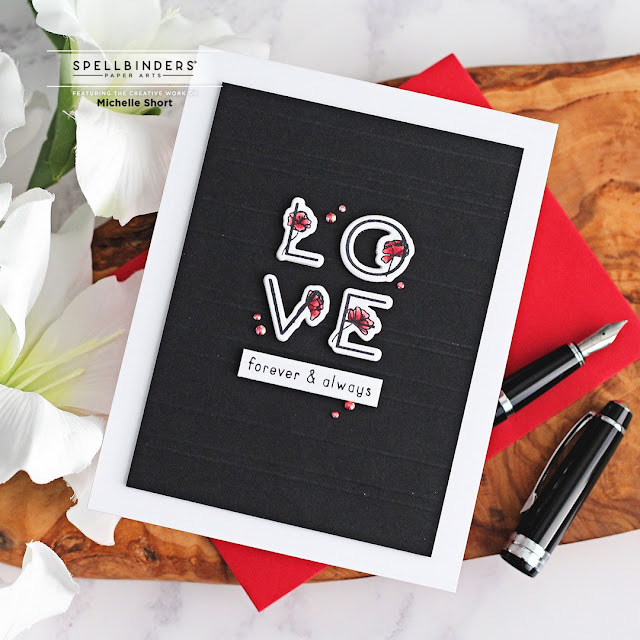
I started off my card by stamping the Paris skyline from the Clearly Besotted Scene It Love Stamp Set on to white cardstock with Memento Tuxedo Black Ink. I coloured it using Copic Markers (the colours that I used are listed below the supplies list). It was fussy cut out with scissors. 

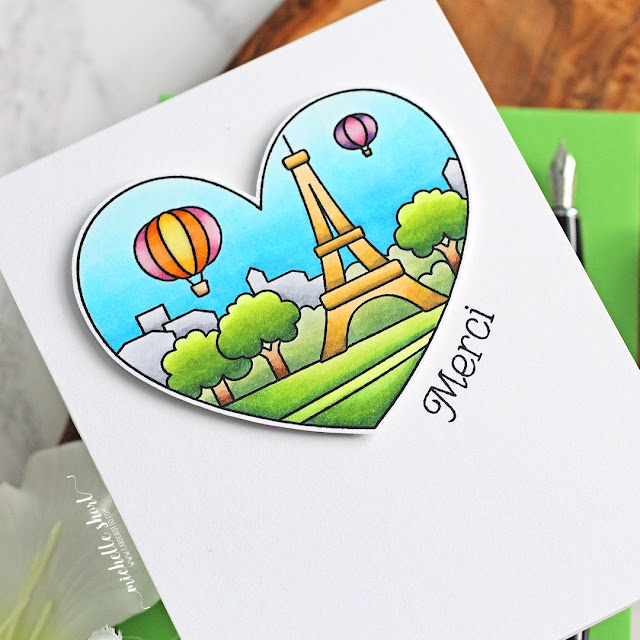
I took a white A2 card base and stamped the sentiment on to it, using the image as a guide to curve the sentiment to the shape of the heart. The image was then added on top with foam tape. To finish off, I added Tonic Nuvo Crystal Glaze to the hot air balloons in the sky. 
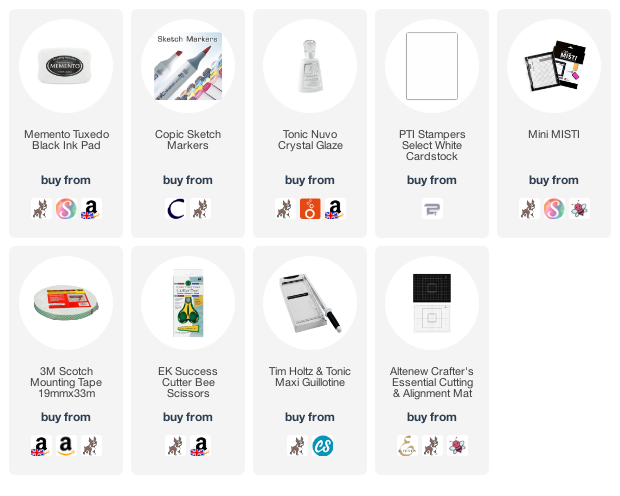
SUPPLIES:


Here are the links to what I have used on the project. Affiliate links are used on some products. This means that if you make a purchase after clicking on my link, I receive a small commission with no extra cost to you. I truly appreciate your support when using these links. Please click on the logo below the product to shop at your favourite store. All products were personally purchased except those from Clearly Besotted, Hero Arts or those marked with an asterisk (*) which were kindly sent to me to use. You can read my full disclosure here.


COPIC MARKERS: Eifel Tower - E87, Y28, Y26, YR31. Trees - E59, E57, E55, G28, YG17, YG23, YG03, YG01. Bushes - G46, G43, G21. Buildings - C5, C3, C1. Balloons - RV66, RV55, RV52/YR18, YR15, YR12/Y17, Y15, Y13/V17, V15, V12. Grass - G28, YG17, YG23, YG03, YG01. Sky - B02, B01, B00, B000, B0000. 

This card reminds me a bit of my card from last month with the Paris skyline inside the die cut heart. So this time, I thought I would colour it with brighter colours for a daytime scene. For more inspiration using the new release, please head over to the Clearly Besotted BlogKeren and our wonderful guests Candice and Mona. Wishing you a wonderful and safe New Years Eve and all the best for 2022. Let's hope it is a happy and healthy one! Thank you so much for all your support this year, it really is so very much appreciated. 

30 December 2021

Clearly Besotted Teasers | Thank Ewe

Hello there and welcome to day three of the Clearly Besotted January Teasers. Release day is 1st January, so not too long to wait now. Today I have a tag to share with you using the new Love is in the Air set. This is a fun set with adorable sheep flying in the air with balloons. Perfect for love themed cards but also just general all year round projects too. 

PLEASE NOTE: This post contains affiliate links. Please see below for my full disclosure.


I started off by stamping the sheep with flower from the Clearly Besotted Love is in the Air Stamp Set with Memento Tuxedo Black Ink. I coloured it with Copic Markers (the colours that I used are listed below the supplies area) and fussy cut it out with scissors. 

I die cut two Clearly Besotted Tag Along Dies from white cardstock (one for the front and one for the back). I placed the Clearly Besotted Cloudy Day Stencil on top of one and secured with Post-It Tape. Using a blending brush, I blended on Tim Holtz Mermaid Lagoon Distress Ink. I moved the stencil down as I went to cover the tag with clouds. 

I splattered on Dr. Ph. Martin's Bleed Proof White paint and set it aside to dry. Once dry, I stamped the sentiment from the set on to the tag with black ink. I die cut the hole reinforcer from black cardstock and added it to the tag. The tags were then adhered back to back and the sheep image added on top with foam tape. to finish off, I added twine through the top of the tag and added white gel pen highlights to the flower. 

SUPPLIES:


Here are the links to what I have used on the project. Affiliate links are used on some products. This means that if you make a purchase after clicking on my link, I receive a small commission with no extra cost to you. I truly appreciate your support when using these links. Please click on the logo below the product to shop at your favourite store. All products were personally purchased except those from Clearly Besotted, Hero Arts or those marked with an asterisk (*) which were kindly sent to me to use. You can read my full disclosure here.


COPIC MARKERS: Sheep - W5, W3, W2, W1, W0, R12. Flower - V09, V17, V15, V12, V01, Y17, Y15, Y13. 

As with all my tags, I might send this as is, add it to a card or add it to a little gift parcel. For more inspiration using the new release, please head over to the Clearly Besotted Blog and to Keren. Also check out what our wonderful guests Candice and Mona have been up to as well. Thanks so much for stopping by today, I hope you have a wonderful day! 

29 December 2021

Clearly Besotted Teasers | Heart & Home

Hello there and welcome to day two of the Clearly Besotted January Teasers. Today I have combined two new sets on my card - Heart & Home and Heart & Homies. The Heart & Home set is perfect for creating scenes - a kitchen, living space, bedroom and even a bathroom! The Heart & Homies set contain lots of cute critters for your scenes. 

PLEASE NOTE: This post contains affiliate links. Please see below for my full disclosure.


I started off my card by stamping the kitchen scene from the Clearly Besotted Heart & Home Stamp Set on to a panel of white cardstock with Memento Tuxedo Black Ink. I masked it off with masking paper and then added a light layer of Distress Ink in the background. I used Wilted Violet for the wall colour and Black Soot for the ground. 

On a separate piece of cardstock, I stamped the cute characters from the Clearly Besotted Heart & Homies Stamp Set with more black ink. They were coloured with Copic Markers and fussy cut out with scissors. I then coloured the kitchen scene with Copic Markers too (the colours that I used are listed below the supplies area). 

I stamped the sentiment from the Heart & Home set below the scene and then adhered the panel to an A2 white card base with thin foam tape. The characters were added on top with more thin foam. To finish off, I added a few white gel pen highlights. 

SUPPLIES:


Here are the links to what I have used on the project. Affiliate links are used on some products. This means that if you make a purchase after clicking on my link, I receive a small commission with no extra cost to you. I truly appreciate your support when using these links. Please click on the logo below the product to shop at your favourite store. All products were personally purchased except those from Clearly Besotted, Hero Arts or those marked with an asterisk (*) which were kindly sent to me to use. You can read my full disclosure here.


COPIC MARKERS: Kitchen appliances - V17, V15, V12, V01. Window - B00, B000, B0000. Measuring cups - C7, C5, C3/E59, E57, E55. Ground - C7, C5, C3, C1, C0. Bunny - W5, W3, W1, W0, R12. Pie - E37, E35, E31, E30. Dog - E59, E57, E55. Hat - W5, W3, W1. 

Although I wouldn't have a purple kitchen in real-life, I think it looks quite cool! For more inspiration using the new release, please head over to the Clearly Besotted Blog, KerenCandice and Mona. Thank you so much for stopping by today, I really do appreciate it. Have a lovely day! 

28 December 2021

Altenew | Year In Review Blog Hop + Giveaway

Hello there, I am delighted to be taking part in a fun blog hop with Altenew today where we look back at the year to see what our favourite projects were that we made. 

PLEASE NOTE: This post contains affiliate links. Please see below for my full disclosure.


It is always difficult critiquing your own work but there were a few projects that stood out to me as being my personal favourites, for various reasons. Here they are:


PROJECT ONE


Main Products Used: 

This was a card that I made for my Terrific Tags with Michelle series over at Altenew. I created the tag first and then added it to the card. I could have picked either as I thought it was a fun way to use washi tape, which I often forget about for card making (using it mainly in my planner and on envelopes usually). You can see my full blog post on it here

PROJECT TWO


Main Products Used:

This was a tag that I made back in March for the Storybook Fantasy Release. This was when I was a guest designer (having joined the team full-time in September). I am not sure why I love this tag, I think because it shows that you can still have layered elements but do it in a clean and simple way, which I love! I also love blue flowers and those flowers from the Book Engravings Set are beautiful! You can see my full blog post on it here

PROJECT THREE


Main Products Used:

This card was made for the Craft Your Life Lush Garden Project Kit release in August. I think I like it so much because of the smooth ink blending and it uses one of my favourite colour collections from Altenew - Cherry Blossom. I just love the beautiful pinks! I also love when elements hang off the card - not so good for fitting in to standard sized envelopes but pretty as a design feature! You can see my full blog post here

PROJECT FOUR


Main Products Used:

This card was made for the Mighty Kind Standalone Dies Collection Release in October. I love the font on the Mighty Alphabet Die Set and thought that it would pair well with the Flowing Foliage Dies too. Of course, I had to add some ink blending fading to white again, this time using beautiful aqua colours from the Sweet Dreams collection. You can see my full blog post here

BLOG HOP:


As mentioned, this post is part of a fun inspiration filled blog hop. For the hop, you should have arrived here from the wonderful Maryam Perez. Next on the hop is the fabulous Mindy Eggen. If you get lost along the way, or want to start the hop from the beginning, please head over to the Altenew Card Blog

GIVEAWAY:

Altenew is giving away a $30 gift certificate to 5 lucky winners and a $15 gift certificate to 4 lucky winners! Please leave a comment on the Altenew Card Blog HERE or share Altenew projects with #AltenewBest2021 on social media by 6th January 2022 for a chance to win. 9 winners will be announced on the Altenew Winners Page on 8th January 2022.

This year has been lovely for me working with Altenew. I started guest designing with them at the beginning of the year and now I am a fully fledged DT member. As you can see, I mainly focus on their floral sets because I love them so much but there are lots of other designs and products available too! Thank you so much for stopping by today. I really do appreciate it. Have a wonderful day! 

Clearly Besotted Teasers | Anniversary Love Birds

Hello there and welcome to the Clearly Besotted January 2022 Teasers. For the next few days, until the release on 1st January 2022, we will be sharing teasers with you using the new sets. Today I am using a new set called Lovely Corners. As the name might suggest, there are two corner images in the set plus a separate one and lots of sentiments. This set is perfect for love themed cards but also spring cards too!

PLEASE NOTE: This post contains affiliate links. Please see below for my full disclosure.


I started off my card by stamping one of the corner images from the Clearly Besotted Lovely Corners Stamp Set on to white cardstock with Memento Tuxedo Black Ink. I then coloured it using Copic Markers (the colours that I used are listed below the supplies area) and fussy cut it out with scissors. 


I then took a panel of white cardstock and blended Tim Holtz Stormy Sky Distress Ink in to the top left hand corner, fading to white as I moved in to the card. I took the sentiment from the Lovely Corners stamp set and stamped it in black. I then covered over the sentiment with a scrap piece of paper and splattered over Dr. Ph. Martin's Bleed Proof White Paint


It was set aside to dry and then the panel was adhered flat to an A2 white card base with tape runner. The image was added on top with foam tape. I finished off by adding some Little Things from Lucy's Cards Bubbles

SUPPLIES:


Here are the links to what I have used on the project. Affiliate links are used on some products. This means that if you make a purchase after clicking on my link, I receive a small commission with no extra cost to you. I truly appreciate your support when using these links. Please click on the logo below the product to shop at your favourite store. All products were personally purchased except those from Clearly Besotted, Hero Arts or those marked with an asterisk (*) which were kindly sent to me to use. You can read my full disclosure here.


COPIC MARKERS: Birds - B69, B66, B63, Y17, Y13. Leaves - G29, YG17, YG25, YG01. Pink flowers - RV69, RV66, RV55, RV52. Purple flowers - V09, V17, V15, V12, Y17, Y13, Y11. 

For more inspiration using the new release, please head over to the Clearly Besotted Blog and to Keren. Also check out what our wonderful guests Candice and Mona have been up to as well. Thank you so much for stopping by today, I really do appreciate it. I will be back later with another post but in the mean-time, I hope you have a lovely day! 

24 December 2021

Wishing You a Very Festive Season!

Hello there, I just wanted to pop on here to wish you a very happy festive season, whether you celebrate Christmas, another festival or nothing at all, I hope you enjoy the next few days. I hope we can all have a safe and peaceful time.

For those of you who are alone, are struggling, are working or this time of year is particularly difficult for you, please know that I am thinking of you. Best wishes to you all!

22 December 2021

Merry & Bright Christmas

Hello there, I am back to share my last Christmas card of 2021 with you. Unfortunately, I didn't get a chance to use all of the products that I wanted for my Christmas cards this year. Every year I tell myself to start earlier and every year I fail! Never mind! Today I have a card to share with you using the adorable Muriel from Purple Onion Designs. Isn't he/she just adorable skating on the ice?

PLEASE NOTE: This post contains affiliate links. Please see below for my full disclosure.


I started off by stamping Purple Onion Designs Muriel with Memento Tuxedo Black Ink on to white cardstock. I also stamped the Purple Onion Designs Snow Much Fun Background Stamp on to another piece of cardstock. Muriel was coloured using Copic Markers (the colours that I used are listed below the supplies list) and fussy cut it out with scissors. 


I then coloured the background scene with Copic Markers before cutting around the top part. I took another panel of white cardstock and added ink blending to it with Distress Inks and blending brushes. I used Mermaid Lagoon at the bottom, Blueprint Sketch in the middle and Seedless Preserves at the top. It was adhered to a 5" x 7" white card base with thin foam tape. I then added the background image on top.


Before adding Muriel on top, I added Arteza White Gel Pen snow to the background. Muriel was added on top with more foam tape. I took the sentiment from the Purple Onion Designs Holiday Messages Sentiment Set and stamped it on to black cardstock with Versamark Ink. I applied white embossing powder and heat set. It was added to the card with more foam tape. 

SUPPLIES:


Here are the links to what I have used on the project. Affiliate links are used on some products. This means that if you make a purchase after clicking on my link, I receive a small commission with no extra cost to you. I truly appreciate your support when using these links. Please click on the logo below the product to shop at your favourite store. All products were personally purchased except those from Clearly Besotted, Hero Arts or those marked with an asterisk (*) which were kindly sent to me to use. You can read my full disclosure here.


COPIC MARKERS: Muriel - YR27, YR24, YR31/E39, E99, E97/R12. Scarf - V09, V17, V15, V12. Mountains - C5, C3, C2, C1, C0. Grass & tree - G29, YG17, YG23, YG03, YG01. Snow - BG13, BG11, BG10. Ice - BG13, BG11, BG10, BG01, BG000, B00, B000, B0000. 

I wouldn't usually use this much foam tape on my cards, it is three layers high, but since I am hand delivering it, I thought it would be ok! Thank you so much for stopping by today, I very much appreciate it. Wishing you a wonderful day! 

21 December 2021

Home for the Holidays

Hello there, as mentioned yesterday, I have another card to share with you using the Concord & 9th Home for the Holidays die set. This time I am using along with the Card Stacks Base dies for a card for my brother, SIL, niece and nephews. 

PLEASE NOTE: This post contains affiliate links. Please see below for my full disclosure.


I started off by die cutting the houses, trees, snow and lampposts from the Concord & 9th Home for the Holidays Die Set using various shades of cardstock. There are a few layers for the houses, roof and door. I also die cut the little wreaths and bows to put on the doors - so cute! 


Since I was making a Christmas card, I also die cut the snow to add to the roof pieces and the tops of the trees, which were cut in the different sizes. For the windows on the houses and also the lampposts, I added Lawn Fawn Pearlescent Vellum behind. I also added Tim Holtz Clear Rock Candy Distress Glitter to the snow. I die cut the Concord & 9th Card Stacks Base Die and added ink blending with brushes and Distress Inks. 


I used Peacock Feathers, Mermaid Lagoon, Blueprint Sketch and Seedless Preserves. I then splattered it with Dr. Ph. Martin's Bleed Proof White paint for the snow. I die cut the snow banks with the die in the Home for the Holidays set. The front piece was stamped with the sentiment from the Hero Arts Graphic Lines Holiday Stamp Set. It was assembled and the houses, trees and lampposts added. 

SUPPLIES:


Here are the links to what I have used on the project. Affiliate links are used on some products. This means that if you make a purchase after clicking on my link, I receive a small commission with no extra cost to you. I truly appreciate your support when using these links. Please click on the logo below the product to shop at your favourite store. All products were personally purchased except those from Clearly Besotted, Hero Arts or those marked with an asterisk (*) which were kindly sent to me to use. You can read my full disclosure here.


It was fun to make a 3D card, I don't make them very often! Thank you so much for stopping by to see me today, I really appreciate it. I hope you are well, take care! 

20 December 2021

Eat, Drink & Be Merry

Hello there, today I have a few cards to share with you using the Concord & 9th Home for the Holiday Die Set. I fell in love with this set as soon as I saw it! Those houses are adorable but I just love the added details with the wreaths and bows and the lampposts!

PLEASE NOTE: This post contains affiliate links. Please see below for my full disclosure.


For my initial card today, I started off by die cutting the Concord & 9th Home for the Holidays Die Set from various shades of cardstock. I used C9 Aqua Sky, Oceanside and Peacock for the house. White for the snow. Hero Arts Pitch Black for the lamppost and C9 Clover for the tree and wreath. For the bow, I used Spellbinders Wild Berry


The pieces were all assembled, adhering with Bearly Art Glue. I then added more of the glue to the white areas and sprinkled on Tim Holtz Clear Rock Candy Distress Glitter. The pieces were set aside while I worked on my background. I took a panel of white cardstock and placed the Clearly Besotted Around About Stencil on top. Using the open area as the sky, I blended on Distress Inks. 


I used Peacock Feathers at the bottom, followed by Mermaid Lagoon and Blueprint Sketch. I finished off with Seedless Preserves at the top. With the stencil still in place, I splattered on Dr. Ph. Martin's Bleed Proof White paint for the snow. It was set aside to dry and the sentiment from the Clearly Besotted Happy Everything Stamp Set stamped below in black. The house, trees and lamppost were then added on top. 


I made quite a few different houses, trees and lampposts, I added Lawn Fawn Pearlescent Vellum behind the windows in the houses and the light in the lampposts. I did create four more cards using them in blues and purples. I also made a 3D card with them, which I will share tomorrow. 

SUPPLIES:


Here are the links to what I have used on the project. Affiliate links are used on some products. This means that if you make a purchase after clicking on my link, I receive a small commission with no extra cost to you. I truly appreciate your support when using these links. Please click on the logo below the product to shop at your favourite store. All products were personally purchased except those from Clearly Besotted, Hero Arts or those marked with an asterisk (*) which were kindly sent to me to use. You can read my full disclosure here.


I think these houses are adorable and I had a lot of fun putting these together. I hope the recipients like them! Thank you so much for stopping by today, I really do appreciate it. As of writing this post, I still have another Christmas card to make and then I think I am done with Christmas crafting, I think. Now to start wrapping the presents! Have a good day! 

17 December 2021

Spellbinders | Love Forever & Always

Hello there, today I have a card to share with you using the Spellbinders December 2021 Clear Stamp & Die of the Month Club Kit. This month is called "Color Outside the Lines" and features some alphabet stamps (a few different letters to create different words) plus flowers, sentiments and a block stamp that can be used in different ways. I used the alphabet stamps to create my card today. 

PLEASE NOTE: This post contains affiliate links. Please see below for my full disclosure.


I started off by stamping the letters to spell 'love' from the Spellbinders December 2021 Clear Stamp & Die of the Month Club Kit on to white cardstock with Memento Tuxedo Black Ink. I coloured the roses with Copic Markers (R89, R39, R37, R35 & R32) and then die cut them out with the coordinating dies. I also die cut the dies another two times just from white cardstock. 

I took a panel of Spellbinders Onyx Cardstock and scored lines in to it using a score board and bone folder. It was adhered to an A2 white card base with thin foam tape. I then stacked up the letters with Bearly Art Glue and adhered them on top. 

I took the sentiment from the Reverse Confetti Word Up Stamp Set and stamped it on to white cardstock with black ink. I cut it in to a strip and added it below the letters with more thin foam tape. To finish off, I coloured Spellbinders Crystal Mix Color Essential Gems with a R35 Copic Marker and added them to the card. 

SUPPLIES:


Here are the links to what I have used on the project. Affiliate links are used on some products. This means that if you make a purchase after clicking on my link, I receive a small commission with no extra cost to you. I truly appreciate your support when using these links. Please click on the logo below the product to shop at your favourite store. All products were personally purchased except those from Clearly Besotted, Hero Arts or those marked with an asterisk (*) which were kindly sent to me to use. You can read my full disclosure here.


I hope that you will check out the Spellbinders Club Kits. It is a wonderful monthly subscription where you receive the kit each month. Designers like myself share inspiration using the kit at the beginning of the month to show you lots of different ways that you can use it. There are also lots of other club kits too, like the Small Die of the Month and Stamp & Clear Die of the Month, that I shared the other day, so there is something for everyone! If you do subscribe, you will get other benefits from Spellbinders too. Please see here for more information. You can also buy older kits here too. 

If you do want to get hold of this kit, you would need to subscribe by 24th December 2021 to receive it. Subscribers can cancel their membership at any time. 

Thank you so much for stopping by today, I really do appreciate it. I hope you have a lovely day and a wonderful weekend! 

16 December 2021

VIDEO | Last Minute Holiday Gift Card Holder Tags

Hello there, I am over on the My Favorite Things YouTube Channel today sharing a last minute holiday gift idea, creating gift card holder tags. I give quite a lot of gift cards as presents, so I love that I can incorporate them in to tags now! 

PLEASE NOTE: This post contains affiliate links. Please see below for my full disclosure.


I started off by die cutting the MFT Do-It-All Gift Tag Die-namics from cardstock, as well as a patterned paper. I love that you can mix and match the different elements in the set and use some layers and not some others. For the pink tag, I used MFT Ripe Raspberry Cardstock along with the MFT Very Merry Paper Pad. For the blue tag, I used Spellbinders Cosmic Sky Cardstock, along with the MFT Holly Jolly Paper Pad


The elements were adhered together using tape runner and MFT On-Point Precision Glue. Once the tags were assembled, I embellished with MFT All Occasion Icons Die-namics. I cut the Santa hat from MFT Red Hot Cardstock and the fur piece from MFT Smooth White Cardstock for the blue tag and Tonic Sugar Crystal Glitter Cardstock for the pink tag. 


These were adhered together with thin foam squares and added to the tags with more thin foam. For the pompom on the hat, I used a white enamel dot. I then stamped the sentiment from the MFT Itty Bitty Gifting Stamp Set on to MFT Smooth White Cardstock and die cut them from the sentiment die in the Do-It-All Gift Tag Die-namics set. It was placed on to the tag and secured with twine, which was tied in a bow at the front. 

VIDEO:


If you are viewing this blog post via email subscription, you can watch the video HERE on YouTube. 

SUPPLIES:


Here are the links to what I have used on the projects. Affiliate links are used on some products. This means that if you make a purchase after clicking on my link, I receive a small commission with no extra cost to you. I truly appreciate your support when using these links. Please click on the logo below the product to shop at your favourite store. All products were personally purchased except those from Clearly Besotted, Hero Arts or those marked with an asterisk (*) which were kindly sent to me to use. You can read my full disclosure here.


Although I made holiday/Christmas gift card tags today, I am looking forward to creating them all year round for lots of different occasions! Thank you so much for stopping by today, I really do appreciate it. I hope you have a wonderful rest of the day! 

12 December 2021

Altenew | Craft Your Life Vintage Tapestry Project Kit Release Blog Hop + Giveaway

Hello there, today sees the release of this month's Craft Your Life Project Kit. This month is Vintage Tapestry and it is so pretty! I love the vintage look of the roses and swirls in the sets. There is more information on the kit below but as always, it consists of a stamp set, die set, stencil and embossing folder. We are celebrating the release with a fun, inspiration filled blog hop with prizes. Please see below for more details. 

PLEASE NOTE: This post contains affiliate links. Please see below for my full disclosure.


I created a card using the stamp set, dies and stencils. I also created a tag using the stamp set, dies and embossing folder. For the card, I started off by taking the layering stencils (there are four) from the Altenew Craft Your Life Project Kit: Vintage Tapestry. I placed the first one on to the front of an A2 white card base and secured with Altenew Satin Masking Tape


Using Altenew Small Ink Blending Tools, I blended shades of Altenew Rock Collection Crisp Dye Inks for the leaves and stems. I then blended shades of Altenew Cool Summer Night Crisp Dye Ink for the flower petals. I stamped the sentiment from the stamp set on top with Altenew Obsidian Pigment Ink


I took the rose and leaves from the stamp set and stamped them on to more white cardstock using the same inks that I used with the stencils. They were die cut out with the coordinating dies and the leaves added to the card with tape runner. The rose was added with Altenew Instant Dimension Foam Tape. To finish off, I added a few Iridescent Jewels. 


I cannot resist a tag, so I first cut an Altenew Terrific Tag Die from white cardstock and then ran it through my die cutting machine inside the embossing folder in the kit. When making the card, I stamped extra leaves and another rose, so I die cut them out and added them to the tag. 


I took the sentiment from the set and stamped it on to black cardstock with Altenew Embossing Ink. I applied Pure White Crisp Embossing Powder and heat set. It was cut in to a strip and added to the tag with Altenew Instant Dimension Foam Tape. To finish off, I added twine through the top of the tag and a few jewels. 

SUPPLIES:


Here are the links to what I have used on the project. Affiliate links are used on some products. This means that if you make a purchase after clicking on my link, I receive a small commission with no extra cost to you. I truly appreciate your support when using these links. Please click on the logo below the product to shop at your favourite store. All products were personally purchased except those from Clearly Besotted, Hero Arts or those marked with an asterisk (*) which were kindly sent to me to use. You can read my full disclosure here.


CRAFT YOUR LIFE PROJECT KIT: VINTAGE TAPESTRY


Vintage beauty in a classic style! Create gorgeous vintage print-inspired projects using this Vintage Tapestry kit! This kit contains a beautiful 3-dimensional embossing folder, a 6x8 layering stamp set, a 4-piece layering stencil set, and a matching die set to cut all the pieces from the stamp set and the layering stencil set.

BLOG HOP:


As mentioned this blog post is part of a fun, inspiration filled blog hop with prizes (see below!). For the hop, you should have arrived here from the wonderful Teresa Litchfield. Next on the hop is the fantastic Danielle Dunlop. If you get lost along the way, or want to start the hop from the beginning, please head over to the Altenew Card Blog

GIVEAWAY:

$300 in total prizes! To celebrate this release, Altenew is giving away a $50 gift certificate to 2 lucky winners and a $25 gift certificate to 8 winners! Please leave a comment on the Altenew Card Blog and/or each designer’s blog post on the blog hop list below by 18th December 2021 for a chance to win. Altenew will draw 10 random winners from the comments left on each stop of this blog hop and announce the winners on the Altenew Winners Page on 20th December 2021.


Thank you so much for stopping by today, I really appreciate it. I hope you have a great rest of the day and weekend
End of code