31 October 2022

Spellbinders | Layered Stitched Diamonds

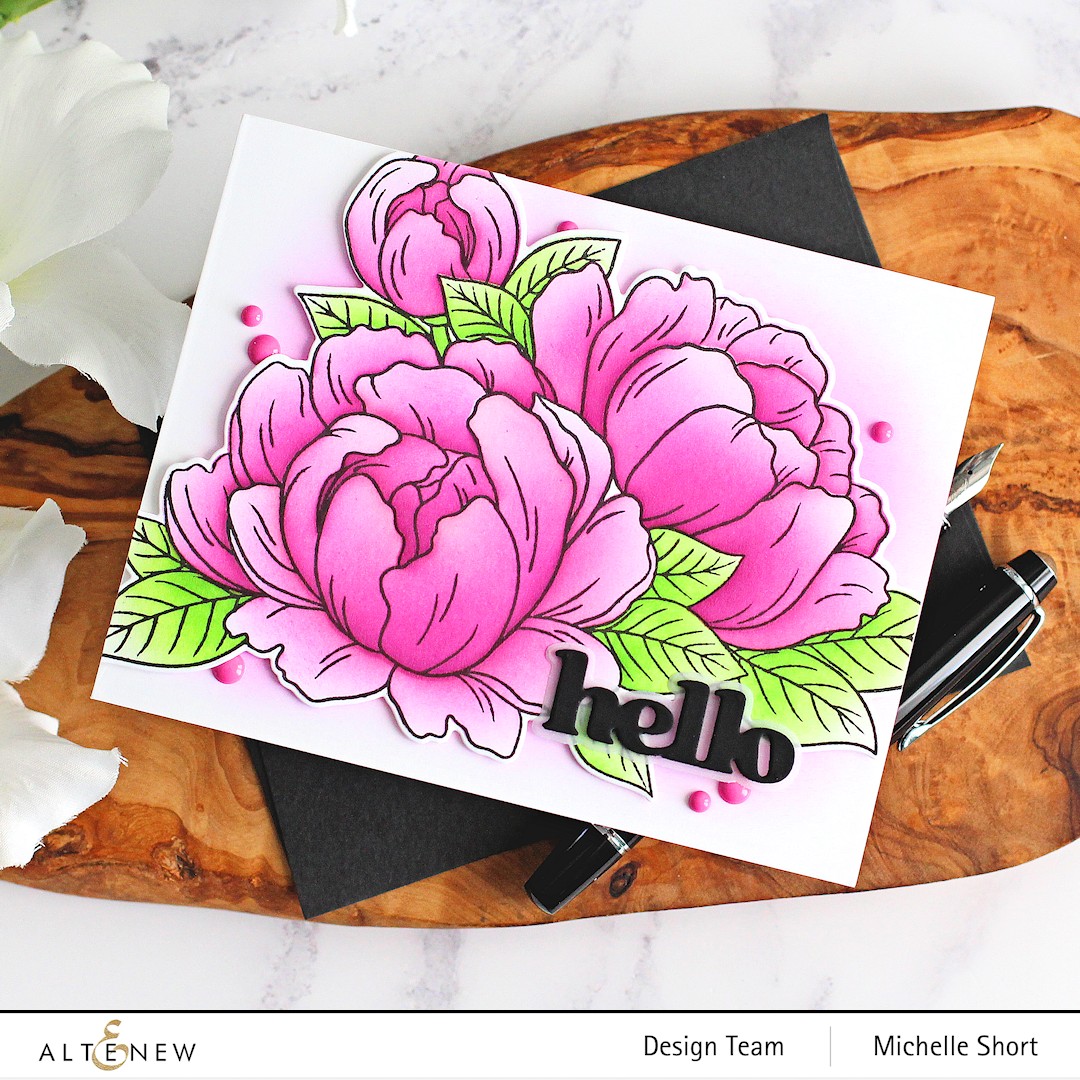
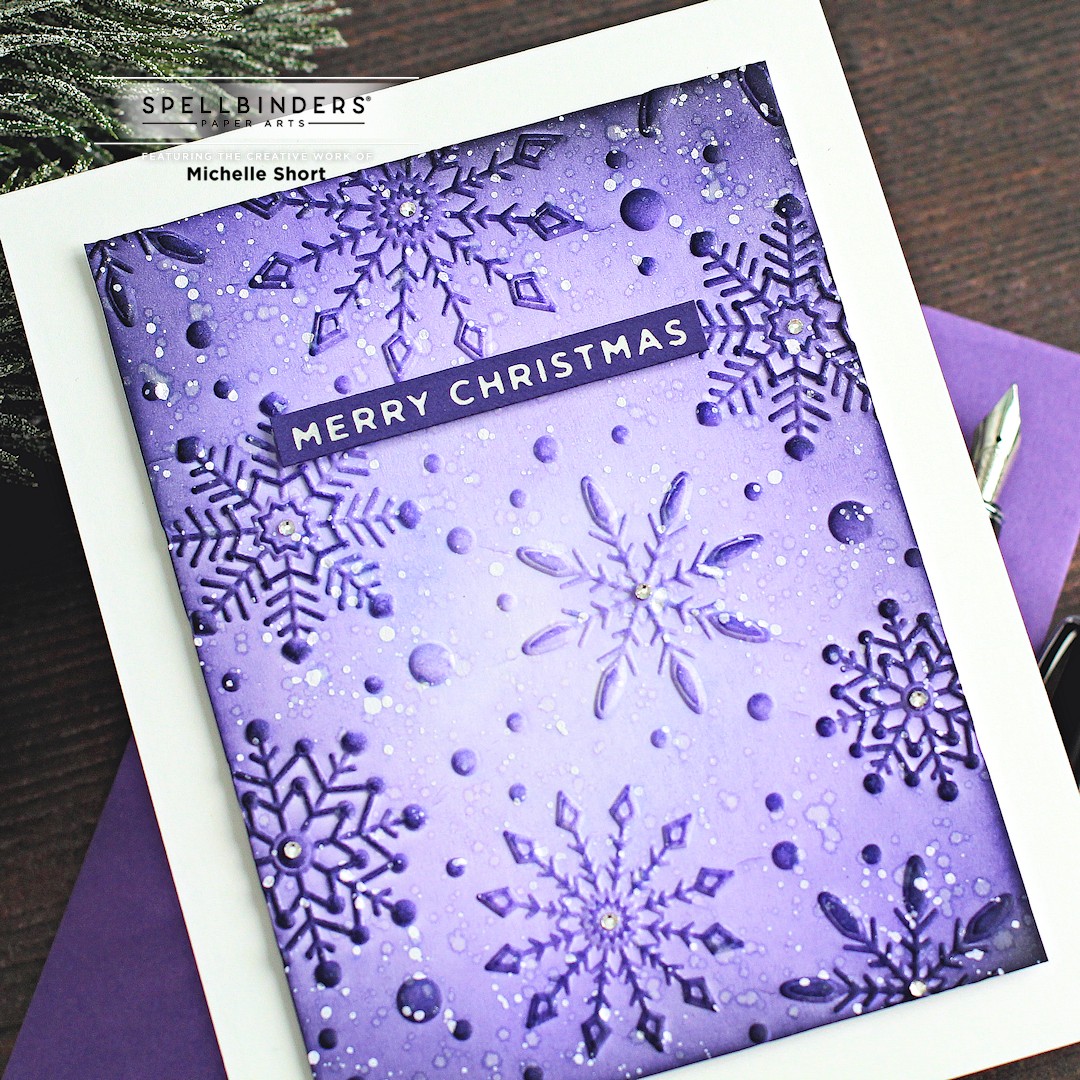
Hello there, I am over on the Spellbinders Blog today, sharing two cards using the Limited Edition Layered Stitched Diamonds Etched Dies. These are not only exclusive to Spellbinders but also limited edition, so if you like them, grab them while you can! 

PLEASE NOTE: This post contains affiliate links. Please see below for my full disclosure.


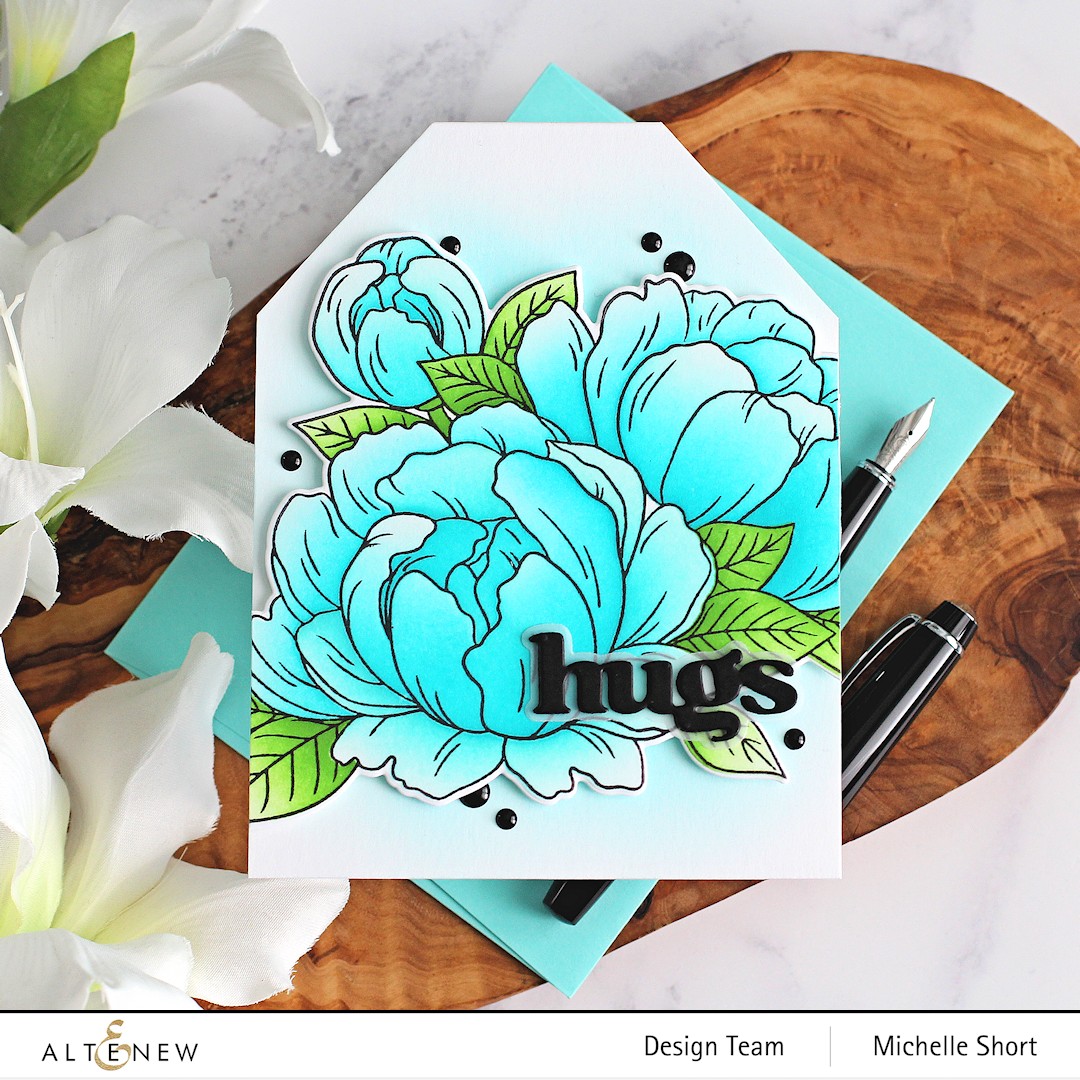
I wanted to show that you can use these dies in different ways. You can do as much or as little stitching you like as a few of diamonds are separate. This also means that you can inlay them like I did on my blue card, but you can also add them with dimension for a different look. You can also use the smaller pieces by themselves too - so many possibilities! 


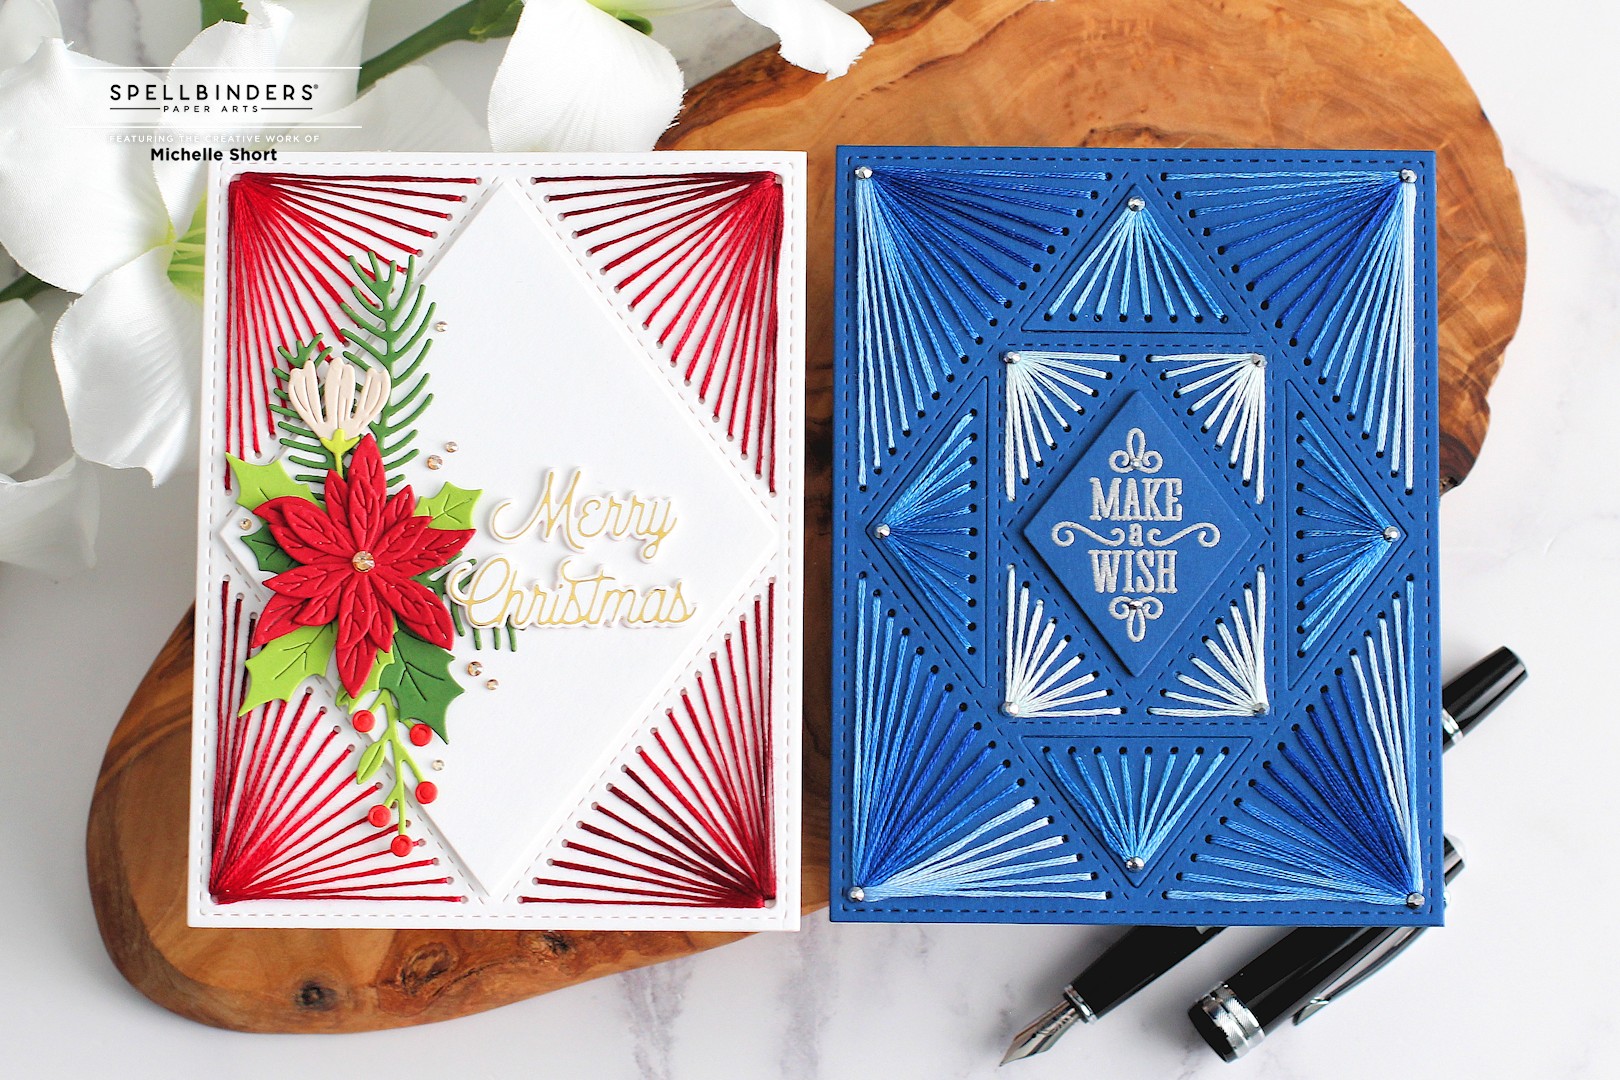
For my first card (left) I wanted to keep the stitching minimal, so I cut the Spellbinders Layered Stitched Diamonds Etched Dies main panel and just stitched the outside corners using DMC Variegated Floss. I covered up the inside pieces with a Spellbinders Essential Diamonds Etched Die and then added foliage on top from the Holiday Blooms and Parcel & Post Christmas Decorations sets. It was finished off with a foiled sentiment

My second card (right) uses all of the pieces except the very centre one. I die cut the pieces from Spellbinders Cosmic Sky Cardstock and stitched with DMC Variegated Floss. I inlayed the triangle pieces together to create one flat card (except for the sentiment). I stamped the sentiment from the Spellbinders Layered Diamonds Sentiments Stamp Set and heat embossed in silver. It was cut out using the centre diamond and adhered on top.
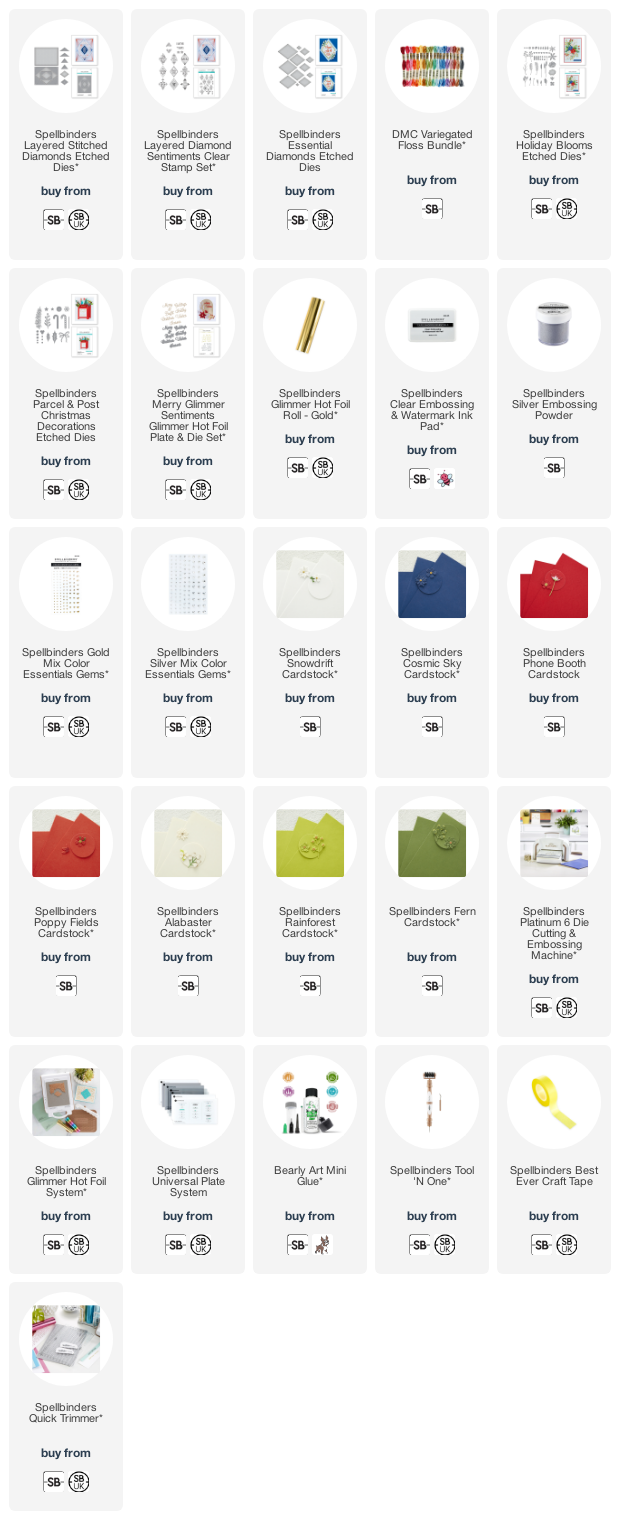
SUPPLIES:


Here are the links to what I have used on the projects. Affiliate links are used on some products. This means that if you make a purchase after clicking on my link, I receive a small commission with no extra cost to you. I truly appreciate your support when using these links. Please click on the logo below the product to shop at your favourite store. All products were personally purchased except those from Clearly Besotted, Hero Arts or those marked with an asterisk (*) which were kindly sent to me to use. You can read my full disclosure here.


For more information on how I made the cards, please head over to the Spellbinders Blog Post. Thank you so much for stopping by to see me today, I really do appreciate it. I hope you have a great rest of the day! 

Clearly Besotted Teasers | Snowdrop Scenes

Hello there and welcome to day four of the Clearly Besotted November 2022 Teasers. Release day is tomorrow but we still have lots to share with you! Today I have a card and tag to share using the new Snowdrop Scene set. This beautiful set features snowdrops along with critters (with snowdrops, holly and poinsettias) and sentiments. 

PLEASE NOTE: This post contains affiliate links. Please see below for my full disclosure.


I started off my card by stamping the reindeer with the holly branch from the Clearly Besotted Snowdrop Scene Stamp Set on to white cardstock using Memento Tuxedo Black Ink. I then coloured them with Copic Markers (the colours that I used are listed below the supplies area) and then fussy cut out using scissors. 


I die cut a panel of white cardstock using the Sunny Studio Slimline Pennants Dies. I placed the Clearly Besotted Cloudy Day Stencil on top and then added ink blending using a blending brush and Tim Holtz Mermaid Lagoon Distress Ink. With everything still in place, I placed the Newton's Nook Snowfall Stencil on top and blended more on the ink on top. I moved the stencils down as I went to cover the panel. 


I then splattered on Dr. Ph Martin's Bleed Proof White Paint, followed by Sparkle Sheer Shimmer Spritz. It was set aside to dry before adhering to a US A2 sized white card base with thin foam tape. The reindeer and holly image were then added on top. 


I took the sentiment from the Clearly Besotted Chitter Chatter Stamp Set and stamped it on to black cardstock using Versamark Ink. I applied white embossing powder and heat set. It was cut into a strip and added to the card with more thin foam tape. To finish off, I added a few Little Things from Lucy's Cards Bubbles and Nuvo Crystal Glaze to the berries. 


I couldn't resist inking up another of the images, so this time, I thought I would create a tag. I die cut the tag from the Clearly Besotted Tag Along Die Collection from white cardstock. I placed the Clearly Besotted Freshly Cut Stencil at the bottom. 

Using Ink Blending Brushes, I blended on Tim Distress Inks in (top to bottom) Seedless Preserves, Prize Ribbon and Mermaid Lagoon above the stencil for the sky. I splattered on Dr. Ph. Martin's Bleed Proof White Paint, removed the stencil and set it aside to dry. 


I stamped the image from the Clearly Besotted Snowdrop Scene Stamp Set on to white cardstock with Memento Tuxedo Black Ink. I coloured it with Copic Markers and fussy cut it out using scissors. It was then added to the tag with thin foam tape. I finished off by adding twine through the top of the tag and more Bubbles. 

SUPPLIES:


Here are the links to what I have used on the projects. Affiliate links are used on some products. This means that if you make a purchase after clicking on my link, I receive a small commission with no extra cost to you. I truly appreciate your support when using these links. Please click on the logo below the product to shop at your favourite store. All products were personally purchased except those from Clearly Besotted, Hero Arts or those marked with an asterisk (*) which were kindly sent to me to use. You can read my full disclosure here.


COPIC MARKERS: Reindeer - E59, E57, E55, E53, E51, E50. Holly - G29, YG17, YG23, YG01. Berries - R89, R39, R37, R35. Bear - E53, E51, E50, 0. Poinsettia - R89, R39, R37, R35, R32, YR27, YR24, YR23, Y15, G29, YG17, YG23, YG01. 

There is a beautiful snowdrop scene image in the set too, which I am hoping to ink up and colour soon as well! For more inspiration using the new sets, please head over to the Clearly Besotted Blog, Keren Kitty, Francine and Alberto. Thank you so much for stopping by, I will be back later with another post but in the meantime, I wish you a wonderful day!

30 October 2022

Clearly Besotted Teasers | Birthday Butterflies

Hello there and welcome to day three of the Clearly Besotted November 2022 Teasers. Release day is Tuesday 1st November, so not too long to wait now! Today I am using the new Flutterby Corners set. Similar to yesterday in that it is butterfly themed but this one has two corner images in it, along with individual butterflies and sentiments. 

PLEASE NOTE: This post contains affiliate links. Please see below for my full disclosure.


I started off my card by stamping the corner image from the Clearly Besotted Flutterby Corners Stamp Set on to white cardstock with Memento Tuxedo Black Ink. I coloured it using Copic Markers (the colours that I have used are listed below the supplies area) and then fussy cut it out with scissors. 


I took a panel of white cardstock and using an ink blending brush, blended Tim Holtz Wilted Violet Distress Ink in the corner. I lightened the pressure as I got closer to the middle of the panel, to fade to white. I then splattered it with Dr. Ph. Martin's Bleed Proof White Paint and set it aside to dry. 


Once dry, it was adhered to a US A2 sized white card base with tape runner adhesive. The image was adhered on top with thin foam tape. I took the sentiment from the Clearly Besotted A Little Sentimental Stamp Set and stamped it on to black cardstock using Versamark Ink. I applied white embossing powder and heat set. It was cut into a strip and added to the card with more thin foam tape. To finish off, I added a few Little Things from Lucy's Cards Bubbles

SUPPLIES:


Here are the links to what I have used on the project. Affiliate links are used on some products. This means that if you make a purchase after clicking on my link, I receive a small commission with no extra cost to you. I truly appreciate your support when using these links. Please click on the logo below the product to shop at your favourite store. All products were personally purchased except those from Clearly Besotted, Hero Arts or those marked with an asterisk (*) which were kindly sent to me to use. You can read my full disclosure here.


COPIC MARKERS: Butterflies - B18, B16, B04, B02, B00, B0000. Lilac flowers - BV11, BV00, BV000/Y17, Y15, Y13, Y11. Purple flowers - V09, V17, V15, V12, V01, V000. Pink flowers - RV66, RV55, RV52/Y17, Y15, Y13, Y11. Leaves - G29, YG17, YG23, YG01. 

This card is pretty much the same design as Friday's card, but I really like this design for these corner images. For more inspiration using the new release, please head over to the Clearly Besotted Blog and my amazing teamie Keren. We also have the wonderful Kitty, Francine and Alberto joining us this month so please do head over and see what they have been up to as well. Thanks so much for stopping by today, I really do appreciate it. I hope you have a wonderful day! 

29 October 2022

VIDEO | Snow Buddy's First Snowfall

Hello there, I was over on the MFT YouTube channel yesterday, sharing a card using some products from the October release. As soon as I saw the snowman (Snow Buddy), I knew I had to use him, he is so cute! I just love the smile on his face looking up at the sky! 

PLEASE NOTE: This post contains affiliate links. Please see below for my full disclosure.

I started off my card with the background as I needed it to dry before I could assemble the card. I took a 3 1/4" x 4 3/4" panel of white cardstock and added ink blending to it with blending brushes. I added a layer of Tim Holtz Wilted Violet Distress Ink first and then to darken up the top, I used Villainous Potion. 


I placed the MFT First Snowfall Stencil on top (securing with low tack tape) and using a palette knife, I applied a layer of Hero Paste Glitter over the top. I removed the stencil and set it aside to dry. 


I die cut MFT Snow Buddy Die-namics from cardstock and assembled him using MFT On-Point Precision Glue. Once the panel was dry, it was adhered to an US A2 sized white card base with thin foam tape. The snowman was then added on top with more thin foam tape. 


I took the sentiment from the MFT Cool Christmas Greetings Stamp Set and stamped it on to MFT Black Licorice Cardstock with Versamark Ink. I applied white embossing powder and heat set. It was cut into a strip and added to the card with more thin foam tape. To finish off, I added white gel pen highlights to the snowman. 

VIDEO:

Here is the video showing how I made the card:


If you are viewing this blog post via email subscription, you can watch the video HERE on YouTube. 

SUPPLIES:


Here are the links to what I have used on the project and in the video. Affiliate links are used on some products. This means that if you make a purchase after clicking on my link, I receive a small commission with no extra cost to you. I truly appreciate your support when using these links. Please click on the logo below the product to shop at your favourite store. All products were personally purchased except those from Clearly Besotted, Hero Arts or those marked with an asterisk (*) which were kindly sent to me to use. You can read my full disclosure here.


He just looks so happy to see that it is snowing! :) Thank you so much for stopping by today, I really do appreciate it. I hope you have a wonderful rest of the day! 

Clearly Besotted Teasers | Flutterby Friends

Hello there and welcome to day two of the Clearly Besotted Teasers. Release day is 1st November 2022. Today I am using the new Flutterby Friends set. This is such a beautiful and cute set with lots of critters with butterflies, as well as individual butterfly images and sentiments. 

PLEASE NOTE: This post contains affiliate links. Please see below for my full disclosure.


I started off my card by stamping the bunny and flowers image, as well as the small butterfly (twice) from the Clearly Besotted Flutterby Friends Stamp Set on to white cardstock using Memento Tuxedo Black Ink. They were colured using Copic Markers (the colours that I used are listed below the supplies list below) and fussy cut out with scissors. 


I took a panel of white cardstock and using ink blending brushes, blended Tim Holtz Distress Inks in (top to bottom) Prize Ribbon, Mermaid Lagoon and Tumbled Glass on top. I then added splatter with Dr. Ph. Martin's Bleed Proof White Paint and Arteza Gouache in Cerulean Blue before setting it aside to dry. 


Once dry, the panel was adhered to a mini slimline (3.5" x 6.25") white card base with thin foam tape. The bunny and butterflies were then added on top with more thin foam tape. I took the sentiment from the Clearly Besotted Pop Up Psst Stamp Set and stamped it on to black cardstock with Versamark Ink. I applied white embossing powder and heat set. It was cut into a strip and added to the card. 

SUPPLIES:


Here are the links to what I have used on the project. Affiliate links are used on some products. This means that if you make a purchase after clicking on my link, I receive a small commission with no extra cost to you. I truly appreciate your support when using these links. Please click on the logo below the product to shop at your favourite store. All products were personally purchased except those from Clearly Besotted, Hero Arts or those marked with an asterisk (*) which were kindly sent to me to use. You can read my full disclosure here.


COPIC MARKERS: Bunny - W7, W5, W3, W1, W0/R20. Purple flower - V09, V17, V15, V01/Y17, Y15, Y13, Y11. Aqua flower - BG49, BG15, BG13, BG11/Y17, Y15, Y13, Y11. Pink flower - RV69, RV66, RV55, RV52.

I could have made so many cards with this set. All of the images are adorable, and I love the individual butterflies too. I do have an idea for them but ran out of time, hopefully I will get a chance to ink them up soon! For more inspiration using the new sets, please head over to the Clearly Besotted Blog, Keren, Kitty, Francine and Alberto. Thank you so much for stopping by today, I really do appreciate it. I will be back later with another post (sorry, a busy few days on the blog this week!) but in the meantime, I hope you have a lovely day!

28 October 2022

VIDEO | Altenew Blossoming Creativity Blog Hop + Giveaway

Hello there and welcome to the second of the blog hops to celebrate the Altenew Just Imagine Release. Today I have two cards to share with you using the Gracious Peonies stamp, stencils and die. This is such a gorgeous set! Please see below for more information on the blog hop and giveaway. 

PLEASE NOTE: This post contains affiliate links. Please see below for my full disclosure.


For my first card, I started off by stamping the large image from the Altenew Gracious Peonies Stamp Set on to white cardstock using Altenew Permanent Black Crisp Dye Ink. I placed the Altenew Gracious Peonies Layering Stencils on top, one by one, and added ink blending to colour the image. 

I used Altenew Rose Petal Crisp Dye Ink Mini Cube Set for the petals and Altenew Green Valley Crisp Dye Ink Mini Cube Set for the leaves. 

The image was cut out using the Altenew Gracious Peonies Die. I took a US white A2 sized card base and added a small amount of ink blending to it with the same Rose Petal inks. I then adhered the image on top using Altenew Instant Dimension Foam Tape, cutting off the excess with scissors. 

I took the Altenew Versatile Greetings Die Set and die cut the hello word three times (stacking them one on top of each other for dimension) from black cardstock and the shadow from Altenew Vellum Translucent Paper. The word was adhered to the shadow and then added to the card. To finish off, I added a few enamel dots (from an older Altenew Our Family set). 

My next card uses the same design but in a different card size format. The Altenew Gracious Peonies Stamp Set was stamped with Altenew Permanent Black Crisp Dye Ink, but this time, it was coloured/ink blended using Altenew Sweet Dreams Crisp Dye Ink Mini Cube Set for the petals and Altenew Green Valley Crisp Dye Ink Mini Cube Set for the leaves. 

For the card base, I took a US sized A2 card base and cut off one corner using a guillotine. Using the piece that I cut off as a guide, I then flipped it over and marked where to cut the other corner so that they would be match. I then cut that off too. This is a great way to create a tag with no measuring! In this case, I created card but if you wanted an actual tag, you could simply die cut or punch a hole in the middle. 

I cut the hugs word from the Altenew Versatile Greetings Die Set the same way as the first card and then finished off with Altenew Essential Black & White Enamel Dots. You can see how I made the card in the video below.

VIDEO:

Here is the video showing how I made the tag shaped card:

If you are viewing this blog post via email subscription, you can watch the video HERE on YouTube. 

SUPPLIES:


Here are the links to what I have used on the projects. Affiliate links are used on some products. This means that if you make a purchase after clicking on my link, I receive a small commission with no extra cost to you. I truly appreciate your support when using these links. Please click on the logo below the product to shop at your favourite store. All products were personally purchased except those from Clearly Besotted, Hero Arts or those marked with an asterisk (*) which were kindly sent to me to use. You can read my full disclosure here.


BLOG HOP:

As mentioned, this post is part of a fun, inspiration filled blog hop with prizes. For the hop, you should have arrived here from Lilith Eeckels. Next on the hop is Annemarie Caister. If you get lost along the way, or want to start the hop from the beginning, please head over to the Altenew Blog

GIVEAWAY:

$300 in total prizes! To celebrate this release, Altenew is giving away a $50 gift certificate to 2 lucky winners and a $25 gift certificate to 8 winners! Please leave a comment on the Altenew Card Blog and/or each designer’s blog post on the blog hop list below by 3rd November 2022 for a chance to win. Altenew will draw 10 random winners from the comments left on each stop of this blog hop and announce the winners on the Altenew Winners Page on 4th November 2022.

I really love both colour combinations for the flowers - the traditional pinks and also the aquas. Which is your favourite? Thank you so much for stopping by today, I really do appreciate it. I hope you have a great time on the rest of the hop and a wonderful rest of the day too! Take care!

Clearly Besotted Teasers | Let It Snow

Hello there and welcome to the start of the Clearly Besotted November 2022 Teasers. Release day is Tuesday 1st November 2022 and from now until then, we will be sharing teasers with you using the new sets. My card today uses the beautiful Snowdrop Corners set. This beautiful set consists of two corner images, two individual critter images and lots of sentiments. 

PLEASE NOTE: This post contains affiliate links. Please see below for my full disclosure.


I started off my card by stamping the corner image from the Clearly Besotted Snowdrop Corners Stamp Set on to white cardstock using Memento Tuxedo Black Ink. It was coloured using Copic Markers (the colours that I used are listed below the supplies list below) and then fussy cut out with scissors.


I took a panel of white cardstock and added ink blending to the corner using Tim Holtz Shaded Lilac Distress Ink and an ink blending brush. I splattered on Dr. Ph. Martin's Bleed Proof White Paint and set it aside to dry. Once dry, I stamped the sentiment from the set on to the panel using Versafine Clair Nocturne Ink


It was adhered to a US A2 sized white card base and then the image added on top with thin foam tape. I added white gel pen dots to the images and then to finish, I added a few Little Things from Lucy's Cards Bubbles

SUPPLIES:


Here are the links to what I have used on the project. Affiliate links are used on some products. This means that if you make a purchase after clicking on my link, I receive a small commission with no extra cost to you. I truly appreciate your support when using these links. Please click on the logo below the product to shop at your favourite store. All products were personally purchased except those from Clearly Besotted, Hero Arts or those marked with an asterisk (*) which were kindly sent to me to use. You can read my full disclosure here.


COPIC MARKERS: Reindeer - E59, E57, E55, E53, E51, E50/E49, E47, E44. Leaves and stems - G29, YG17, YG23, YG01. Snowdrop petals - BV13, BV00, BV0000. 

The other corner image has snowdrops, poinsettias and holly. I am looking forward to using that one too! For more teasers, please head over to the Clearly Besotted Blog and my amazing teamie Keren. We also have the fabulous Kitty, Francine and Alberto guesting with us this month so please do pop over and see what they have made too. Thanks so much for stopping by today, I really appreciate it. I will be back later with another post, but in the meantime, I hope you have a great day! 

25 October 2022

Spellbinders | Holiday Floral Swag Embossing Folder - 3 Ways

Hello there, I am over on the Spellbinders Blog today, sharing three projects using the new Holiday Floral Swag 3D Embossing Folder. This is such a pretty folder with so much dimension! You can use it in lots of different ways, and I share three today. 

PLEASE NOTE: This post contains affiliate links. Please see below for my full disclosure.


My first project (A2 card, left) uses the Spellbinders Holiday Floral Swag 3D Embossing Folder as a simple background to the Nordic Ornament (which I am obsessed with right now!). The ornament was embellished with a blue poinsettia and vellum branches. The sentiment is foiled and cut using a Swallowtail Tag

My second project (tag, top right) shows how you can use the raised areas of the embossing to add ink for a dramatic look! I used gold ink on a black tag. The tag is adorned with Tweet Cardinal and a foiled sentiment

For my last project (A2 card, bottom right), the Spellbinders Holiday Floral Swag 3D Embossing Folder was embossed on to white cardstock and then I blended Distress Oxide Inks on top. This really enhances the embossing! I also added some white and shimmer splatter for that added frosty look! The card is simply finished off with a foiled sentiment

SUPPLIES:


Here are the links to what I have used on the projects. Affiliate links are used on some products. This means that if you make a purchase after clicking on my link, I receive a small commission with no extra cost to you. I truly appreciate your support when using these links. Please click on the logo below the product to shop at your favourite store. All products were personally purchased except those from Clearly Besotted, Hero Arts or those marked with an asterisk (*) which were kindly sent to me to use. You can read my full disclosure here.


For more details on how I made the projects, please head over to the Spellbinders blog post HERE. Thank you so much for stopping by today, I really do appreciate it. I hope you have a lovely day! 

19 October 2022

VIDEO | Cardstock Strips 2 Ways

Hello there, today I have two tags to share with you using cardstock strips. These were shared over on the Altenew blog and YouTube Channel back in April, so I apologise if you have already seen them. I am finally now just catching up on some of my posts over here too. 

PLEASE NOTE: This post contains affiliate links. Please see below for my full disclosure.


For my tags, I started off with the cardstock strips element. On the first tag, I took a piece of white cardstock and placed a sheet of Altenew Double-Sided Adhesive Sheet on top. I removed the backing paper and then adhered strips of different widths on top, in a diagonal pattern. 

I used Altenew Gradient Cardstock - Pinkalicious from Cherry Blossom, Purple Wine from Rose Petal, Warm Sunshine and Caramel Toffee from Summer Afternoon and Mountain Mist and Volcano Lake from Sea Shore

Once the cardstock strips were adhered to the panel, I die cut it using the Altenew Terrific Tags Die

For the second tag, I die cut the tag first from white cardstock and then adhered the cardstock strips on top (this time the strips are all the same width) on top with liquid glue. I cut the excess off the sides using scissors. I did cut another two tags from white cardstock to add to the backs for a finished look. 

For the focal point, I die cut two of the dies from the Altenew Flowing Foliage Die Set three times each from white cardstock with Double-Sided Adhesive Sheet on the back. They were stacked up one on top of another and then I added Altenew Vellum Translucent Paper to solid areas. 

I cut the excess off with scissors and then adhered the foliage to the tags with small dabs of liquid glue. I stamped two sentiments from the Altenew Tiny Sentiments: Hello Stamp Set on to black cardstock with Altenew Embossing Ink

I applied Altenew Pure White Crisp Embossing Powder and heat set. They were adhered to the tags using Altenew Instant Dimension Foam Tape. To finish off, I tied twine through the top of the tags and tied in a bow. 

VIDEO:

If you are viewing this blog post via email subscription, you can watch the video HERE on YouTube. 

SUPPLIES:


Here are the links to what I have used on the projects. Affiliate links are used on some products. This means that if you make a purchase after clicking on my link, I receive a small commission with no extra cost to you. I truly appreciate your support when using these links. Please click on the logo below the product to shop at your favourite store. All products were personally purchased except those from Clearly Besotted, Hero Arts or those marked with an asterisk (*) which were kindly sent to me to use. You can read my full disclosure here.


I definitely think that my favourite one is the one with the white space, with just the strips in the middle, but I like the other one too! Let me know what you think! Thank you so much for stopping by today, I really do appreciate it. I hope you have a wonderful day! 

17 October 2022

Spellbinders | Inky Snowflakes

Hello there and happy Monday to you! As mentioned on Friday, I am back to share another way to use the Spellbinders Flurry of Snowflakes 3D Embossing Folder with you. This time, I am using the folder as a focal point in itself. 

PLEASE NOTE: This post contains affiliate links. Please see below for my full disclosure.


I started off by running the Spellbinders Flurry of Snowflakes 3D Embossing Folder through my die cutting machine with a panel of white cardstock. If you use the Platinum 6, you will need the new Universal Plate System to work with these 3D folders. 


Using Blending Brushes, I blended on Tim Holtz Distress Inks in Wilted VioletVillainous Potion and Black Soot. I then splattered on Sparkle Sheer Shimmer Spritz and Dr. Ph. Martin's Bleed Proof White paint before setting it aside to dry. 


The panel was adhered to a US A2 sized white card base with thin foam tape. I took the sentiment from the Spellbinders Mini Christmas Sentiment Strips Glimmer Hot Foil Plate & Die Set and foiled it on to Spellbinders Royal Amethyst Cardstock with Spellbinders Silver Glimmer Hot Foil Roll.


It was cut into a strip and added to the card with more thin foam tape. To finish off, I added teeny tiny Spellbinders Silver Mix Color Essentials Gems to the centres of the snowflakes. 

SUPPLIES:


Here are the links to what I have used on the project. Affiliate links are used on some products. This means that if you make a purchase after clicking on my link, I receive a small commission with no extra cost to you. I truly appreciate your support when using these links. Please click on the logo below the product to shop at your favourite store. All products were personally purchased except those from Clearly Besotted, Hero Arts or those marked with an asterisk (*) which were kindly sent to me to use. You can read my full disclosure here.


This card is actually giving me Halloween vibes ... without the snowflakes of course! I think because of the colours, but I do really like how it turned out and something a little bit different! It shows up the snowflakes beautifully, too! Thank you so much for stopping by today, I really do appreciate it. I hope you have a lovely day! 

14 October 2022

Spellbinders | Flurry of Snowflakes Ornament

Hello there, today I have a card to share with you using the new Spellbinders Flurry of Snowflakes 3D Embossing Folder which is out today. I have used it in a subtle way as a background for my card as I love the white-on-white look. However, I do have another card to share with you on Monday, using it in a different way! 

PLEASE NOTE: This post contains affiliate links. Please see below for my full disclosure.


I started off by running a panel of white cardstock through my die cutting machine (Platinum 6) with the Spellbinders Flurry of Snowflakes 3D Embossing Folder. The panel was then simply adhered flat to a US A2 sized white card base. 


I took the Spellbinders Nordic Ornaments Etched Dies and cut the larger one from white cardstock. I adhered strips of Spellbinders Purple Mist, Lilac Blossom and Royal Amethyst Cardstock on top, adhering with Bearly Art Glue. I cut the excess off the sides with scissors. I die cut the ornament topper from silver glitter cardstock and adhered it on top. 


Whilst die cutting, I die cut the poinsettia from Spellbinders Holiday Blooms Etched Dies using vellum. I also die cut the leaves from the set with silver glitter cardstock. They were adhered to the ornament with more Bearly Art Glue. I tied DMC Silver Diamant Thread through the top of the ornament (double) and tied in a bow. It was then adhered to the card with thin foam tape


I took the sentiment from the Spellbinders Mini Christmas Sentiments Glimmer Hot Foil & Die Set and foiled it on to Spellbinders Royal Amethyst Cardstock with Spellbinders Silver Glimmer Hot Foil Roll. It was cut into a strip and added to the ornament with thin foam tape. To finish off, I added a few Spellbinders Silver Mix Color Essentials Gems

SUPPLIES:


Here are the links to what I have used on the project. Affiliate links are used on some products. This means that if you make a purchase after clicking on my link, I receive a small commission with no extra cost to you. I truly appreciate your support when using these links. Please click on the logo below the product to shop at your favourite store. All products were personally purchased except those from Clearly Besotted, Hero Arts or those marked with an asterisk (*) which were kindly sent to me to use. You can read my full disclosure here.


I really love the white, silver and pop of purple on the card. This design would work well with lots of different colour combinations as well, I think. Also, it looks a lot prettier in real-life. Sadly, winter/autumn photography is always difficult in my craft room. Thank you so much for stopping by today, I really do appreciate it. I hope you will check out the new Spellbinders releases and have a wonderful day and great weekend!
End of code